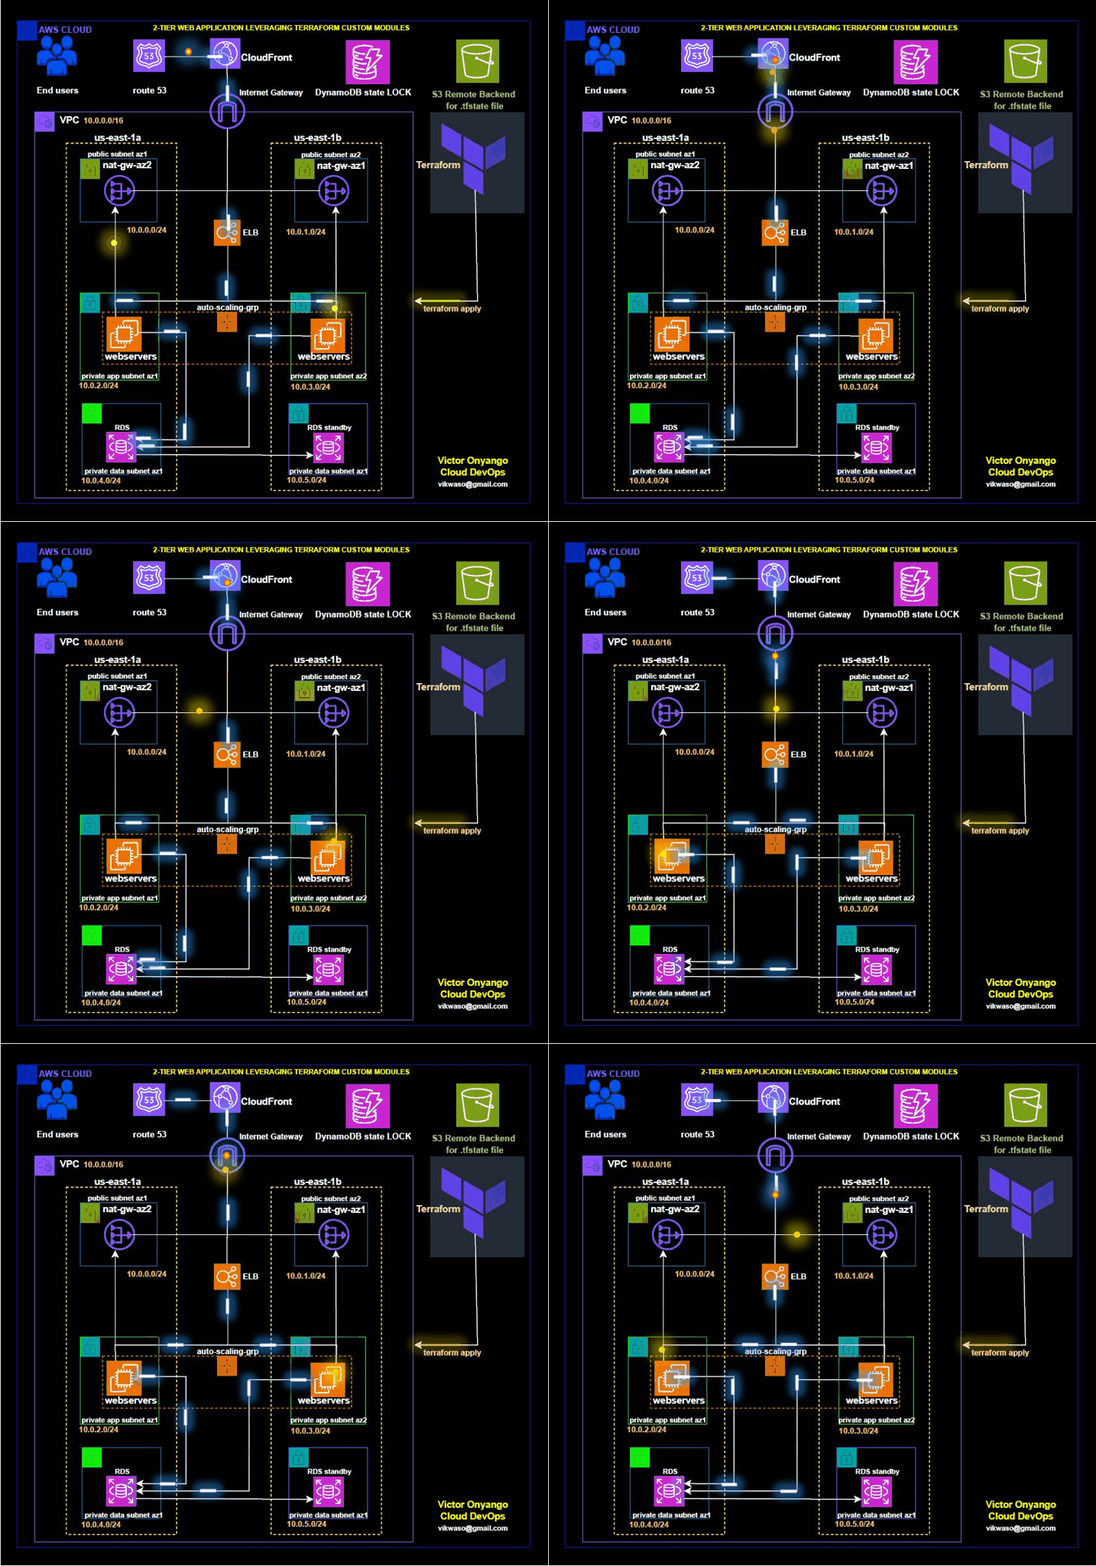
In modern cloud infrastructure, Terraform is a popular tool for defining and provisioning infrastructure as code. It allows you to create, update, and manage cloud resources in a consistent and repeatable manner. Custom modules in Terraform enable you to encapsulate and reuse configuration across different projects, improving maintainability and scalability.
What Are Terraform Custom Modules?
Terraform modules are containers for multiple resources that are used together. A custom module is a user-defined module that provides reusable components to define infrastructure.
We will utilize reusable Terraform modules to efficiently define, provision, and manage our infrastructure.
Three-tier architecture, also known as client-server architecture, is a software design pattern that divides an application into three main parts or tiers:
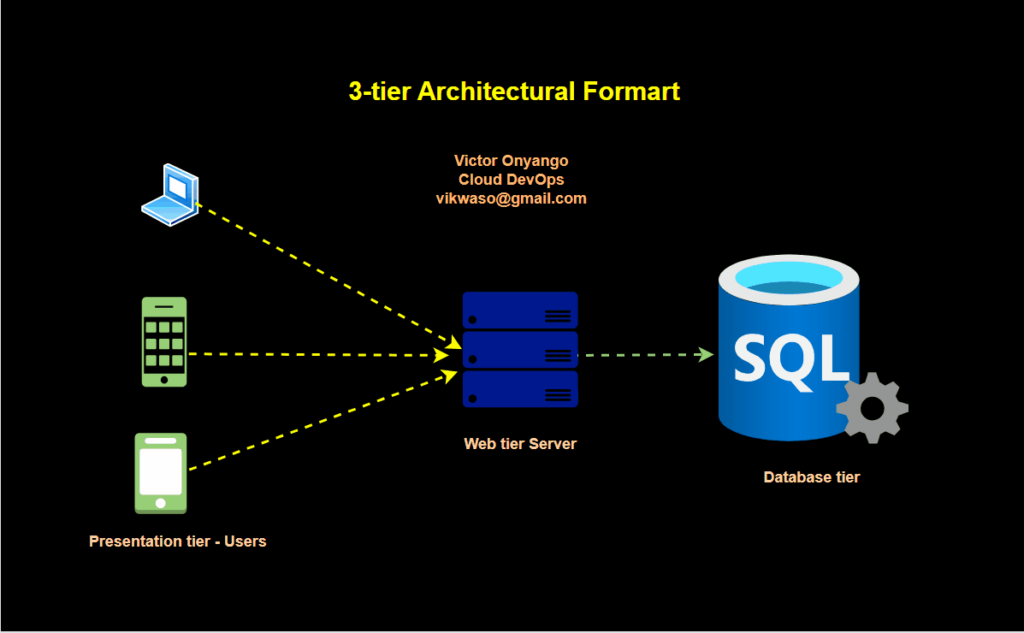
Let’s start building our infrastructure.
Configuring Keys
Terraform should have IAM Access and secret access keys to interact with the AWS services.
you can achieve this by creating the keys, installing the AWS CLI, and having these credentials configured.
After configuring the AWS credentials, you can verify the profile for that key. In most cases, it will be saved in the following directory and the profile will be ‘default’. You can change this profile to whatever name you want.
home/.aws/credentials
#to view your key you can navigate to this directory using the cd command.
cd /home/.aws/credentials

.aws$ cat credentials
[victor]
aws_access_key_id = AKIA4IWSMDHGGAAAVGKLLLLNMHYTGG
aws_secret_access_key = 789j/mmmkkuuihggkjjjDce+NcY6yRo2ShF3R0aw/wG1tdY
Write Terraform files
Finally, it’s time to write your infrastructure. but before you jump on it. let me clarify a few things, we are going to use best practices while writing code.
Best practices
store state files on remote location
Create an s3 bucket to save the state file in a remote location. Over to the s3 console, and click on the Create Bucket button. give any name to your bucket and click on Create a bucket.
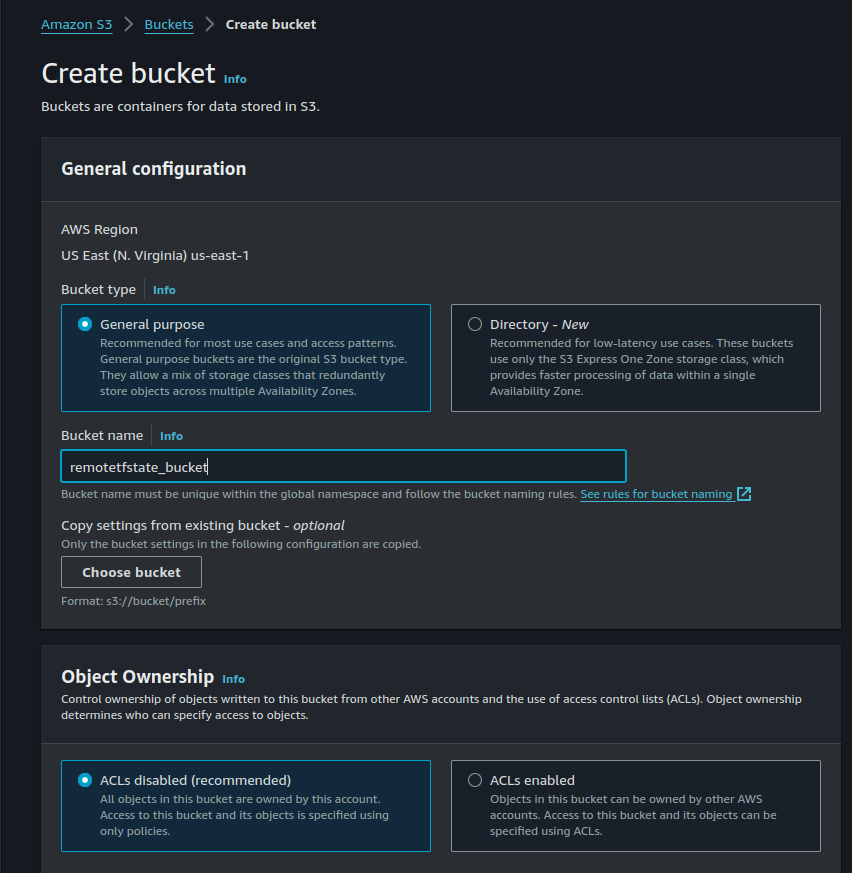

try to keep versioning for backups
You can enable versioning while creating a bucket but if you forget then select the bucket that you have just created and click on the Properties tab and on the top you will find the option Bucket versioning. click on edit and enable it.
State-locking ensures that the,
tfstate file
remains consistent when working on a collaborative project, preventing multiple people from making changes at the same time.
Also, navigate to the DynamoDB service dashboard and click the “Create Table” button. You can choose any table name you like. but make sure to set the Partition Key as LockID (be aware that it is case-sensitive).
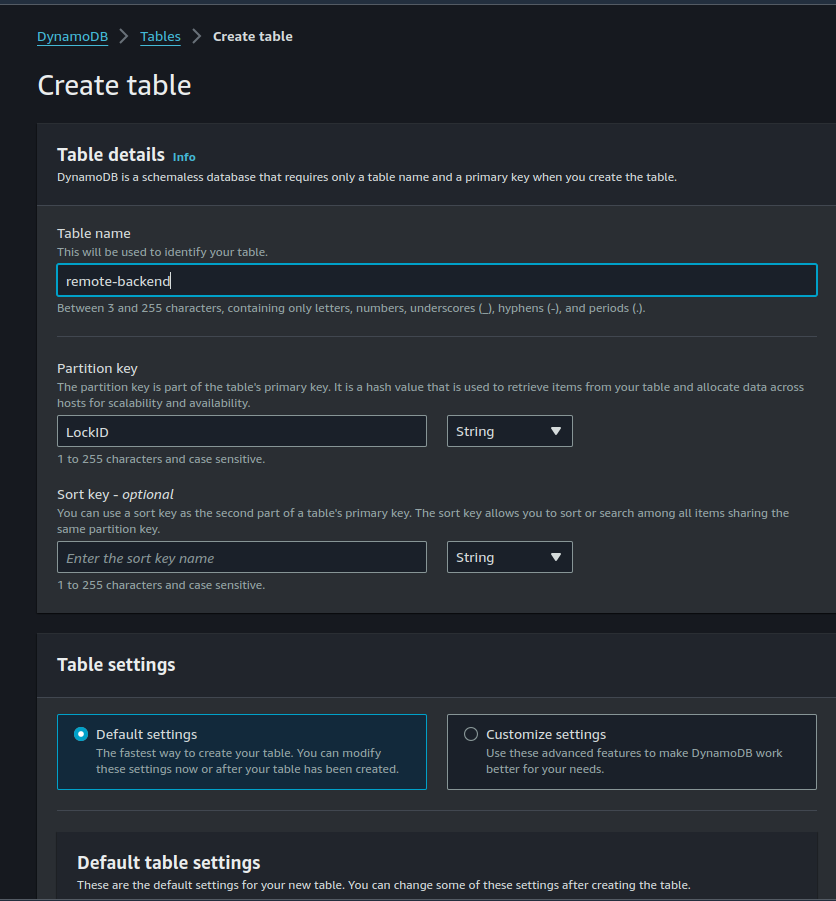
This is crucial because DynamoDB uses this key to lock and release the file. After setting it up, click “Create Table.”

Let’s go over a few key things to remember when writing code.
backend.tf
We will follow a modular approach to build our infrastructure.
Directory Structure
testmodule$ tree
.
├── modules
│   ├── alb
│   │   ├── main.tf
│   │   ├── output.tf
│   │   └── variable.tf
│   ├── asg
│   │   ├── config.sh
│   │   ├── main.tf
│   │   └── variables.tf
│   ├── cloudfront
│   │   ├── main.tf
│   │   ├── output.tf
│   │   └── variables.tf
│   ├── key
│   │   ├── client_keys
│   │   ├── client_keys.pub
│   │   ├── main.tf
│   │   └── output.tf
│   ├── nat
│   │   ├── main.tf
│   │   └── variables.tf
│   ├── rds
│   │   ├── main.tf
│   │   └── variable.tf
│   ├── route53
│   │   ├── main.tf
│   │   └── variables.tf
│   ├── security-group
│   │   ├── main.tf
│   │   ├── outputs.tf
│   │   └── variables.tf
│   └── vpc
│       ├── main.tf
│       ├── outputs.tf
│       └── variables.tf
└── root
    ├── backend.tf
    ├── main.tf
    ├── provider.tf
    ├── Readme.md
    ├── variables.tf
    └── variables.tfvars
In the working directory, create two subdirectories. root and modules. The root will contain our main configuration files.
└── root
    ├── backend.tf
    ├── main.tf
    ├── provider.tf
    ├── Readme.md
    ├── variables.tf
    └── variables.tfvars
The modules directory will contain the separate modules for each service.
.
├── modules
│   ├── alb
│   │   ├── main.tf
│   │   ├── output.tf
│   │   └── variable.tf
│   ├── asg
│   │   ├── config.sh
│   │   ├── main.tf
│   │   └── variables.tf
│   ├── cloudfront
│   │   ├── main.tf
│   │   ├── output.tf
│   │   └── variables.tf
│   ├── key
│   │   ├── client_keys
│   │   ├── client_keys.pub
│   │   ├── main.tf
│   │   └── output.tf
│   ├── nat
│   │   ├── main.tf
│   │   └── variables.tf
│   ├── rds
│   │   ├── main.tf
│   │   └── variable.tf
│   ├── route53
│   │   ├── main.tf
│   │   └── variables.tf
│   ├── security-group
│   │   ├── main.tf
│   │   ├── outputs.tf
│   │   └── variables.tf
│   └── vpc
│       ├── main.tf
│       ├── outputs.tf
│       └── variables.tf
Inside the root folder, create three files.
# For configuring the modules
main.tf

# For storing the vaiables
variables.tf

# For declaring the vaiables
terraform.tfvars

└── root
    ├── backend.tf
    ├── main.tf
    ├── provider.tf
    ├── Readme.md
    ├── variables.tf
    └── variables.tfvars
Each module will also contain the following.
# for that module configuration
main.tf

# to declare the variables required in that module variables.tf
variales.tf

# can be used as variables in modules.
outputs.tf that
testmodule$ tree
.
├── modules
│   ├── alb
│   │   ├── main.tf
│   │   ├── output.tf
│   │   └── variable.tf
│   ├── asg
│   │   ├── config.sh
│   │   ├── main.tf
│   │   └── variables.tf
│   ├── cloudfront
│   │   ├── main.tf
│   │   ├── output.tf
│   │   └── variables.tf
│   ├── key
│   │   ├── client_keys
│   │   ├── client_keys.pub
│   │   ├── main.tf
│   │   └── output.tf
│   ├── nat
│   │   ├── main.tf
│   │   └── variables.tf
│   ├── rds
│   │   ├── main.tf
│   │   └── variable.tf
│   ├── route53
│   │   ├── main.tf
│   │   └── variables.tf
│   ├── security-group
│   │   ├── main.tf
│   │   ├── outputs.tf
│   │   └── variables.tf
│   └── vpc
│       ├── main.tf
│       ├── outputs.tf
│       └── variables.tf
└── root
    ├── backend.tf
    ├── main.tf
    ├── provider.tf
    ├── Readme.md
    ├── variables.tf
    └── variables.tfvars
Inside the root directory.
# provider.tf file

terraform {
  required_providers {
    aws = {
      source  = "hashicorp/aws"
      version = "~> 4.67.0"
    }
  }
}

# main.tf file

# create a vpc from our vpc module
module "vpc" {
  source                             = "../module/vpc"
  region                             = var.region
  project_name                       = var.project_name
  vpc_cidr                           = var.vpc_cidr
  public_subnet_az1_cidr             = var.public_subnet_az1_cidr
  public_subnet_az2_cidr             = var.public_subnet_az2_cidr
  private_app_subnet_az1_cidr        = var.private_app_subnet_az1_cidr
  private_app_subnet_az2_cidr        = var.private_app_subnet_az2_cidr
  private_data_subnet_az1_cidr       = var.private_data_subnet_az1_cidr
  private_data_subnet_az2_cidr       = var.private_data_subnet_az2_cidr

}

module "nat" {
  source = "../module/nat"

  public_subnet_az1_id              = module.vpc.public_subnet_az1_id
  internet_gateway                  = module.vpc.internet_gateway
  public_subnet_az2_id              = module.vpc.public_subnet_az2_id
  vpc_id                            = module.vpc.vpc_id
  private_app_subnet_az1_id         = module.vpc.private_app_subnet_az1_id
  private_app_subnet_az2_id         = module.vpc.private_app_subnet_az2_id
  private_data_subnet_az1_id        = module.vpc.private_data_subnet_az1_id
  private_data_subnet_az2_id        = module.vpc.private_data_subnet_az2_id
}

module "security-group" {
  source = "../module/security-group"
  vpc_id = module.vpc.vpc_id
}

# creating Key for instances
module "key" {
  source = "../module/key"
}

# Creating Application Load balancer
module "alb" {
  source         = "../module/alb"
  project_name   = module.vpc.project_name
  alb_sg_id      = module.security-group.alb_sg_id
  public_subnet_az1_id = module.vpc.public_subnet_az1_id
  public_subnet_az2_id = module.vpc.public_subnet_az2_id
  vpc_id         = module.vpc.vpc_id
}

module "asg" {
  source         = "../module/asg"
  project_name   = module.vpc.project_name
  key_name       = module.key.key_name
  client_sg_id   = module.security-group.client_sg_id
  private_app_subnet_az1_id = module.vpc.private_app_subnet_az1_id
  private_app_subnet_az2_id = module.vpc.private_app_subnet_az2_id
  tg_arn         = module.alb.tg_arn

}

# creating RDS instance

module "rds" {
  source         = "../module/rds"
  db_sg_id       = module.security-group.db_sg_id
  private_data_subnet_az1_id = module.vpc.private_data_subnet_az1_id
  private_data_subnet_az2_id = module.vpc.private_data_subnet_az2_id
  db_username    = var.db_username
  db_password    = var.db_password
}

# create cloudfront distribution
module "cloudfront" {
  source = "../module/cloudfront"
  certificate_domain_name = var.certificate_domain_name
  alb_domain_name = module.alb.alb_dns_name
  additional_domain_name = var.additional_domain_name
  project_name = module.vpc.project_name
}

# Add record in route 53 hosted zone

module "route53" {
  source = "../module/route53"
  cloudfront_domain_name = module.cloudfront.cloudfront_domain_name
  cloudfront_hosted_zone_id = module.cloudfront.cloudfront_hosted_zone_id

}

# variables.tf file

variable "region" {}
variable "project_name" {}
variable "vpc_cidr" {}
variable "public_subnet_az1_cidr" {}
variable "public_subnet_az2_cidr" {}
variable "private_app_subnet_az1_cidr" {}
variable "private_app_subnet_az2_cidr" {}
variable "private_data_subnet_az1_cidr" {}
variable "private_data_subnet_az2_cidr" {}
variable "db_password" {}
variable "db_username" {}
variable certificate_domain_name {
    default = "viktechsolutionsllc.com"
}
variable additional_domain_name {
    default = "viktechsolutionsllc.com"
}

# variables.tfvars file
region = "us-east-1"
project_name = "terraform-project"
vpc_cidr = "10.0.0.0/16"
public_subnet_az1_cidr = "10.0.0.0/24"
public_subnet_az2_cidr = "10.0.1.0/24"
private_app_subnet_az1_cidr = "10.0.2.0/24"
private_app_subnet_az2_cidr = "10.0.3.0/24"
private_data_subnet_az1_cidr = "10.0.4.0/24"
private_data_subnet_az2_cidr = "10.0.5.0/24"
db_username = "vic"
db_password = "victor2011"

# backend.tf file
# store the terraform state file in s3 bucket.
terraform {
  backend "s3" {
    bucket = "statebucket123"
    key    = "project/terraform.tfstate"
    region = "us-east-1"
    dynamodb_table = "remote-backend"
  }
}

# .gitignore file

/**/*.tfstate*
/**/.terraform

../modules/key/client_key
../modules/key/client_key.pub
# Local .terraform directories
**/.terraform/*
.terraform/*
*.hcl
*.lock*
../.terraform/*
terraform.*
*.tfvars*

# .tfstate files
*.tfstate
/**/*.tfstate*
*.tfstate.*
let’s embark on building our modules.
Setuping up VPC
Create a directory inside modules named vpc. Inside vpc, we will be creating three files namely:
└── vpc
    ├── main.tf
    ├── outputs.tf
    └── variables.tf
##The main.tf file

#create vpc
resource "aws_vpc" "vpc" {
    cidr_block                  = var.vpc_cidr
    instance_tenancy            = "default"
    enable_dns_hostnames        = true
    enable_dns_support          = true

    tags = {
        Name                    = "${var.project_name}-vpc"
    }
}

# create internet gateway and attach it to vpc
resource "aws_internet_gateway" "internet_gateway" {
  vpc_id                        = aws_vpc.vpc.id

  tags = {
    Name                        = "${var.project_name}-igw"
  }
}

# use data source to get list of all availability zones
# Declare the data source
data "aws_availability_zones" "availability_zones" {}

# create public subnet az1
resource "aws_subnet" "public_subnet_az1" {
    vpc_id                     = aws_vpc.vpc.id
    cidr_block                 = var.public_subnet_az1_cidr
    availability_zone          = data.aws_availability_zones.availability_zones.names[0]
    map_public_ip_on_launch    = true
    tags = {
        Name = "public sunet az1"
    }
}

# create public_subnet_az2
resource "aws_subnet" "public_subnet_az2" {
    vpc_id                     = aws_vpc.vpc.id
    cidr_block                 = var.public_subnet_az2_cidr
    availability_zone          = data.aws_availability_zones.availability_zones.names[1]
    map_public_ip_on_launch    = true
    tags = {
        Name = "public sunet az2"
    }
}

# create route table and add public route
resource "aws_route_table" "public_route_table" {
  vpc_id                     = aws_vpc.vpc.id

  route {
    cidr_block               = "0.0.0.0/0"
    gateway_id               = aws_internet_gateway.internet_gateway.id
  }

  tags = {
    Name                     = "public route table"
  }
}

# associate public subnet az1 with the public route table
resource "aws_route_table_association" "public_subnet_az1_route_table_association" {
  subnet_id                  = aws_subnet.public_subnet_az1.id
  route_table_id             = aws_route_table.public_route_table.id
}

# associate publi subnet az2 with pulic subnet az2
resource "aws_route_table_association" "public_subnet_az2_route_table_association" {
  subnet_id                  = aws_subnet.public_subnet_az2.id
  route_table_id             = aws_route_table.public_route_table.id
}

# creatr private app subnet az1
resource "aws_subnet" "private_app_subnet_az1" {
  vpc_id                     = aws_vpc.vpc.id
  cidr_block                 = var.private_app_subnet_az1_cidr
  availability_zone          = data.aws_availability_zones.availability_zones.names[0]
  map_public_ip_on_launch    = false

  tags = {
    Name                     = "private app subnet az1"
  }
}

# creatr private app subnet az2
resource "aws_subnet" "private_app_subnet_az2" {
  vpc_id                     = aws_vpc.vpc.id
  cidr_block                 = var.private_app_subnet_az2_cidr
  availability_zone          = data.aws_availability_zones.availability_zones.names[1]
  map_public_ip_on_launch    = false

  tags = {
    Name                     = "private app subnet az2"
  }
}

# creatr private data subnet az1
resource "aws_subnet" "private_data_subnet_az1" {
  vpc_id                     = aws_vpc.vpc.id
  cidr_block                 = var.private_data_subnet_az1_cidr
  availability_zone          = data.aws_availability_zones.availability_zones.names[0]
  map_public_ip_on_launch    = false

  tags = {
    Name                     = "private data subnet az1"
  }
}

# creatr private data subnet az2
resource "aws_subnet" "private_data_subnet_az2" {
  vpc_id                     = aws_vpc.vpc.id
  cidr_block                 = var.private_data_subnet_az2_cidr
  availability_zone          = data.aws_availability_zones.availability_zones.names[1]
  map_public_ip_on_launch    = false

  tags = {
    Name                     = "private data subnet az2"
  }
}


## vpc variables.tf file

variable "region" {}
variable "project_name" {}
variable "vpc_cidr" {}
variable "public_subnet_az1_cidr" {}
variable "public_subnet_az2_cidr" {}
variable "private_app_subnet_az1_cidr" {}
variable "private_app_subnet_az2_cidr" {}
variable "private_data_subnet_az1_cidr" {}
variable "private_data_subnet_az2_cidr" {}


##vpc outputs.tf file

output "region" {
 value = var.region
}

output "project_name" {
  value = var.project_name
}

output "vpc_id" {
  value = aws_vpc.vpc.id
}

output "public_subnet_az1_id" {
  value = aws_subnet.public_subnet_az1.id
}

output "public_subnet_az2_id" {
  value = aws_subnet.public_subnet_az2.id
}

output "private_app_subnet_az1_id" {
  value = aws_subnet.private_app_subnet_az1.id
}

output "private_app_subnet_az2_id" {
  value = aws_subnet.private_app_subnet_az2.id
}

output "private_data_subnet_az1_id" {
  value = aws_subnet.private_data_subnet_az1.id
}

output "private_data_subnet_az2_id" {
  value = aws_subnet.private_data_subnet_az2.id
}

output "internet_gateway" {
  value = aws_internet_gateway.internet_gateway
}
Creating NAT Gateway.
Create a nat-gateway directory inside the modules directory then add these files to the directory.
├── nat
│   ├── main.tf
│   └── variables.tf
## our nat main.tf file

# allocate elastic ip. this eip will be used for the nat-gateway in the subnet public subnet az1
resource "aws_eip" "eip-nat-gateway-az1" {
  vpc = true

  tags = {
    Name = "elastic IP nat gateway az1"
  }
}

# allocate elastic ip. this eip will be used for the nat-gateway in the public subnet az2
resource "aws_eip" "eip_nat_gateway-az2" {
  vpc  = true

  tags   = {
    Name = "elastic IP nat gateway az2"
  }
}

# create nat gateway in public subnet az1
resource "aws_nat_gateway" "nat-gateway-az1" {
  allocation_id                                  = aws_eip.eip-nat-gateway-az1.id
  subnet_id                                      = var.public_subnet_az1_id

  tags = {
    Name = "nat gateway az1"
  }
# to ensure proper ordering, it is recommended to add an explicit dependency
#  depends_on = [var.internet_gateway.id]
}

# create nat gateway in public subnet az2
resource "aws_nat_gateway" "nat-gateway-az2" {
  allocation_id                                  = aws_eip.eip_nat_gateway-az2.id
  subnet_id                                      = var.public_subnet_az2_id

  tags = {
    Name = "nat gateway az2"
  }
# to ensure proper ordering, it is recommended to add an explicit dependency
#  depends_on                                     = [var.internet_gateway.id]
}

# create private route table Private-Route Table-1 and add route through Nat gateway az1
resource "aws_route_table" "private-root-table-1" {
  vpc_id                                         = var.vpc_id

  route {
    cidr_block                                   = "0.0.0.0/0"
    nat_gateway_id                               = aws_nat_gateway.nat-gateway-az1.id
  }

  tags   = {
    Name = "Private root table 1"
  }
}

# associate private app subnet az1 with the private route table 1
resource "aws_route_table_association" "private_app_subnet_az1" {
  subnet_id                                    = var.private_app_subnet_az1_id
  route_table_id                               = aws_route_table.private-root-table-1.id
}

# associate private data subnet az1 with route table 1
resource "aws_route_table_association" "private_data_subnet_az1" {
  subnet_id                                    = var.private_data_subnet_az1_id
  route_table_id                               = aws_route_table.private-root-table-1.id
}

# create private private-route-table-2 and add route through nat gateway az2
resource "aws_route_table" "private-route-table-az2" {
  vpc_id                                      = var.vpc_id

  route {
    cidr_block                                = "0.0.0.0/0"
    nat_gateway_id                            = aws_nat_gateway.nat-gateway-az2.id
  }

  tags   = {
    Name = "private route table z2"
  }
}

# associate private app subnet az2 with private route table az2
resource "aws_route_table_association" "private_app_subnet_az2" {
  subnet_id                                  = var.private_app_subnet_az2_id
  route_table_id                             = aws_route_table.private-route-table-az2.id
}

# associate private data subnet az2 with private route table az2
resource "aws_route_table_association" "private_data_subnet_az2" {
  subnet_id                                  = var.private_data_subnet_az2_id
  route_table_id                             = aws_route_table.private-route-table-az2.id
}


## variables.tf file

variable public_subnet_az1_id {}
variable public_subnet_az2_id {}
variable private_app_subnet_az1_id {}
variable private_app_subnet_az2_id {}
variable private_data_subnet_az1_id {}
variable private_data_subnet_az2_id {}
variable internet_gateway {}
variable vpc_id {}
Creating Security Groups.
Create a directory named security-group inside the modules directory and create the following files.
├── security-group
│   ├── main.tf
│   ├── outputs.tf
│   └── variables.tf
## security group main.tf file


resource "aws_security_group" "alb_sg" {
  name        = "alb security group"
  description = "enable http/https access on port 80/443"
  vpc_id      = var.vpc_id

  ingress {
    description = "http access"
    from_port   = 80
    to_port     = 80
    protocol    = "tcp"
    cidr_blocks = ["0.0.0.0/0"]
  }

  ingress {
    description = "https access"
    from_port   = 443
    to_port     = 443
    protocol    = "tcp"
    cidr_blocks = ["0.0.0.0/0"]
  }

  egress {
    from_port   = 0
    to_port     = 0
    protocol    = -1
    cidr_blocks = ["0.0.0.0/0"]
  }

  tags = {
    Name = "Application Load balancer Security Group"
  }
}

# create security group for the Client
resource "aws_security_group" "client_sg" {
  name        = "client_sg"
  description = "enable http/https access on port 80 for elb sg"
  vpc_id      = var.vpc_id

  ingress {
    description     = "http access"
    from_port       = 80
    to_port         = 80
    protocol        = "tcp"
    security_groups = [aws_security_group.alb_sg.id]
  }

  egress {
    from_port   = 0
    to_port     = 0
    protocol    = -1
    cidr_blocks = ["0.0.0.0/0"]
  }

  tags = {
    Name = "Client_sg"
  }
}

# create security group for the Database
resource "aws_security_group" "db_sg" {
  name        = "db_sg"
  description = "enable mysql access on port 3306 from client-sg"
  vpc_id      = var.vpc_id

  ingress {
    description     = "mysql access"
    from_port       = 3306
    to_port         = 3306
    protocol        = "tcp"
    security_groups = [aws_security_group.client_sg.id]
  }

  egress {
    from_port   = 0
    to_port     = 0
    protocol    = -1
    cidr_blocks = ["0.0.0.0/0"]
  }

  tags = {
    Name = "database_sg"
  }
}

## security group variables.tf file

variable vpc_id {}

## security group outputs.tf file


output "alb_sg_id" {
  value = aws_security_group.alb_sg.id
}

output "client_sg_id" {
  value = aws_security_group.client_sg.id
}

output "db_sg_id" {
  value = aws_security_group.db_sg.id
}
Creating key pair for SSH.
Create a directory named key inside the modules directory and create the following files.
├── key
│   ├── client_keys
│   ├── client_keys.pub
│   ├── main.tf
│   └── output.tf
## main.tf file


resource "aws_key_pair" "client_keys" {
  public_key = file("${path.module}/client_keys.pub")

  tags = {
    Name = "client_keys"
  }
}


## output.tf file
output "key_name" {
  value = aws_key_pair.client_keys.key_name
}
Creating Application Load balancer
In the modules directory, create a subdirectory named alb and create the following files.
## the main.tf file

# create application load balancer
resource "aws_lb" "application_load_balancer" {
  name                                             = "${var.project_name}-alb"
  internal                                         = false
  load_balancer_type                               = "application"
  security_groups                                  = [var.alb_sg_id]
  subnets                                          = [var.public_subnet_az1_id,var.public_subnet_az2_id]
  enable_deletion_protection                       = false

  tags   = {
    Name                                           = "${var.project_name}-alb"
  }
}

# create target group
resource "aws_lb_target_group" "alb_target_group" {
  name                                              = "${var.project_name}-tg"
  target_type                                       = "instance"
  port                                              = 80
  protocol                                          = "HTTP"
  vpc_id                                            = var.vpc_id

  health_check {
    enabled                                         = true
    interval                                        = 300
    path                                            = "/"
    timeout                                         = 60
    matcher                                         = 200
    healthy_threshold                               = 2
    unhealthy_threshold                             = 5
  }

  lifecycle {
    create_before_destroy                           = true
  }
}

# create a listener on port 80 with redirect action
resource "aws_lb_listener" "alb_http_listener" {
  load_balancer_arn = aws_lb.application_load_balancer.arn
  port              = 80
  protocol          = "HTTP"

  default_action {
    type = "forward"
    target_group_arn = aws_lb_target_group.alb_target_group.arn
  }
}

## the variable.tf file

variable "project_name" {}
variable "alb_sg_id" {}
variable "public_subnet_az1_id" {}
variable "public_subnet_az2_id" {}
variable "vpc_id" {}

## the output.tf file

output "tg_arn" {
  value = aws_lb_target_group.alb_target_group.arn
}

output "alb_dns_name" {
  value = aws_lb.application_load_balancer.dns_name
}
Auto Scaling Groups
In the modules directory, create a subdirectory named asg and create the following files.
├── asg
│   ├── config.sh
│   ├── main.tf
│   └── variables.tf
resource "aws_launch_template" "lt_name" {
  name          = "${var.project_name}-tpl"
  image_id      = var.ami
  instance_type = var.cpu
  key_name      = var.key_name
  user_data     = filebase64("../module/asg/config.sh")


  vpc_security_group_ids = [var.client_sg_id]
  tags = {
    Name = "${var.project_name}-tpl"
  }
}

resource "aws_autoscaling_group" "asg_name" {

  name                      = "${var.project_name}-asg"
  max_size                  = var.max_size
  min_size                  = var.min_size
  desired_capacity          = var.desired_cap
  health_check_grace_period = 300
  health_check_type         = var.asg_health_check_type #"ELB" or default EC2
  vpc_zone_identifier = [var.private_app_subnet_az1_id,var.private_app_subnet_az2_id]
  target_group_arns   = [var.tg_arn] #var.target_group_arns

  enabled_metrics = [
    "GroupMinSize",
    "GroupMaxSize",
    "GroupDesiredCapacity",
    "GroupInServiceInstances",
    "GroupTotalInstances"
  ]

  metrics_granularity = "1Minute"

  launch_template {
    id      = aws_launch_template.lt_name.id
    version = aws_launch_template.lt_name.latest_version
  }
}

# scale up policy
resource "aws_autoscaling_policy" "scale_up" {
  name                   = "${var.project_name}-asg-scale-up"
  autoscaling_group_name = aws_autoscaling_group.asg_name.name
  adjustment_type        = "ChangeInCapacity"
  scaling_adjustment     = "1" #increasing instance by 1
  cooldown               = "300"
  policy_type            = "SimpleScaling"
}

# scale up alarm
# alarm will trigger the ASG policy (scale/down) based on the metric (CPUUtilization), comparison_operator, threshold
resource "aws_cloudwatch_metric_alarm" "scale_up_alarm" {
  alarm_name          = "${var.project_name}-asg-scale-up-alarm"
  alarm_description   = "asg-scale-up-cpu-alarm"
  comparison_operator = "GreaterThanOrEqualToThreshold"
  evaluation_periods  = "2"
  metric_name         = "CPUUtilization"
  namespace           = "AWS/EC2"
  period              = "120"
  statistic           = "Average"
  threshold           = "70" # New instance will be created once CPU utilization is higher than 30 %
  dimensions = {
    "AutoScalingGroupName" = aws_autoscaling_group.asg_name.name
  }
  actions_enabled = true
  alarm_actions   = [aws_autoscaling_policy.scale_up.arn]
}

# scale down policy
resource "aws_autoscaling_policy" "scale_down" {
  name                   = "${var.project_name}-asg-scale-down"
  autoscaling_group_name = aws_autoscaling_group.asg_name.name
  adjustment_type        = "ChangeInCapacity"
  scaling_adjustment     = "-1" # decreasing instance by 1
  cooldown               = "300"
  policy_type            = "SimpleScaling"
}

# scale down alarm
resource "aws_cloudwatch_metric_alarm" "scale_down_alarm" {
  alarm_name          = "${var.project_name}-asg-scale-down-alarm"
  alarm_description   = "asg-scale-down-cpu-alarm"
  comparison_operator = "LessThanOrEqualToThreshold"
  evaluation_periods  = "2"
  metric_name         = "CPUUtilization"
  namespace           = "AWS/EC2"
  period              = "120"
  statistic           = "Average"
  threshold           = "5" # Instance will scale down when CPU utilization is lower than 5 %
  dimensions = {
    "AutoScalingGroupName" = aws_autoscaling_group.asg_name.name
  }
  actions_enabled = true
  alarm_actions   = [aws_autoscaling_policy.scale_down.arn]
}

## variable.tf

variable "project_name"{}
variable "ami" {
    default = "ami-04a81a99f5ec58529"
}
variable "cpu" {
    default = "t2.micro"
}
variable "key_name" {}
variable "client_sg_id" {}
variable "max_size" {
    default = 6
}
variable "min_size" {
    default = 2
}
variable "desired_cap" {
    default = 3
}
variable "asg_health_check_type" {
    default = "ELB"
}
variable "private_app_subnet_az1_id" {}
variable "private_app_subnet_az2_id" {}
variable "tg_arn" {}

## config.sh


#!/bin/bash

# Set Variables for Ubuntu
PACKAGE="apache2"
SVC="apache2"

echo "Running Setup on Ubuntu"
# Installing Apache
echo "########################################"
echo "Installing packages."
echo "########################################"
sudo apt update
sudo apt install $PACKAGE -y > /dev/null
echo

# Start & Enable Apache Service
echo "########################################"
echo "Start & Enable HTTPD Service"
echo "########################################"
sudo systemctl start $SVC
sudo systemctl enable $SVC
echo

# Add a custom message to the default index.html
echo "########################################"
echo "Adding custom message to index.html"
echo "########################################"
echo "Our application is successfully configured thumbs up" > /var/www/html/index.html
echo

echo "Apache installation and setup complete."
Creating RDS instance
In the modules directory, create a subdirectory named rds and create the following files.
├── rds
│   ├── main.tf
│   └── variable.tf
## main.tf file
resource "aws_db_subnet_group" "db-subnet" {
  name       = var.db_subnet_group_name
  subnet_ids = [var.private_data_subnet_az1_id, var.private_data_subnet_az2_id] # Replace with your private subnet IDs
}

resource "aws_db_instance" "db" {
  identifier              = "rds-database-instance"
  engine                  = "mysql"
  engine_version          = "5.7.44"
  instance_class          = "db.t3.micro"
  allocated_storage       = 20
  username                = var.db_username
  password                = var.db_password
  db_name                 = var.db_name
  multi_az                = false
  storage_type            = "gp2"
  storage_encrypted       = false
  publicly_accessible     = false
  skip_final_snapshot     = true
  backup_retention_period = 0

  vpc_security_group_ids = [var.db_sg_id]

  db_subnet_group_name = aws_db_subnet_group.db_subnet_group.name

  tags = {
    Name = "rds-database"
  }
}

resource "aws_db_subnet_group" "db_subnet_group" {
  name       = "rds-db-subnet-group"
  subnet_ids = [var.private_data_subnet_az1_id, var.private_data_subnet_az2_id]

  tags = {
    Name = "rds-db-subnet-group"
  }
}

## variable.tf file

variable "db_subnet_group_name" {
  default = "db_subnet_group"
}
variable "private_data_subnet_az1_id" {}
variable "private_data_subnet_az2_id" {}
variable "db_username" {}
variable "db_password" {}
variable "db_sg_id" {}

variable "db_sub_name" {
    default = "book-shop-db-subnet-a-b"
}
variable "db_name" {
    default = "testdb"
}
Create CloudFront distribution
In the modules directory, create a subdirectory named Cloudfront and create the following files.
├── cloudfront
│   ├── main.tf
│   ├── output.tf
│   └── variables.tf
## main.tf file

# use data source to get the certificate from AWS Certificate Manager
data "aws_acm_certificate" "issued" {
  domain   = var.certificate_domain_name
  statuses = ["ISSUED"]
}

#creating Cloudfront distribution :
resource "aws_cloudfront_distribution" "my_distribution" {
  enabled             = true
  aliases             =  [var.additional_domain_name]
  origin {
    domain_name = var.alb_domain_name
    origin_id   = var.alb_domain_name
    custom_origin_config {
      http_port              = 80
      https_port             = 443
      origin_protocol_policy = "http-only"
      origin_ssl_protocols   = ["TLSv1.2"]
    }
  }
  default_cache_behavior {
    allowed_methods        = ["GET", "HEAD", "OPTIONS", "PUT", "POST", "PATCH", "DELETE"]
    cached_methods         = ["GET", "HEAD", "OPTIONS"]
    target_origin_id       = var.alb_domain_name
    viewer_protocol_policy = "redirect-to-https"
    forwarded_values {
      headers      = []
      query_string = true
      cookies {
        forward = "all"
      }
    }
  }
  restrictions {
    geo_restriction {
      restriction_type = "none"
    }
  }
  tags = {
    Name = var.project_name
  }
  viewer_certificate {
    acm_certificate_arn      = data.aws_acm_certificate.issued.arn
    ssl_support_method       = "sni-only"
    minimum_protocol_version = "TLSv1.2_2018"
  }
}

## variables.tf file

variable "certificate_domain_name" {}
variable "additional_domain_name" {}
variable "alb_domain_name" {}
variable "project_name" {}

## outputs.tf file

output "cloudfront_domain_name" {
  value = aws_cloudfront_distribution.my_distribution.domain_name
}

output "cloudfront_id" {
  value = aws_cloudfront_distribution.my_distribution.id
}

output "cloudfront_arn" {
  value = aws_cloudfront_distribution.my_distribution.arn
}


output "cloudfront_status" {
  value = aws_cloudfront_distribution.my_distribution.status
}

output "cloudfront_hosted_zone_id" {
  value = aws_cloudfront_distribution.my_distribution.hosted_zone_id
}
Route 53
Now, we will route traffic through our custom domain. So, create folder name route53 inside the modules directory.
├── route53
│   ├── main.tf
│   └── variables.tf
## main.tf file

data "aws_route53_zone" "public-zone" {
  name         = var.hosted_zone_name
  private_zone = false
}
resource "aws_route53_record" "cloudfront_record" {
  zone_id = data.aws_route53_zone.public-zone.zone_id
  name    = "vik.${data.aws_route53_zone.public-zone.name}"
  type    = "A"

  alias {
    name                   = var.cloudfront_domain_name
    zone_id                = var.cloudfront_hosted_zone_id
    evaluate_target_health = false
  }
}

## variable.tf file

variable "hosted_zone_name" {
    default = "viktechsolutionsllc.com"
}
variable "cloudfront_domain_name" {}
variable "cloudfront_hosted_zonetwo above commands are just for refactoring and validating. Actual work begins now.
Go through all your files, to make sure you don’t have any syntax. we will then run the below commands just to refactor and validate our format.
$terraform validate
Let’s now create our infrastructure, change your directory to the root directory by running the below command
cd root
# terraform init, this initializes Terraform in a directory, downloading any required providers. It should be run once when setting up a new Terraform config.
terraform init

# terraform plan this generates an execution plan to show what Terraform will do when you call apply. You can use this to preview the changes Terraform will make.
terraform plan

# terraform apply this executes the actions proposed in the plan and actually provisions or changes your infrastructure.
terraform apply

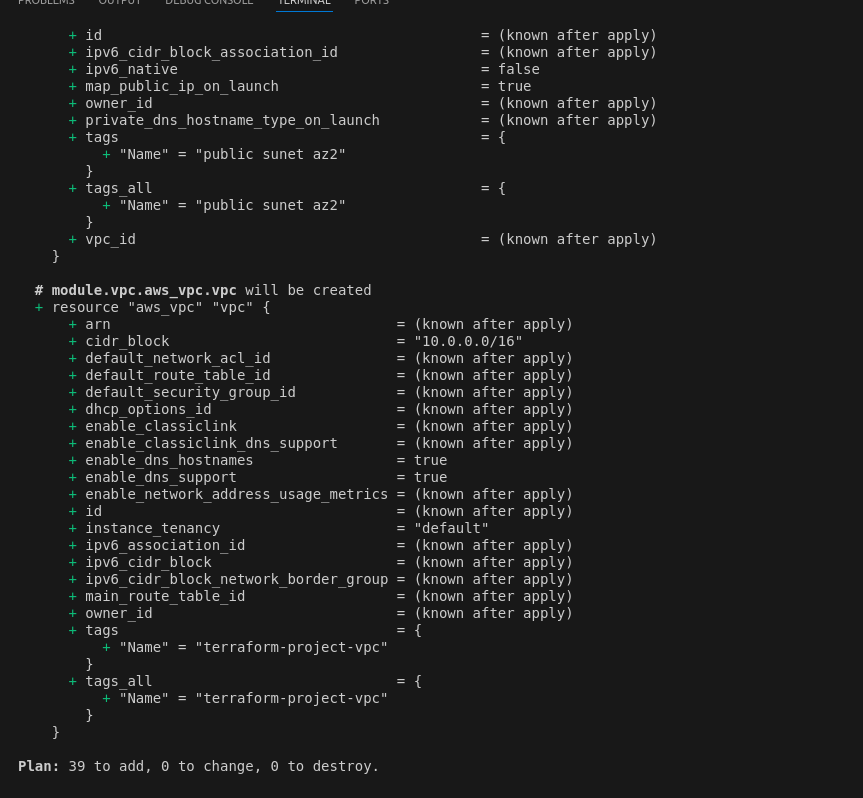


When you log in to your AWS Management Console, you’ll see all the resources you set up with Terraform.
pull everything down.
# destroy all the created resources by running the bellow command.

terraform destroy
( You might have to delete some resources manually too.)

Since we have the public and private keys, we wouldn’t want to push to a remote repository like GitHub. Include the following file in your root directory.
.gitignore

Now, you can initialize git and push to GitHub.
Here is the link to my git repository.
Conclusion
Thanks for reading and stay tuned for more.
This project demonstrates the power of Terraform modules in creating and managing infrastructure. By following the steps outlined above, you can easily deploy and manage the infrastructure for your web applications with consistency and reliability.

A skilled Cloud DevOps Engineer and Solutions Architect specializing in infrastructure provisioning and automation, with a focus on building scalable, fault-tolerant, and secure cloud environments.

