Introduction
In today’s fast-paced digital landscape, CI/CD pipelines are crucial for efficient and reliable software delivery. We will leverage DevOps tools to build a robust CI/CD pipeline using Jenkins, SonarQube, Docker, and GitHub Webhooks on the AWS Cloud environment.
Jenkins automates builds and deployments, SonarQube ensures code quality, Docker standardizes environments, and GitHub Webhooks trigger the pipeline.
We will create a CI/CD pipeline that automates the process from code checking to deployment. First, we’ll do code checking on one of our branches in the GitHub repository. Jenkins will then pull the code from GitHub, after which SonarQube will perform static code analysis, scanning for bugs and vulnerabilities. If the code passes the quality checks, Jenkins will then automatically deploy our code to docker which will then be accessed in the browser by our end users.
To achieve this, we’ll leverage AWS EC2 instances. We will set up three separate EC2 instances for Jenkins, SonarQube, and Docker.
link to github repository.
GitHub – Victorwasonga/Jenkins-Sorqube-Docker
Contribute to Victorwasonga/Jenkins-Sorqube-Docker development by creating an account on GitHub.
let’s dive into the hands-on.
log into the AWS management console, navigate to the EC2 dashboard, and spin up three EC2 Instances. For this project, I will not show how to launch an EC2 instance.
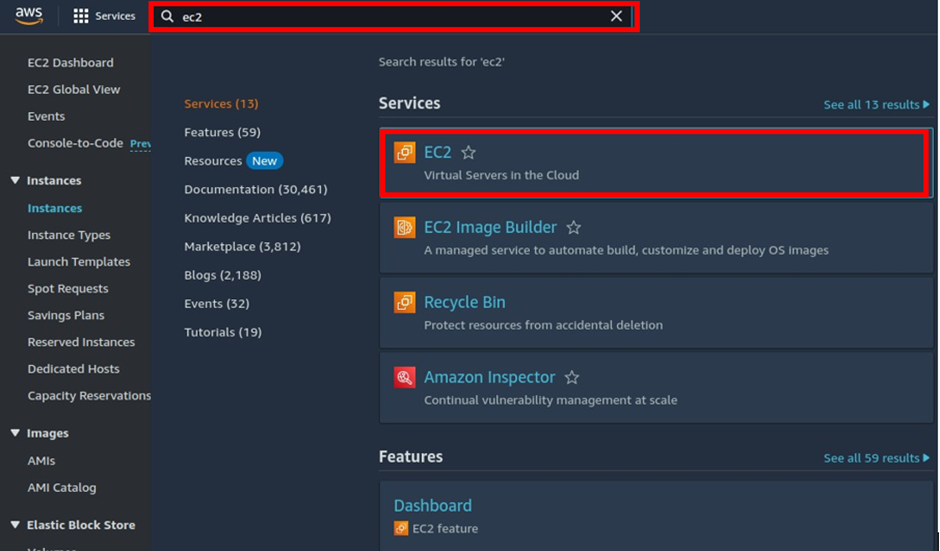
As you can see, my EC2 instances are up and running. For the Jenkins and the docker servers, we have used t2. Medium, while for the docker server have used t3. Micro.
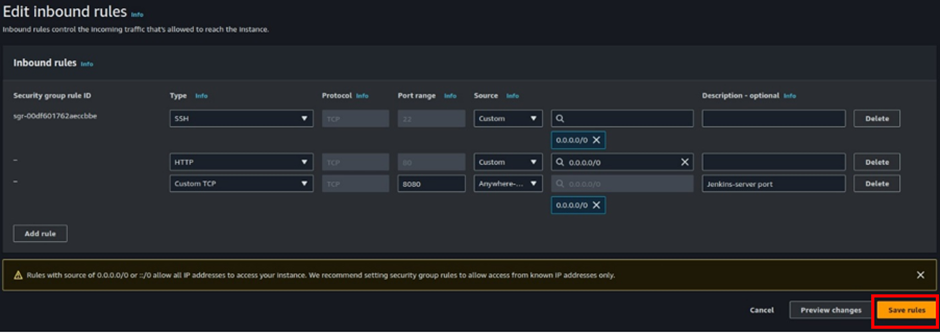
Jenkins uses port 8080, and SonarQube port 9000. For the docker server, we will open port 8085. go ahead and launch your Instances and adjust the security groups as appropriate.

Let’s start by setting up our Jenkins server. Navigate to the directory where you downloaded your key pair and run the below ssh command.
ssh -i <path-to-your-private-key.pem> user@serverIP
#below is how the command should look like replace the IP address with your server IP.

#also replace the .pem key file with your key
ssh -i web-SSHkeys.pem ubuntu@174.129.149.237

After logging into your server, for identification, change the server hostname rather than the IP address, run the below command in your terminal.
sudo hostnamectl set-hostname Jenkins-server

Give it a bash shell and click enter.
/bin/bash

Let’s now start with some small housekeeping to the Jenkins server by updating the server. Type in the below command in your terminal.
sudo apt update

Jenkins uses Java, install Java using the below command.
sudo apt install opnjdk-17-jre

after successful Java installation, paste in the below command to install Jenkins.
sudo wget -O /usr/share/keyrings/jenkins-keyring.asc \
  https://pkg.jenkins.io/debian-stable/jenkins.io-2023.key
echo "deb [signed-by=/usr/share/keyrings/jenkins-keyring.asc]" \
  https://pkg.jenkins.io/debian-stable binary/ | sudo tee \
  /etc/apt/sources.list.d/jenkins.list > /dev/null
sudo apt-get update
sudo apt-get install jenkins

Use this command to check Jenkins status. Make sure to copy your first login password.
sudo systemctl status jenkins


To access the Jenkins server in the browser, let’s open port 8080.
Go to the Jenkins server in the management console. Move to the security tab, then click the security group.

Go to the inbound rules then click Edit inbound rules tab.

Click add rule, for TCP add 8080, then you can limit the source traffic to your IP (recommended) or anywhere on the Internet then click saverule.

Copy the IP address of the server then paste it to your browser followed 8080 port number .
#replace the IP address with your servers IP

http://174.129.149.237:8080

Success Jenkins UI will appear and you will be prompted to key in your admin password, this is the password you copied. If you didn’t copy it, dont worry, you can view the contents of the following directory.
cat /var/jenkins/secretes/initialAdminpassword
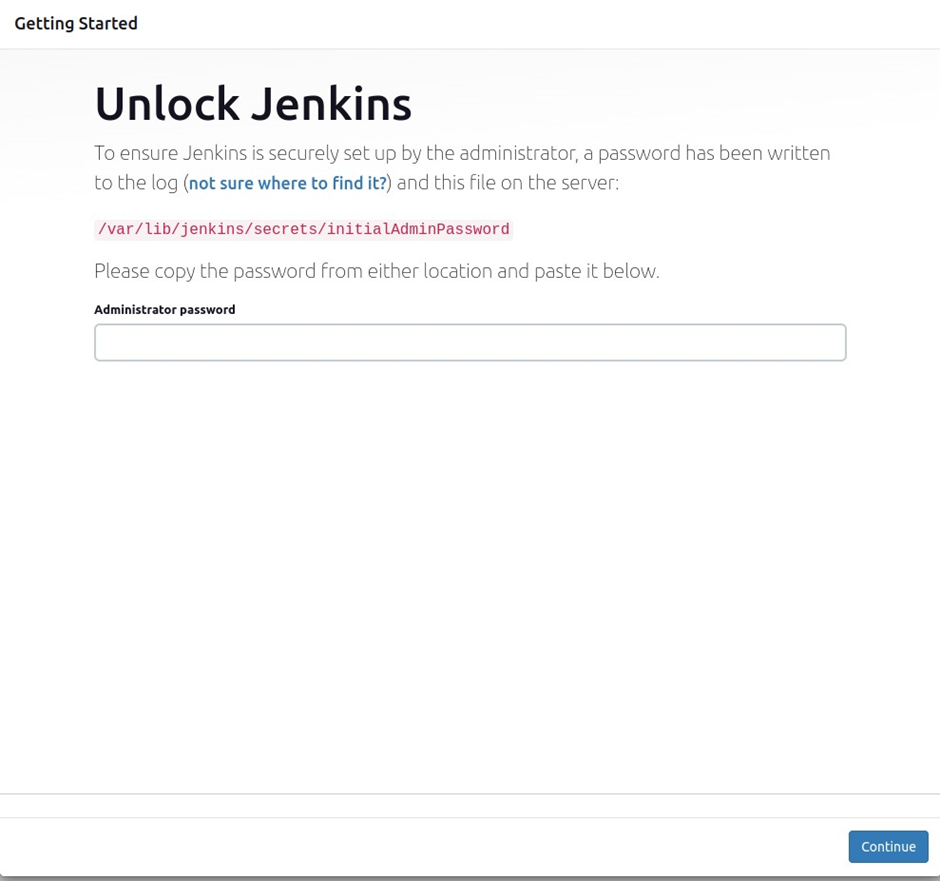
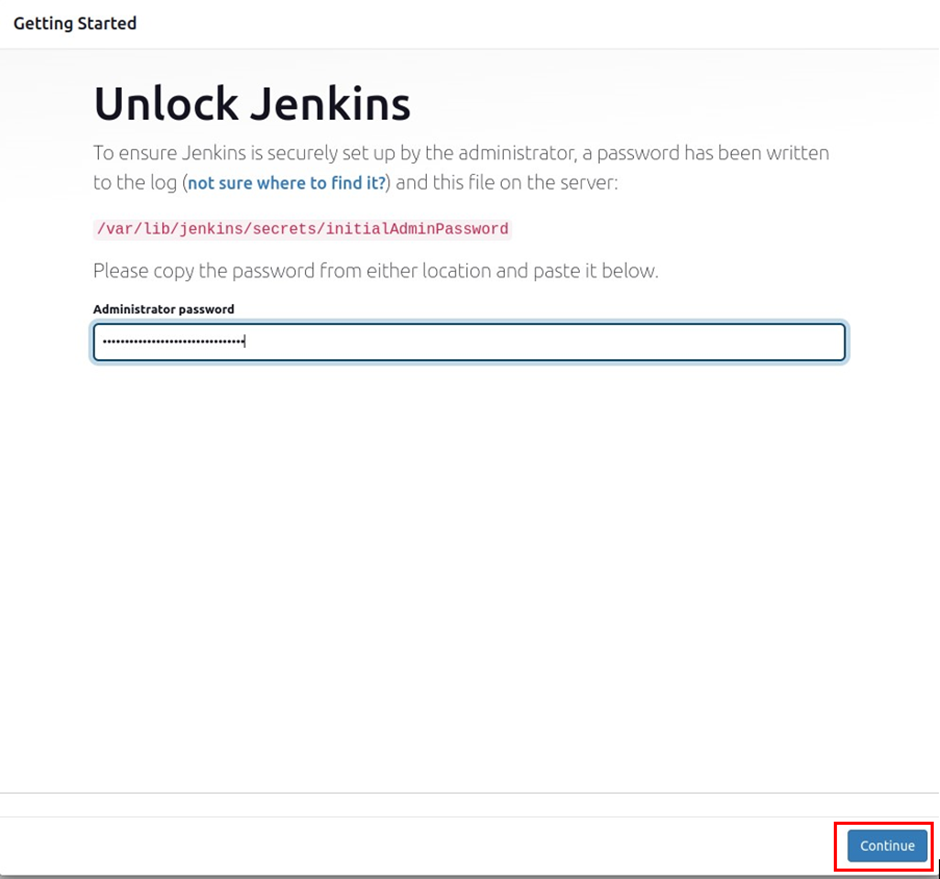
Enter your first admin password then click continue.
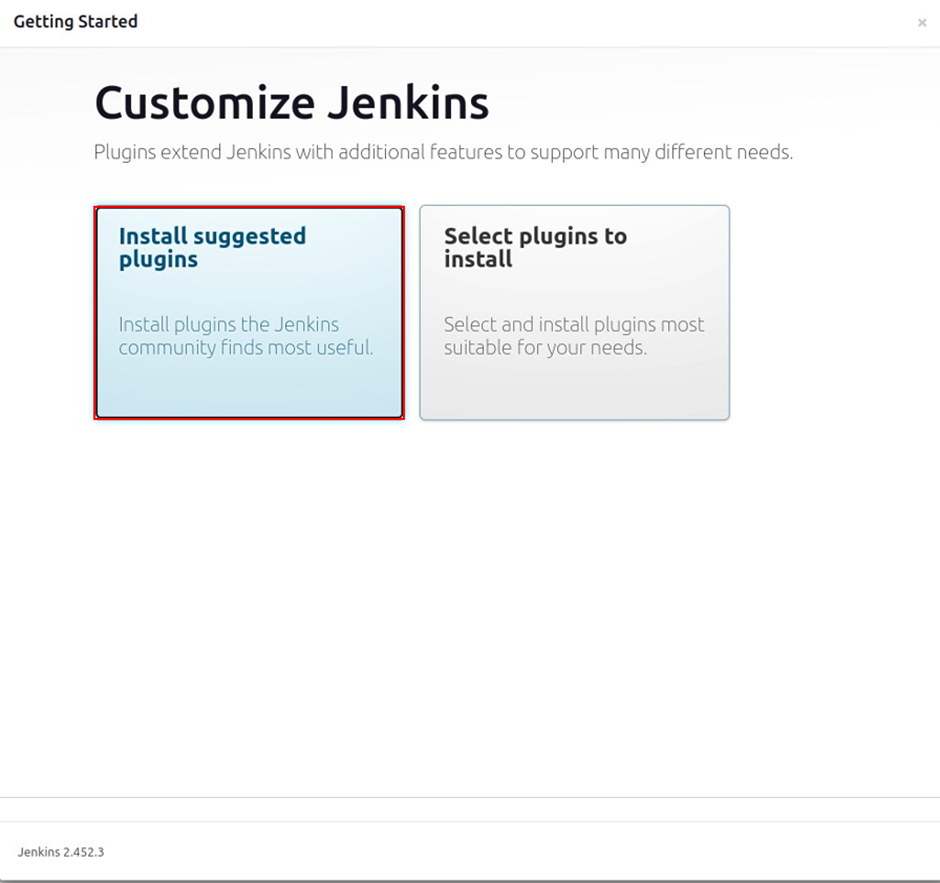
Click install suggested plugins.
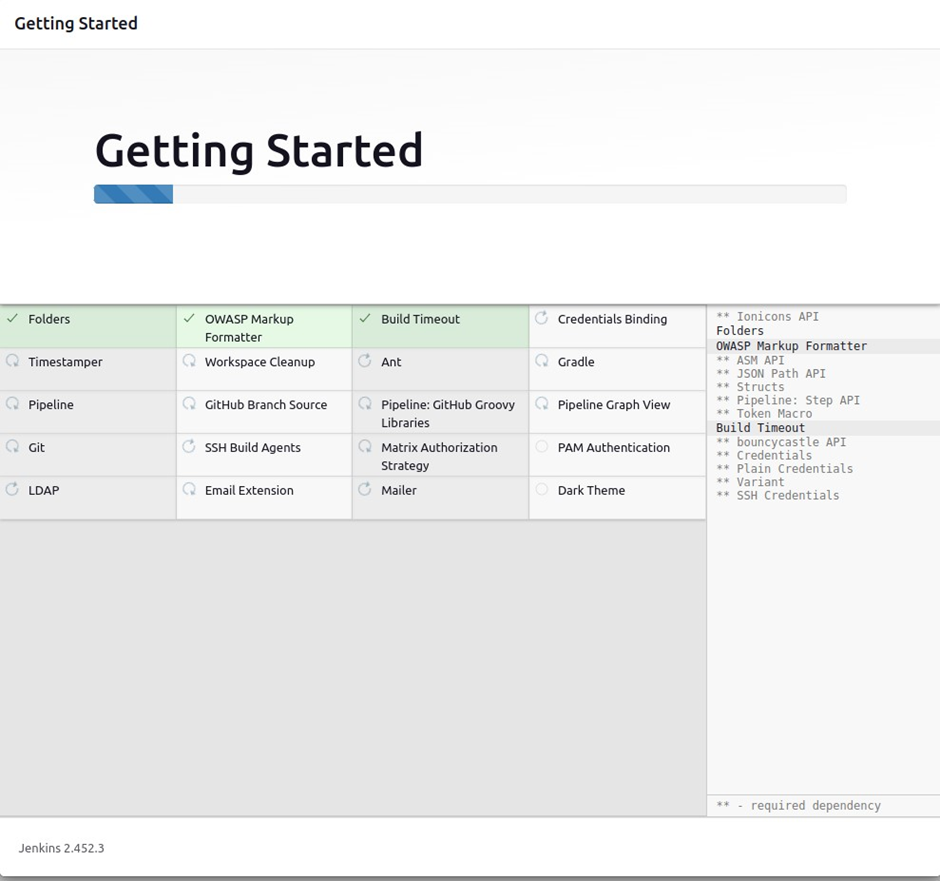
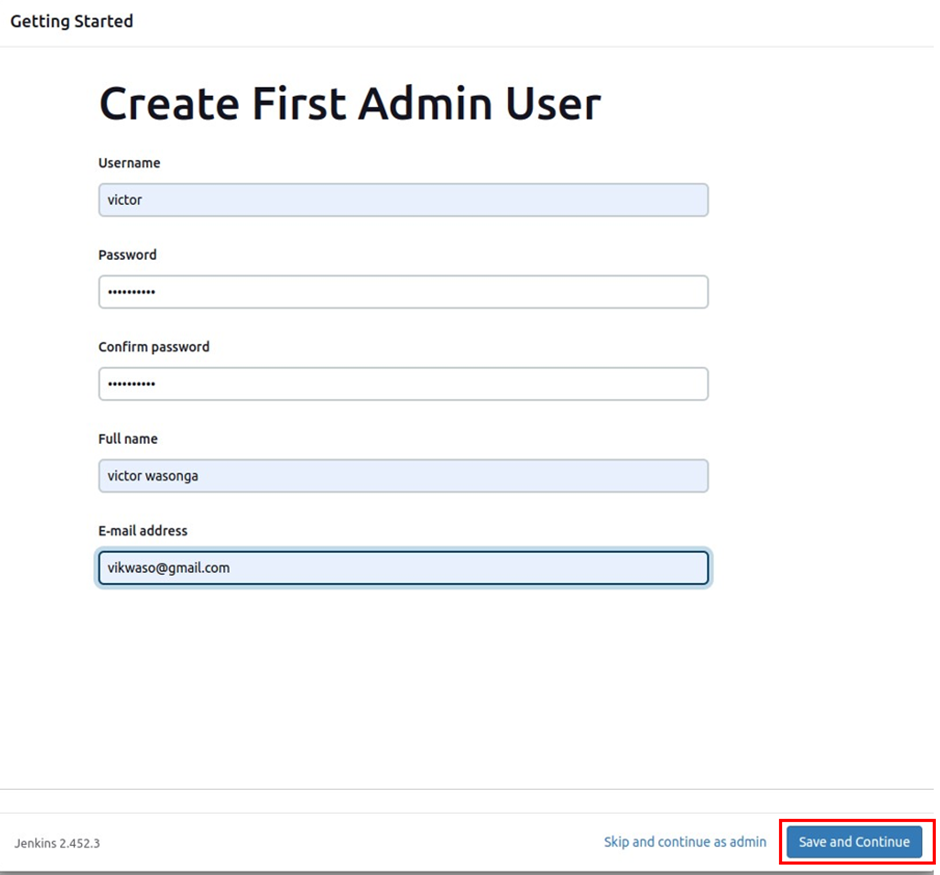
Create the first admin user by entering your details. Click save and continue.
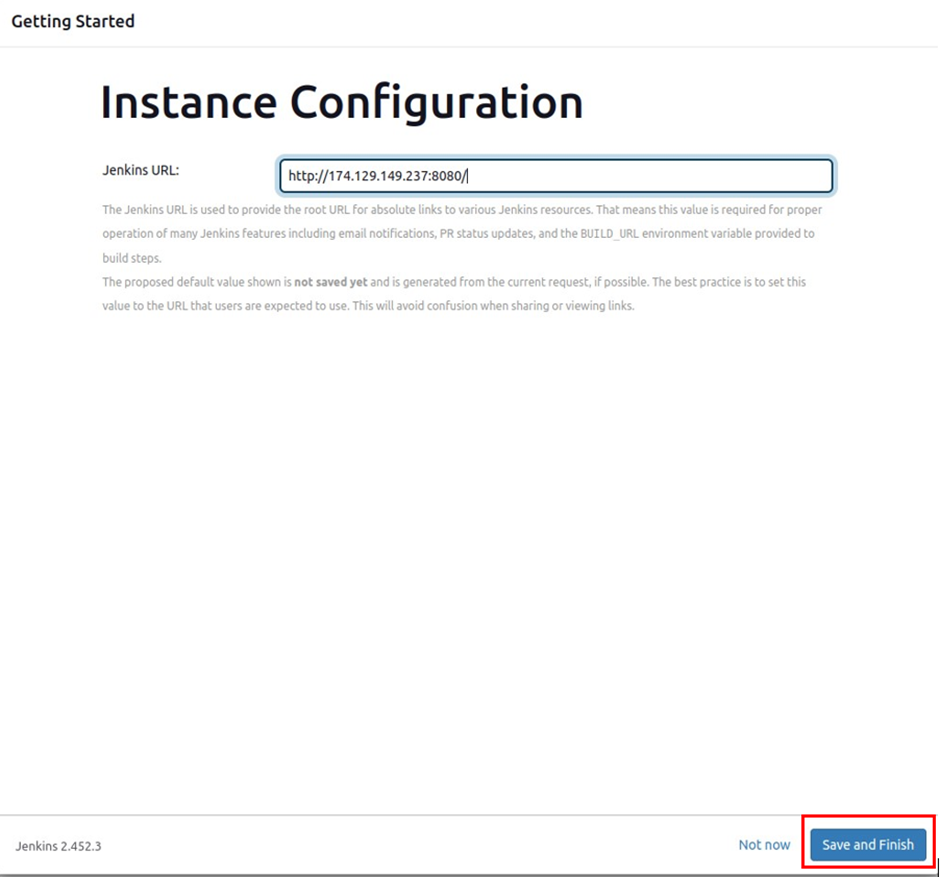
Click save and finish.
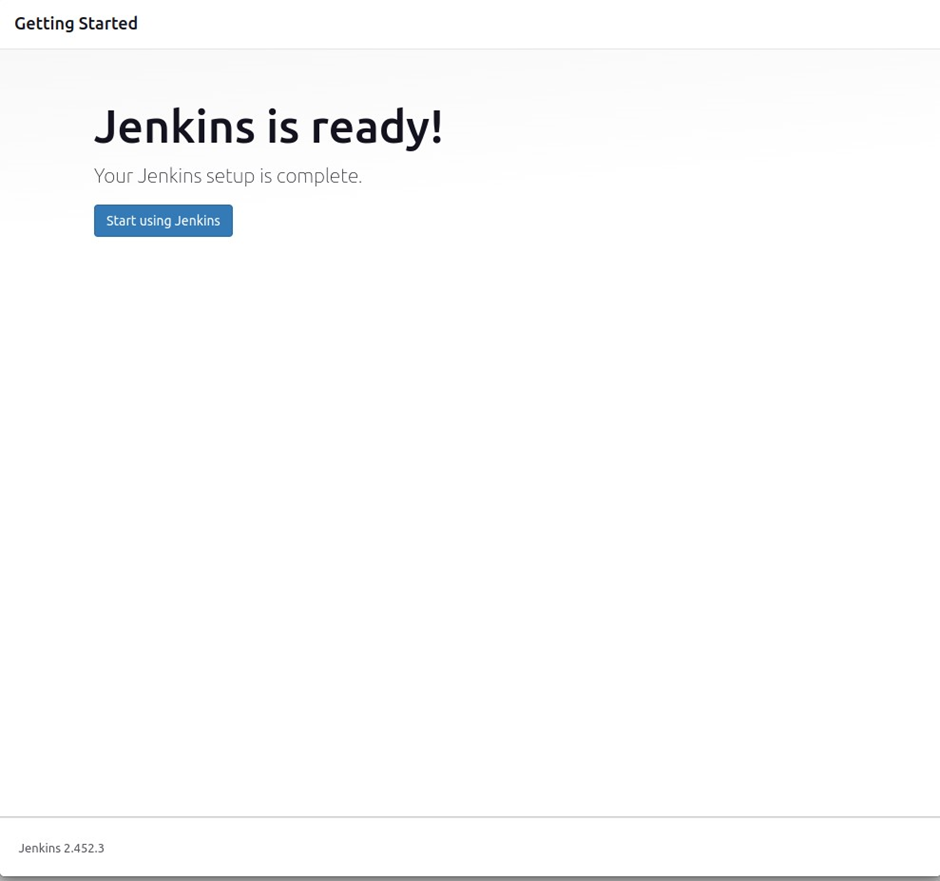
Success Jenkins is ready, click start using Jenkins.
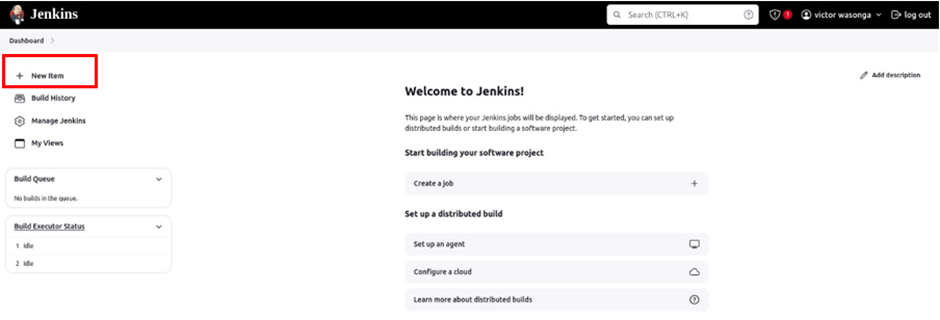
Create your first Jenkins job by clicking the new item.
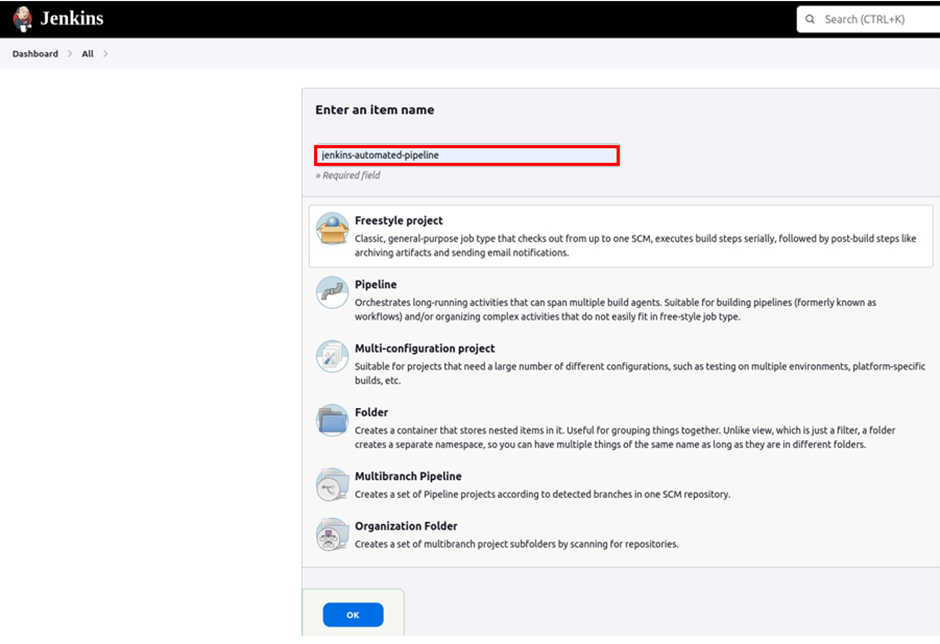
Enter name then select free style project. Scroll down and click ok.
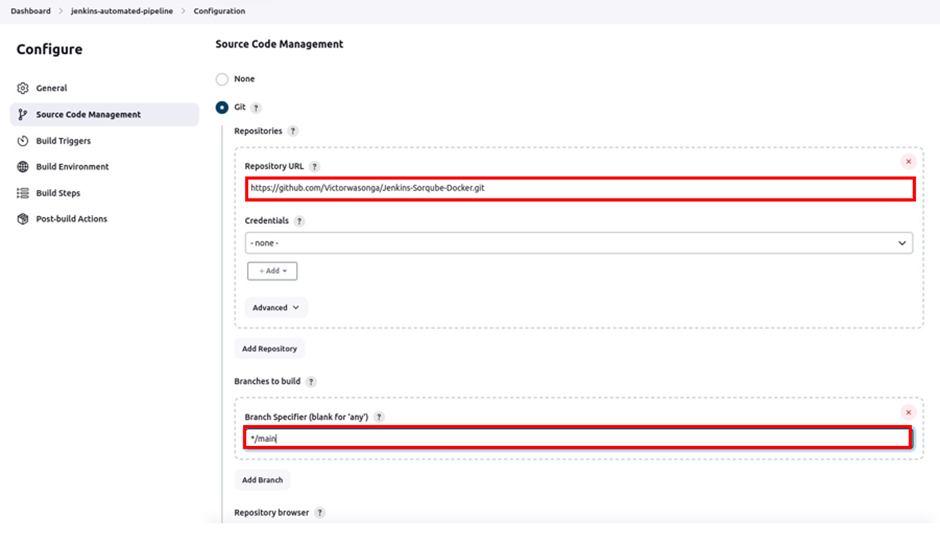
Under source code management select Git.
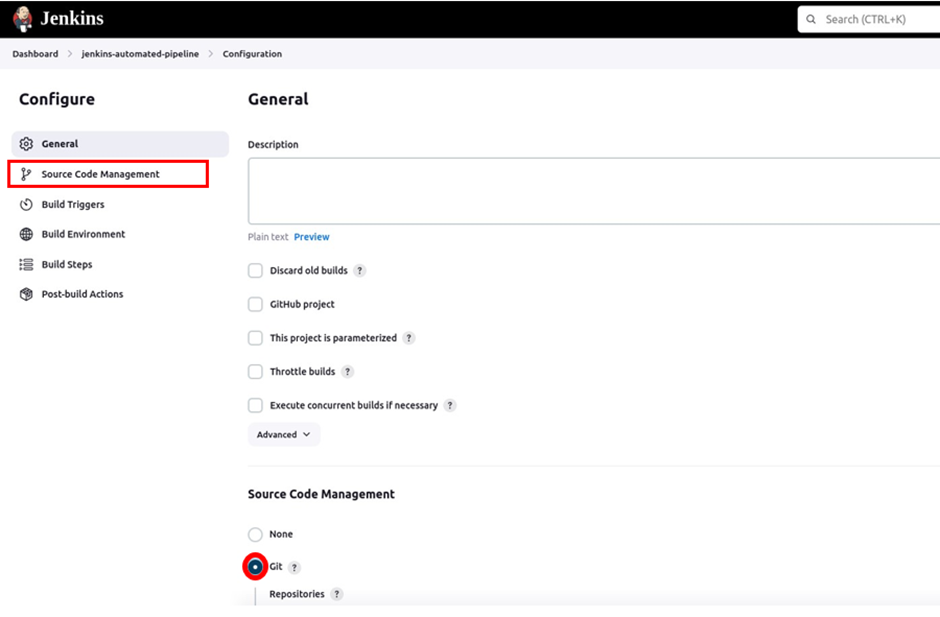
In the source code management UI, under the repository URL, make sure to paste your GitHub repository URL. Under branches, add your repo branch, my code resides in the main branch so I will select main then click save.
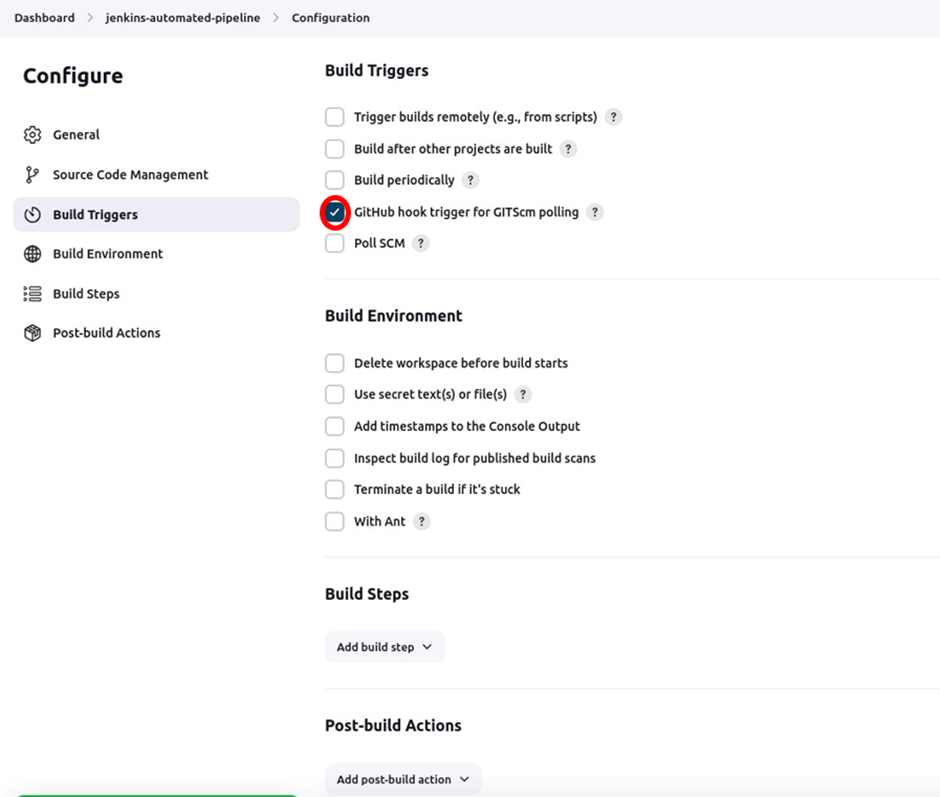
For your build triggers select “GitHub hook trigger for GITscm polling.’’ Scroll down and click save.
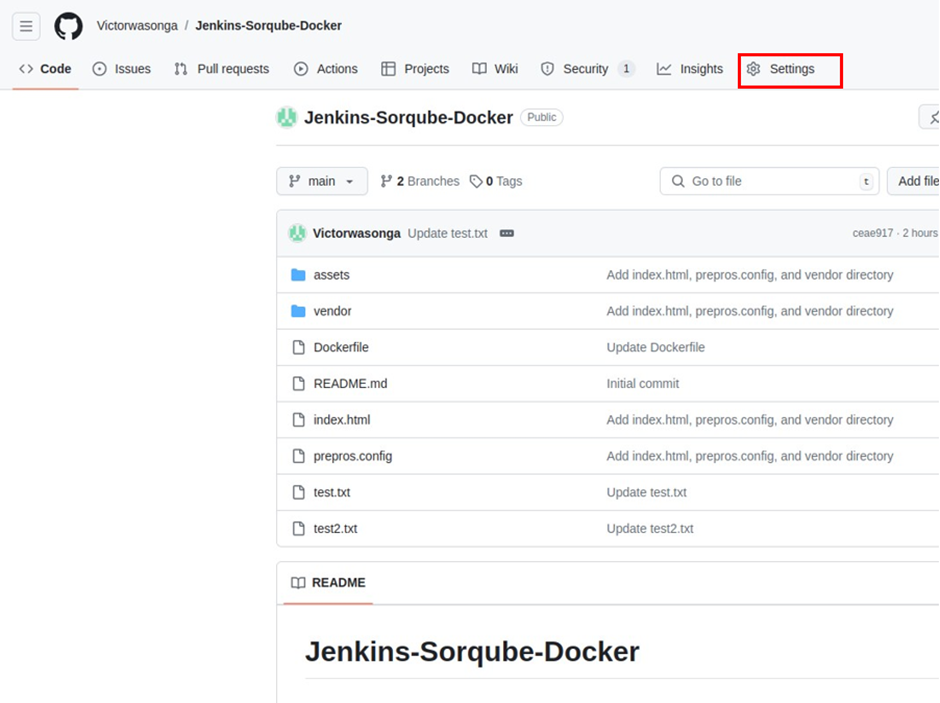
Let’s now go to our GitHub repository and make the following changes. Click Settings.
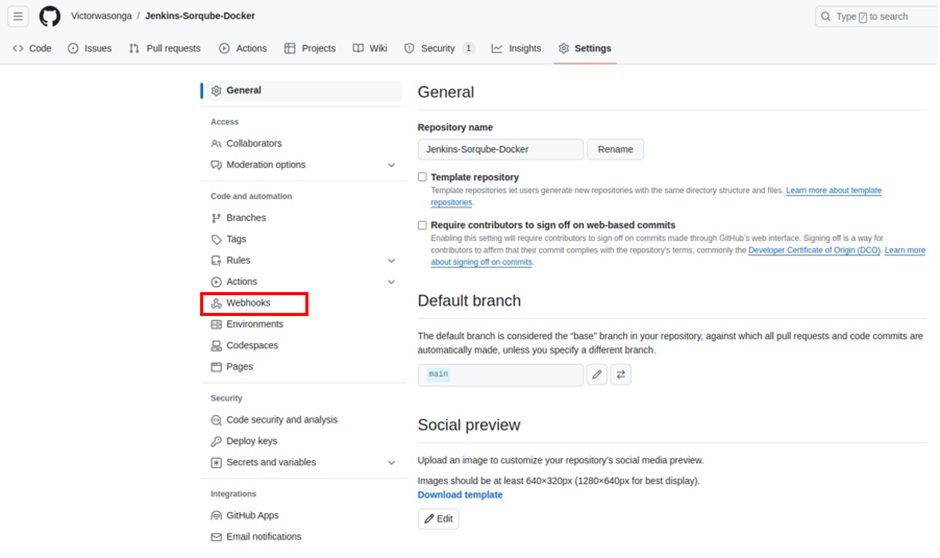
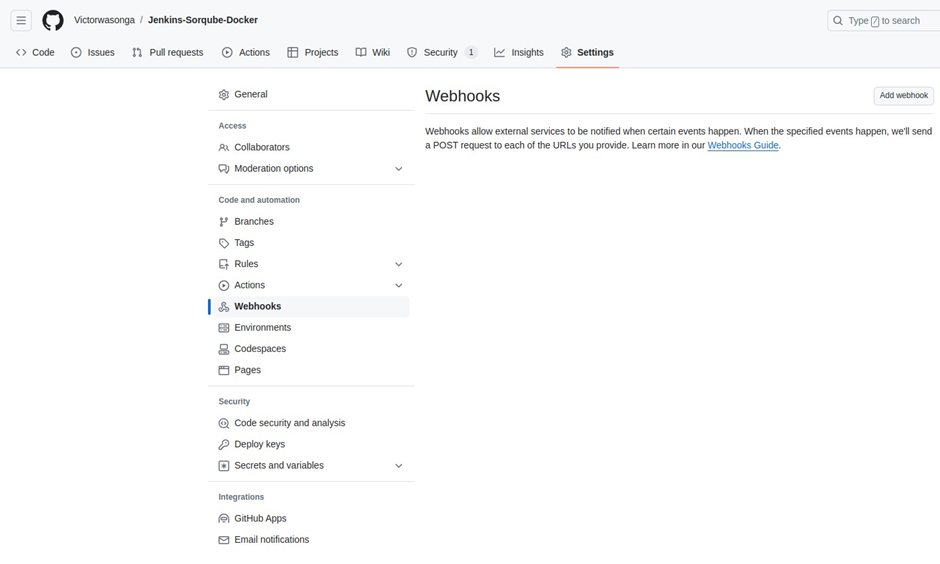
In the settings UI, scroll down and select webhooks.
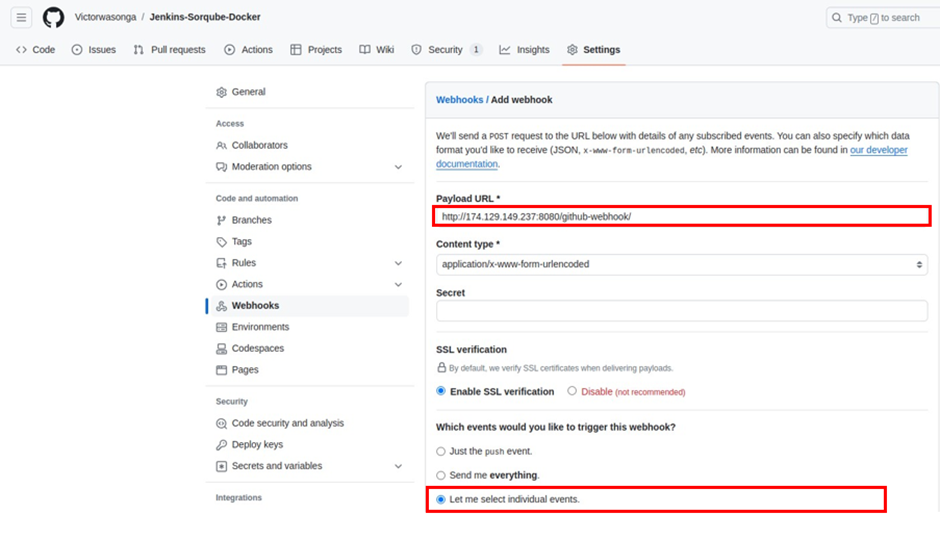
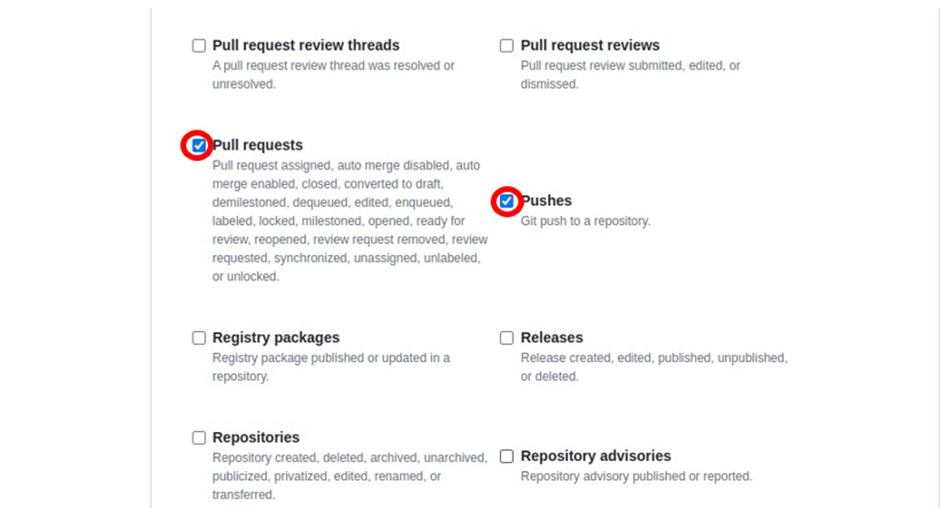
In the webhooks UI, under the payload URL, paste in your server IP in the format shown below. Then select the radio button for “let me select individual events,’’ then scroll down and select “pull request’’ and ‘pushes’ then click add webhook.
http://174.129.149.237:8080/github-webhook/
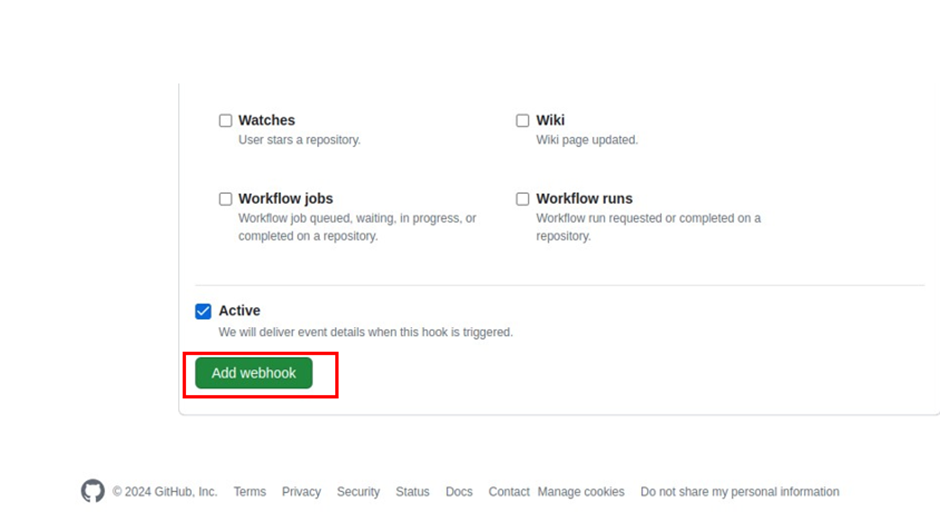
Webhook was added successfully.

Come back to the Jenkins project dashboard then click Build Now to test the pipeline. Underbuild history, you will see your first project is successful.
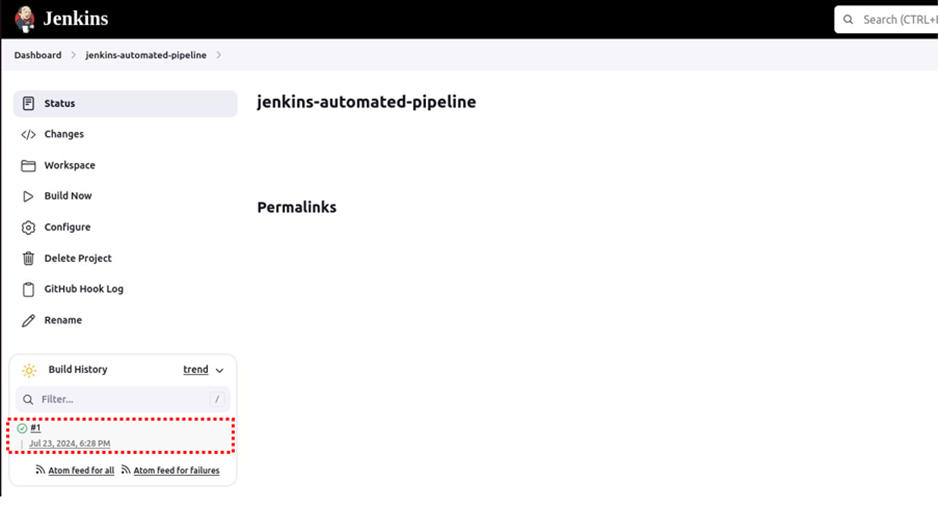
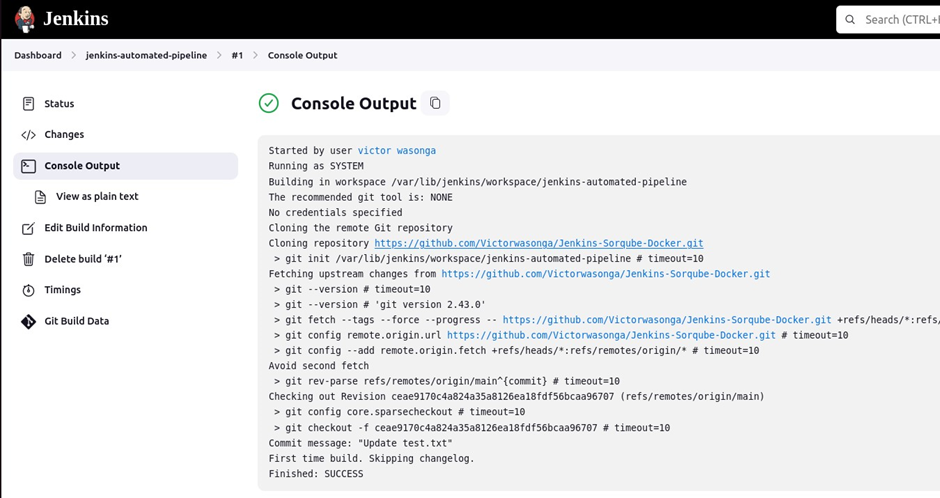
Click console output.
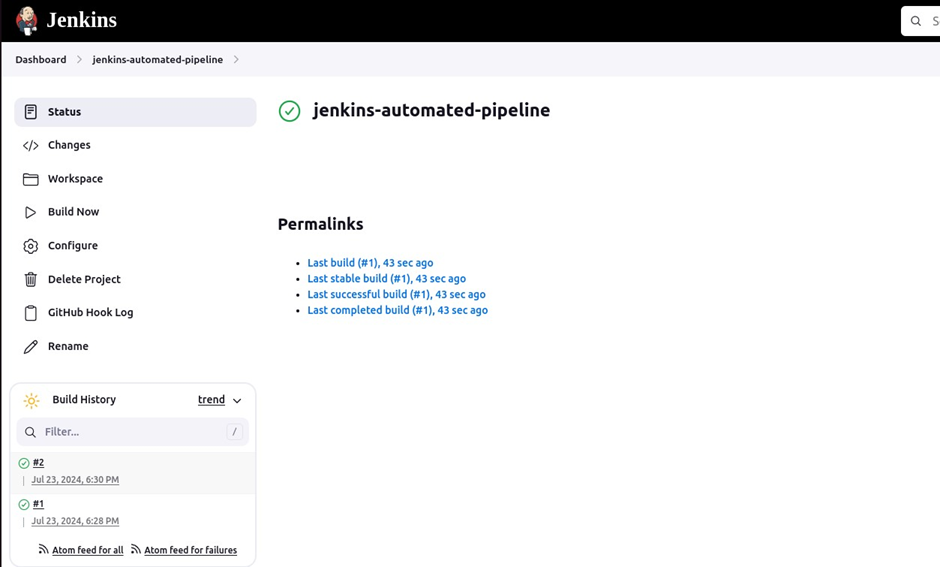
Testing the GitHub webhook by making some small changes to your repoitory then commit the changes. Jenkins will be triggered automatically.
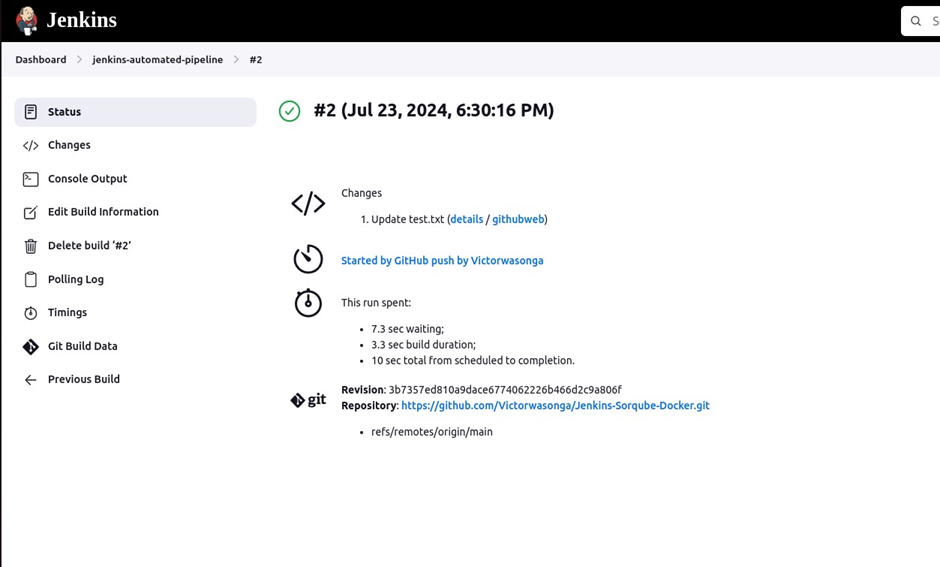
Confirm this by clicking the polling log.
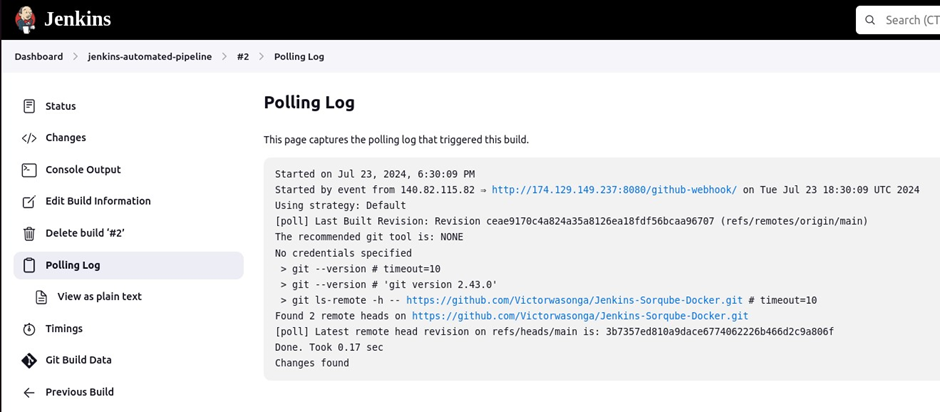
Now ssh into the SonarQube server.
#replace the IP address with your server IP
ssh -i web-SSHkeys.pem ubuntu@3.80.73.246

Let’s change the server hostname for easy identification.
sudo hostnamectl set-hostname Sonarqube-server
/bin/bash

Run update and upgrade.
sudo apt update

sudo apt upgrade -y

Install Java then use wget to download SonarQube.
wget https://binaries.sonarsource.com/Distribution/sonarqube/sonarqube-9.9.0.64466.zip

#run ls command in your terminal to list directory content.
ls
You can see the .zip file.

Install unzip
#run this command to install unzip
sudo apt install unzip

Unzip the .zip file.
#run this command in your terminal to unzip the .zip file
sudo unzip sonarqube-9.9.0.65466.zip

#run ls command again to list directory contents to see the unzipped file
ls

#run cd command to change directory into sonarqube-9.9.0.65466
cd
#again cd command to change to the bin directory
ls
#run ls command to list contents of bin directory
ls
#run cd command to change to linux-x86-64 directory
cd

#run ls command to list contents of linux-x86-64 directory
#execute the sonar.sh with either {console|start|force-stop|restart|status|dump}

./sonar.sh console

Remember SonarQube uses port 9000, if you have not updated it on your security group, go and make those changes.
access SonarQube in your browser.
#replace the IP address with your server IP
http://3.80.73.246:9000
The first credential for SonarQube is admin.
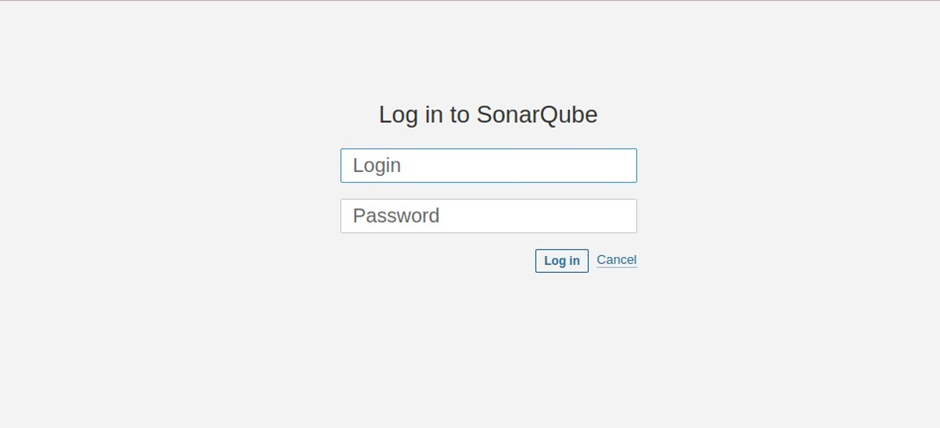
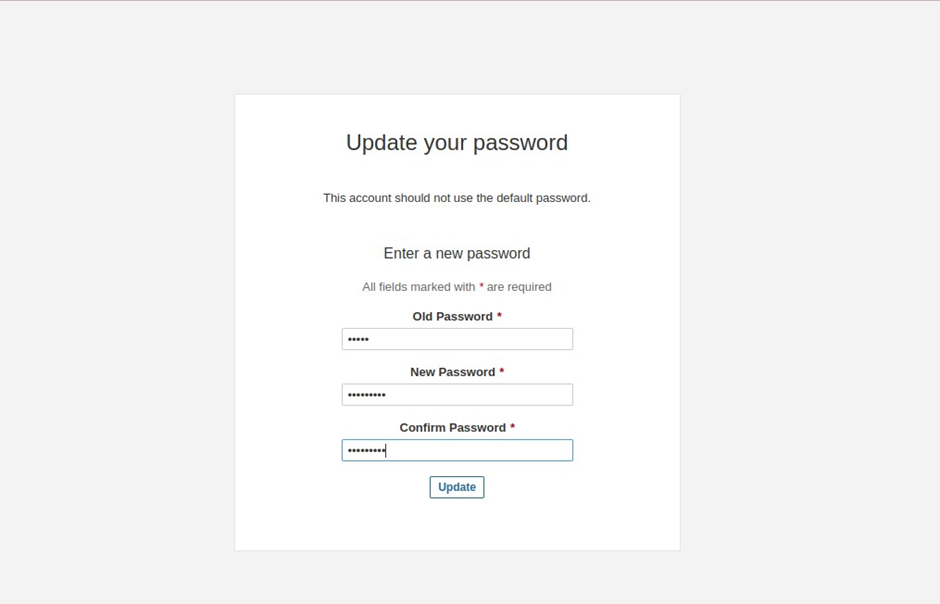
Fill in details then click update.
In the SonarQube UI, select manual.
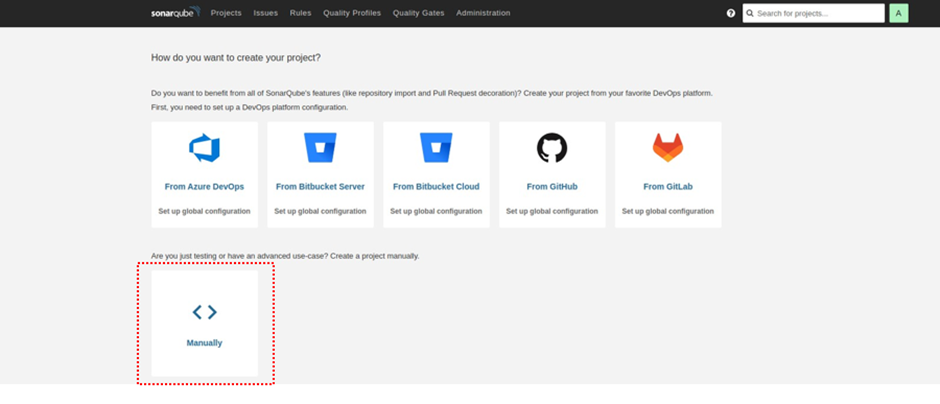
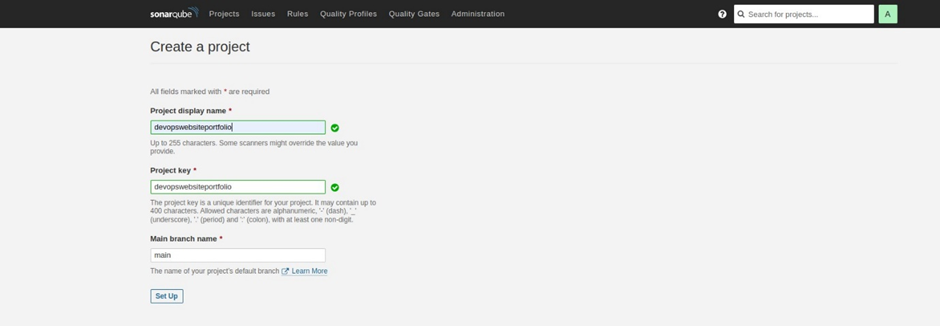
Enter the project display name then select set up.
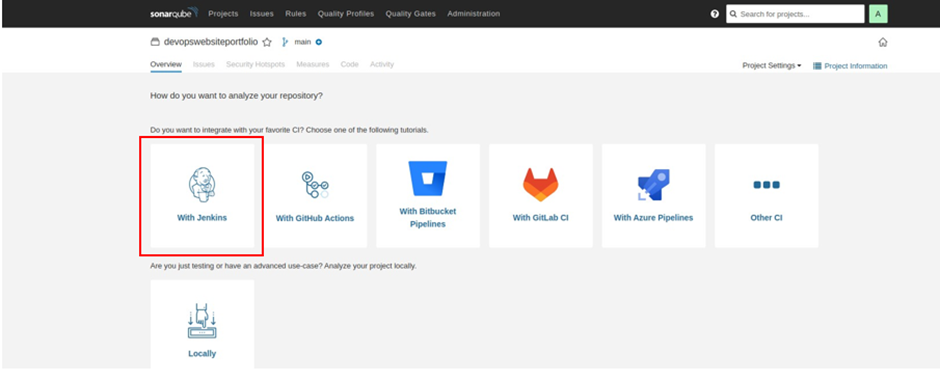
Select Jenkins as your CI.
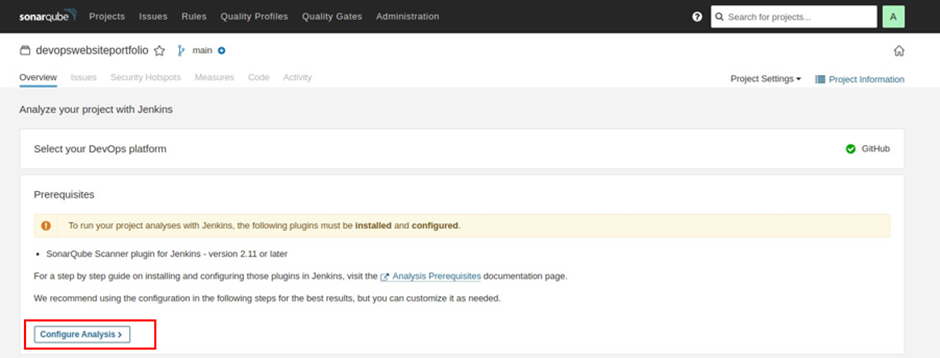
For the DevOps platform select GitHub.

Select configure analysis.
Select other.
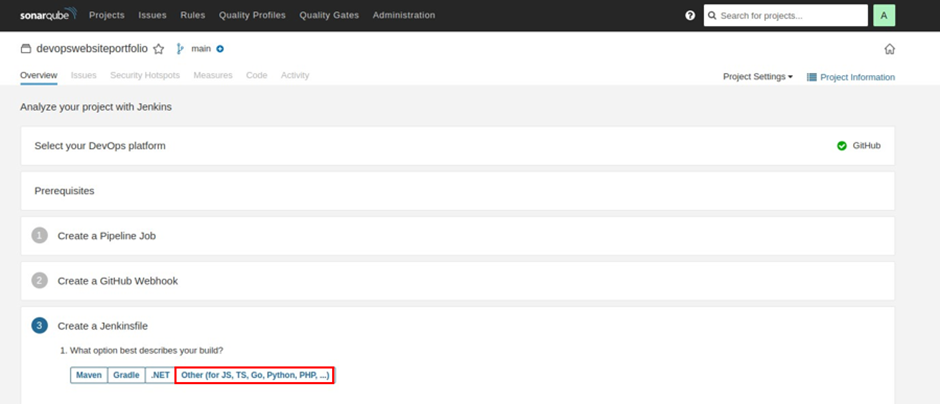
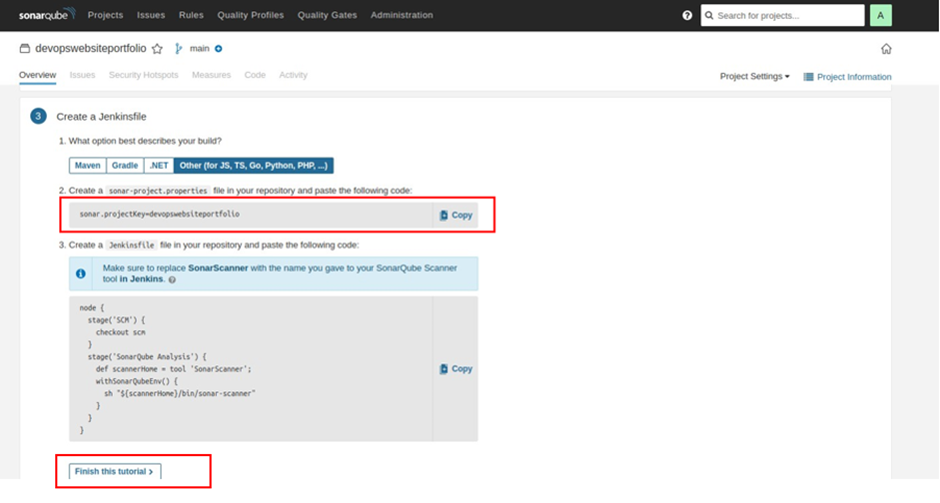
In the Create Jenkins file, under option two, copy the sonar. Project key to your clipboard. Then click this tutorial.
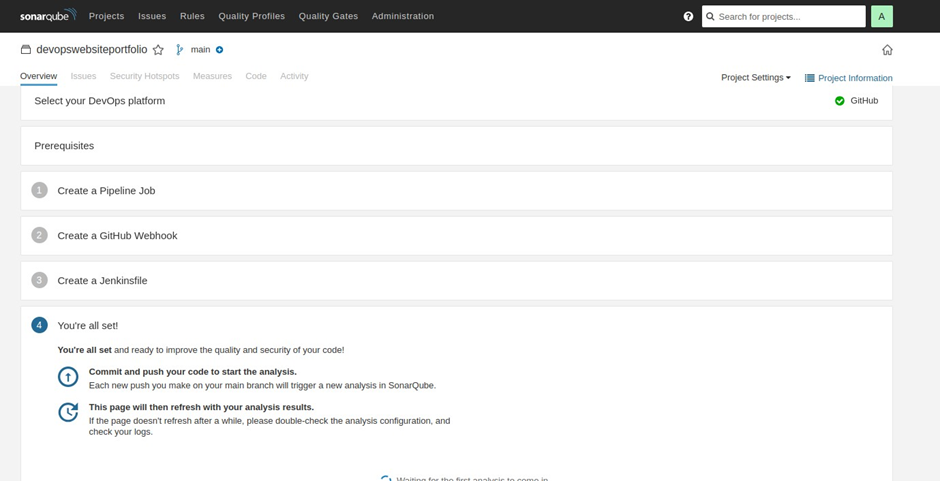
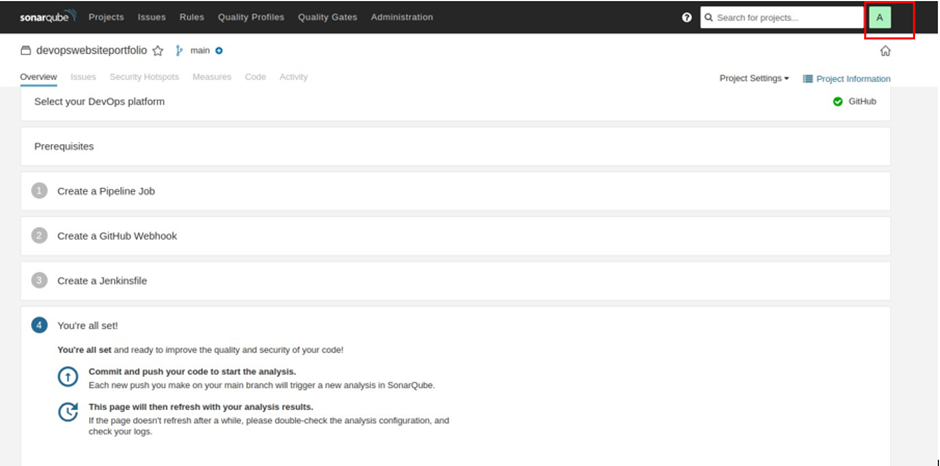
Select the A at the top right corner.
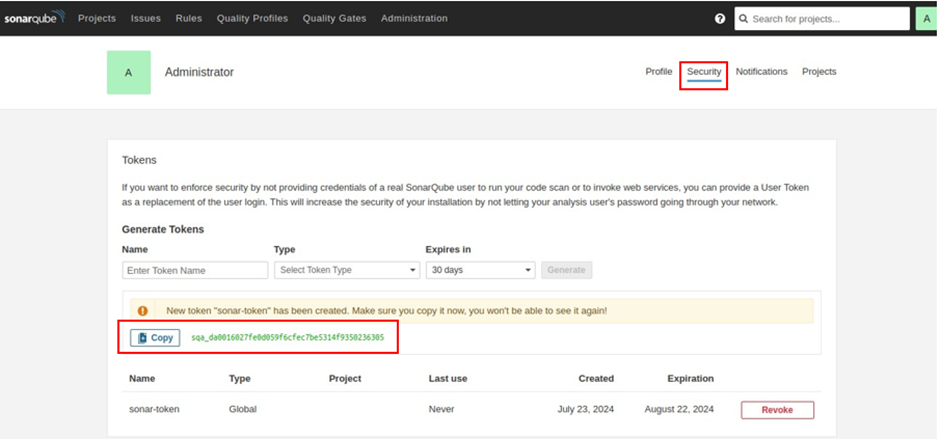
Navigate to the security tab, then under tokens, generate token, fill in the token name, select type and expiry date then select generate. Copy the token to your clipboard.
Let’s finish SonarQube installations by installing plugins to Jenkins. Select Jenkins dashboard.
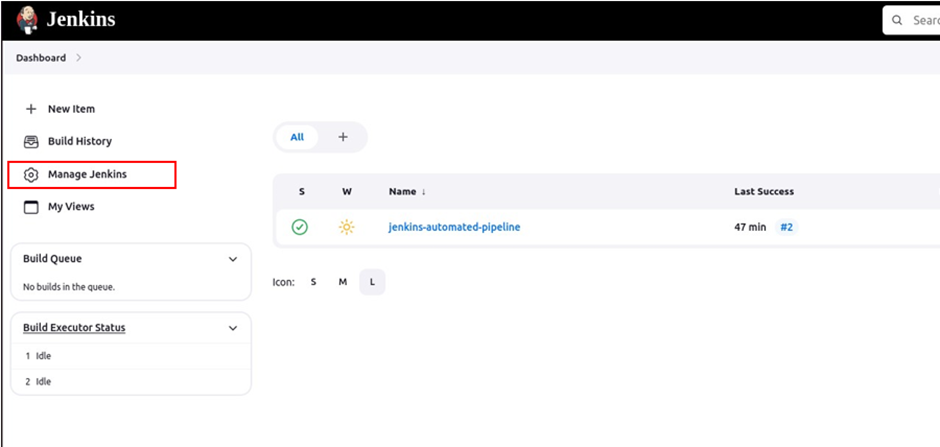
Go to manage Jenkins then select plugins.
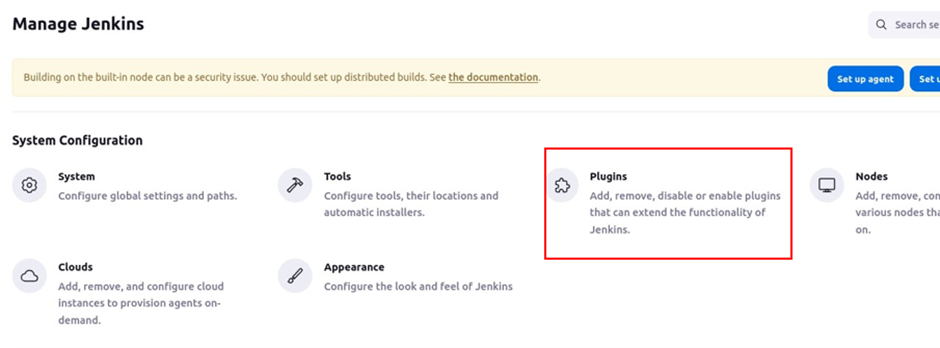
Select available plugins, select SonarQube scanner then click install.

Again search for SSH2 easy and click install.

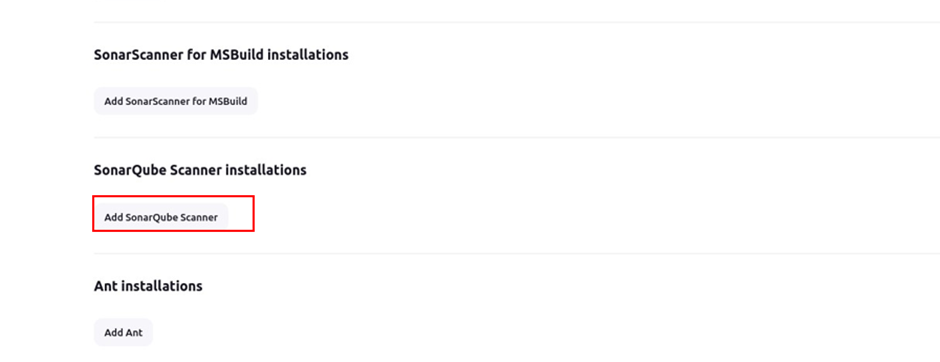
Back to the Jenkins dashboard, click Manage Jenkins then select System Configuration. Scroll down to SonarQube installations then click Add SonarQube scanner.

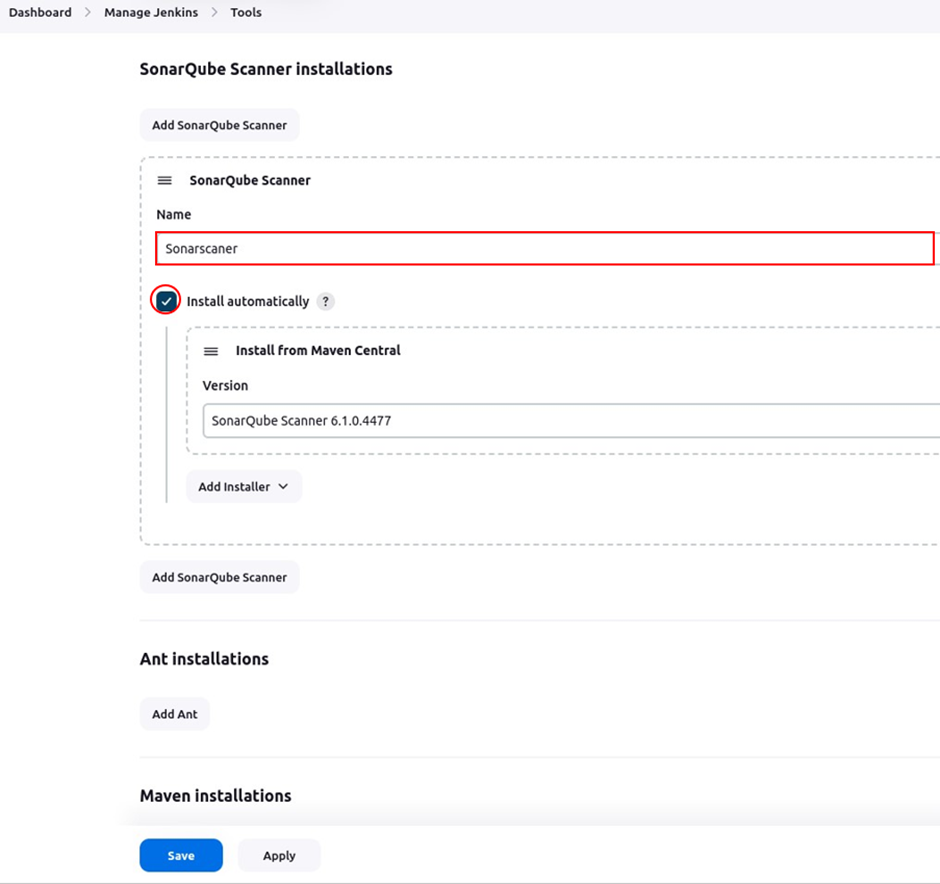
Give your SonarQube scanner a name under the name section then make sure the box for installation automatically is ticked. Scroll down then click save.
Come back to manage Jenkins UI, click configure system, then scroll down to the SonarQube servers section.
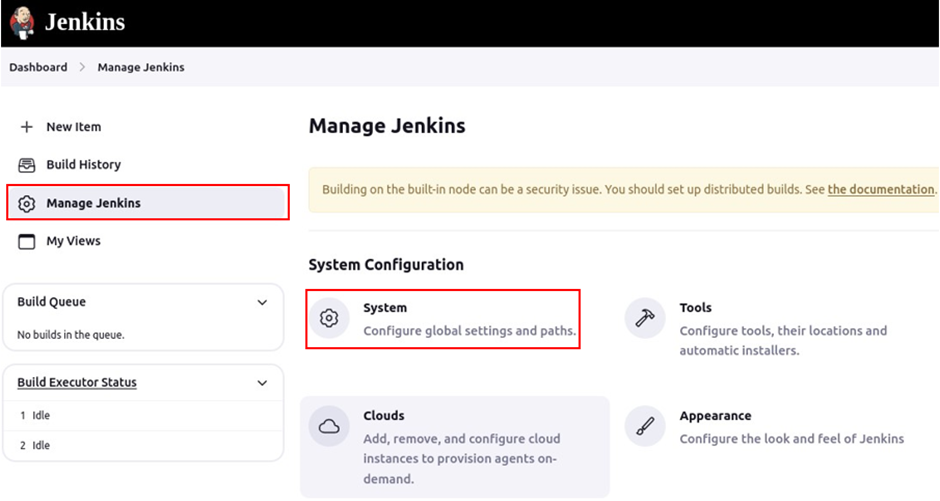
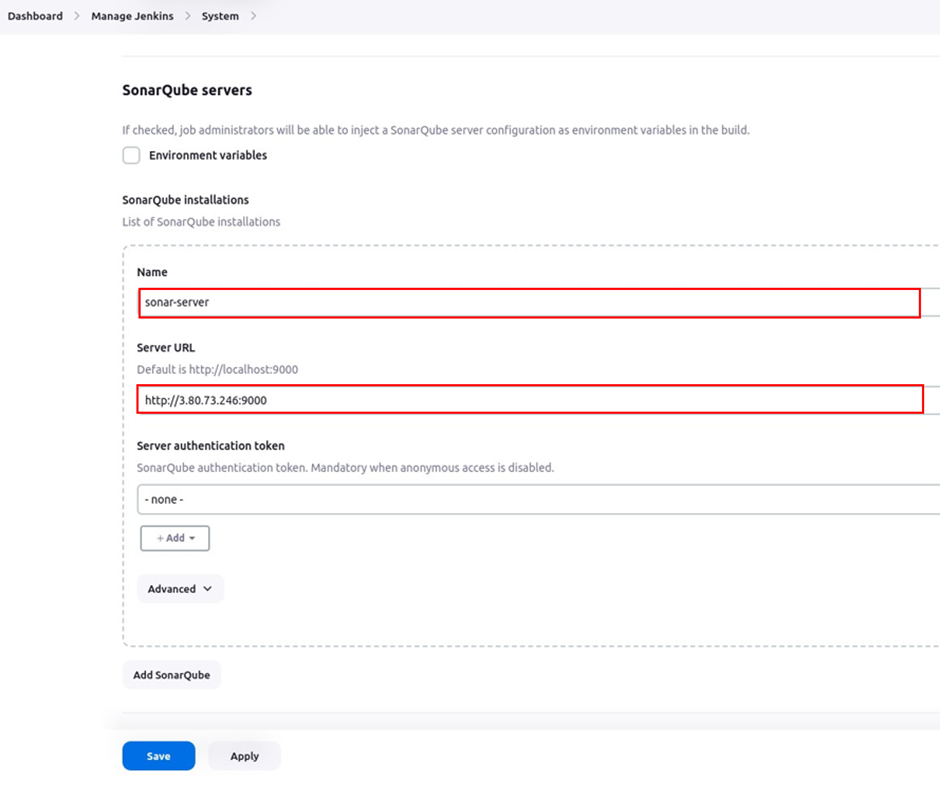
Click on Add SonarQube.

Name your SonarQube server under name, for server URL, paste in the URL of your server as below, click apply then save.
#replace server IP with your IP address
http://3.80.73.246:9000
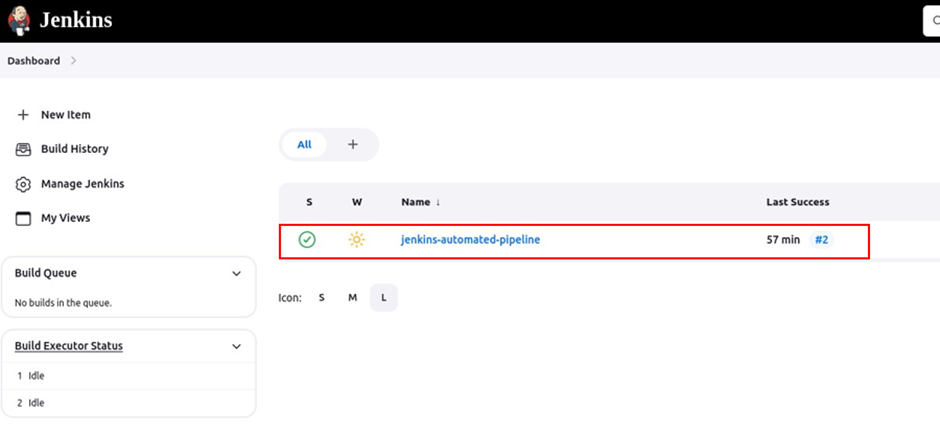
Come back to the pipeline.
Go to the configure system section.
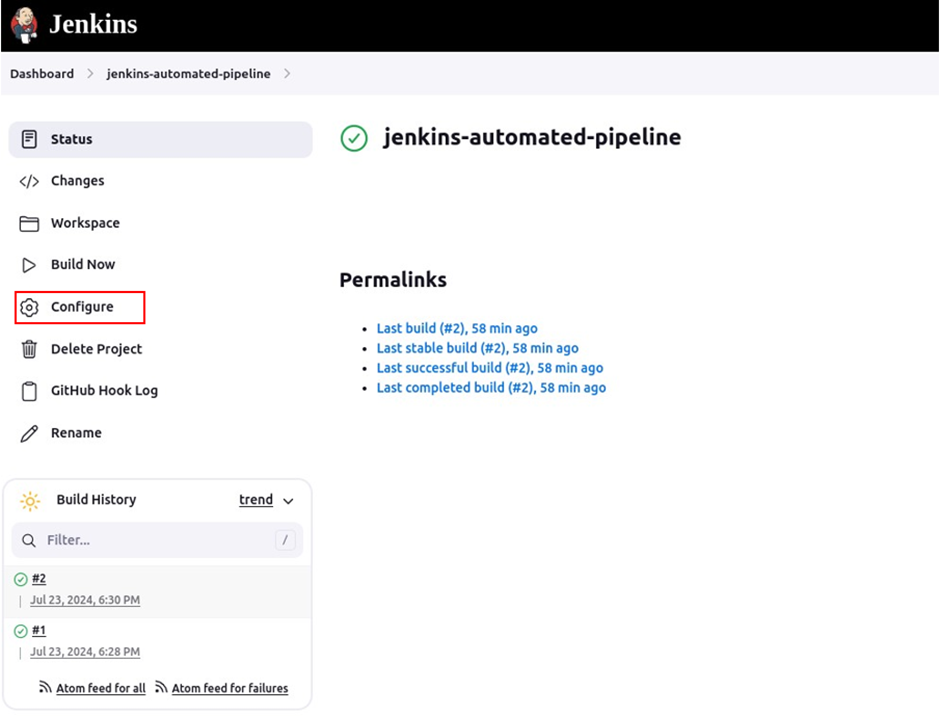
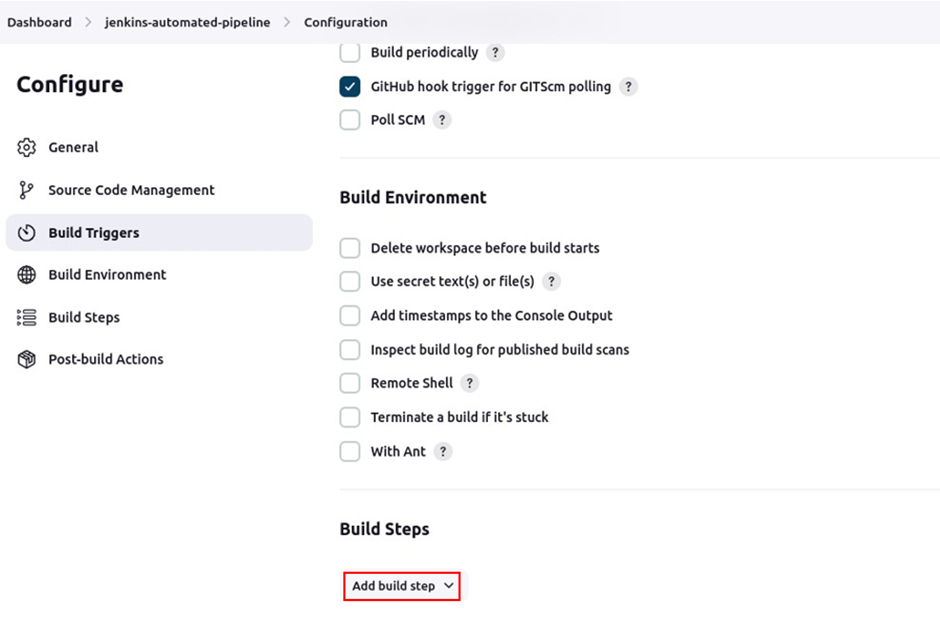
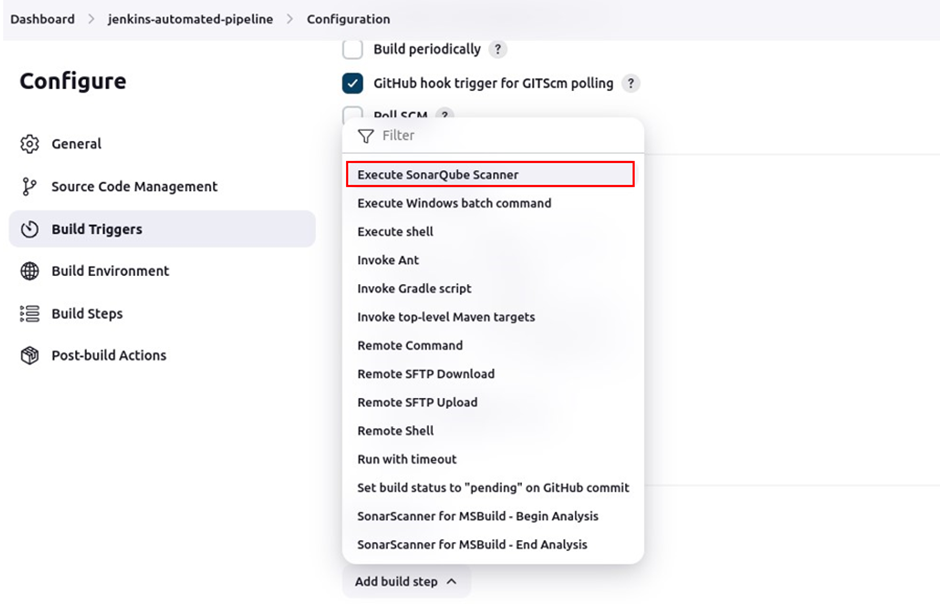
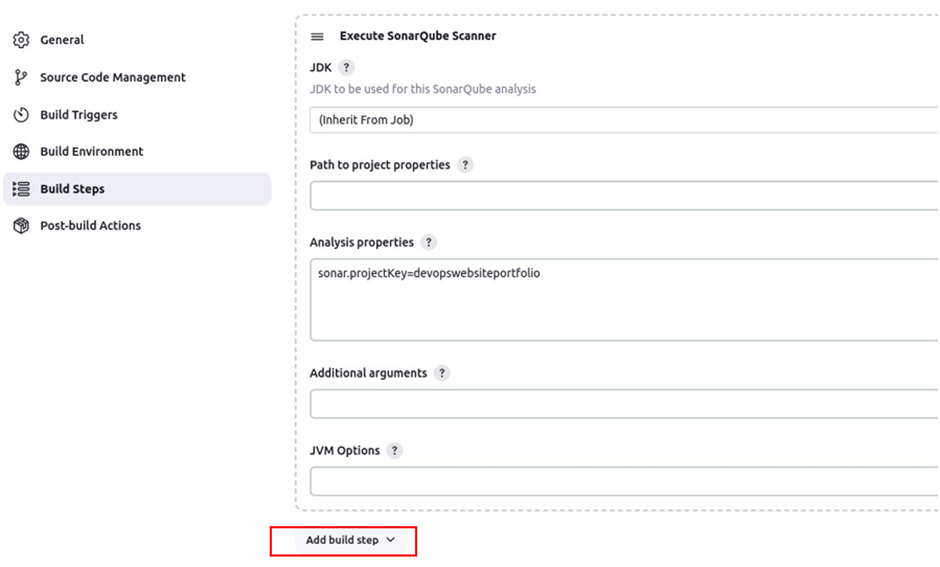
We will add a build step that will execute the SonarQube scanner. So move to the build step section click add build step then make sure you select execute SonarQube scanner.
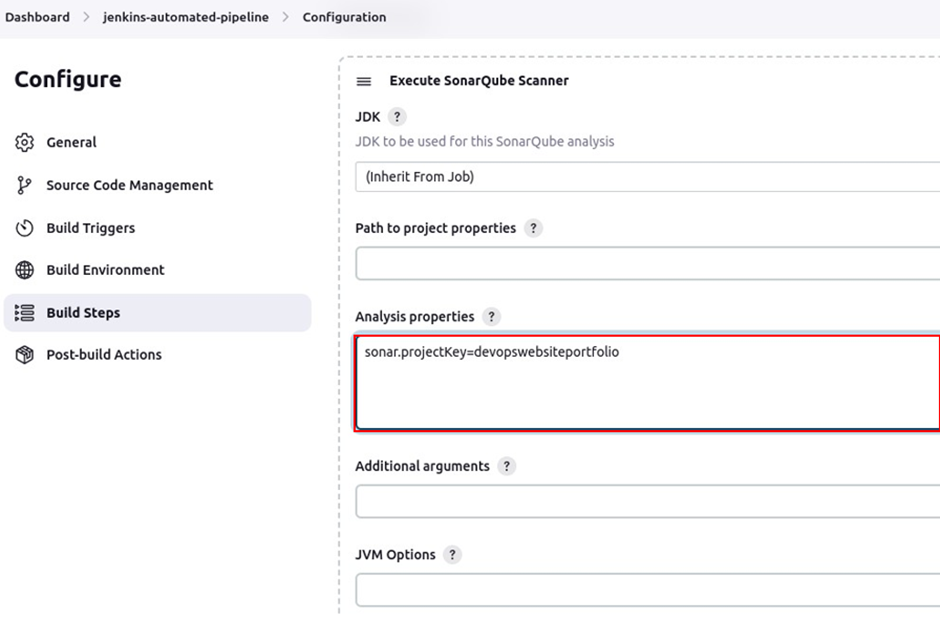
In the SonarQube scanner section under analysis properties, paste in the sonar project key you copied earlier, then click save.
Come back to manage Jenkins.
Click System Configure.
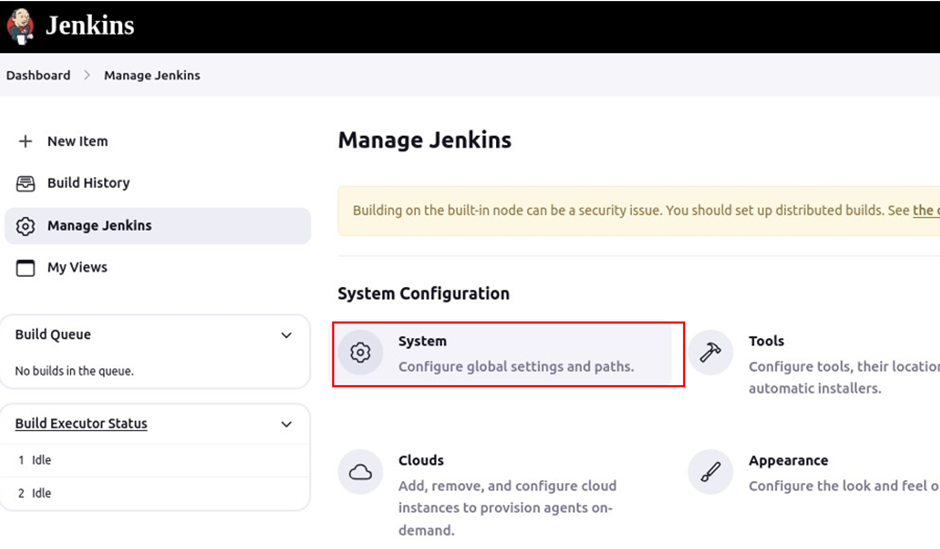
Enter the server authentication token. In the server authentication section, click the add drop-down button then select Jenkins.
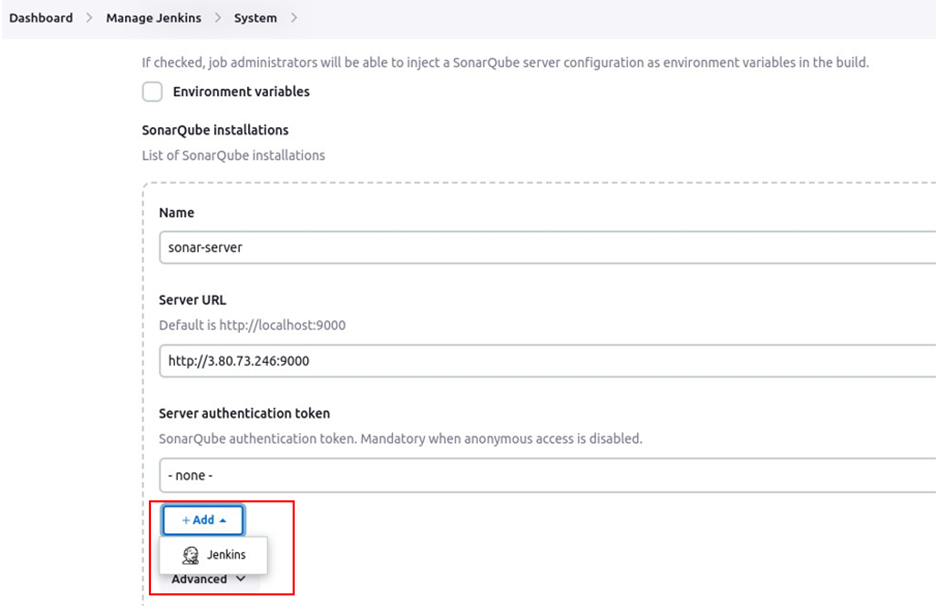
In the Jenkins credentials provider section, select the drop-down button under kind then select secrete text. Under secrete, paste in the secret token you copied earlier, in the ID section, give it a name then save it.
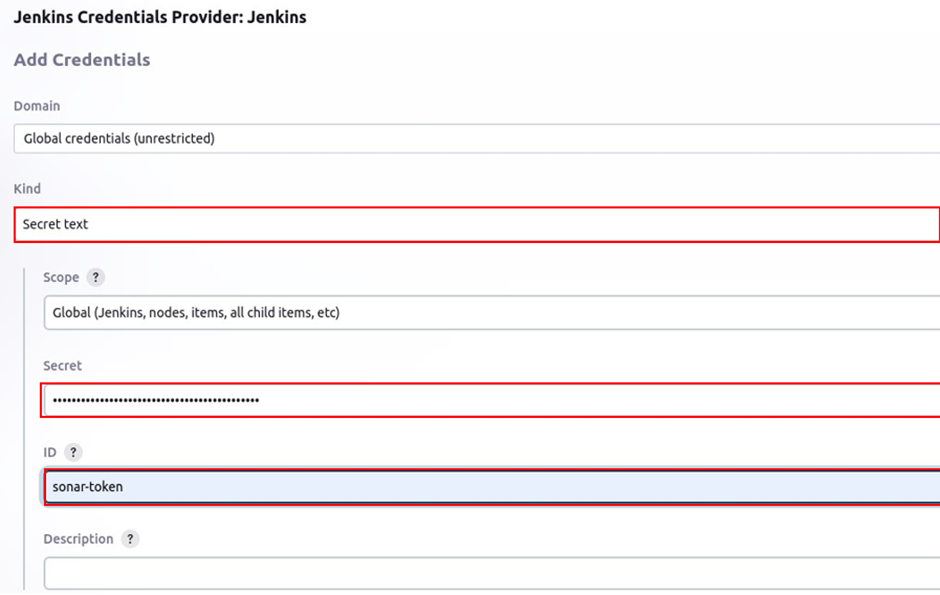
Again, select the drop-down button under server authentication token, select the token ID then click save.
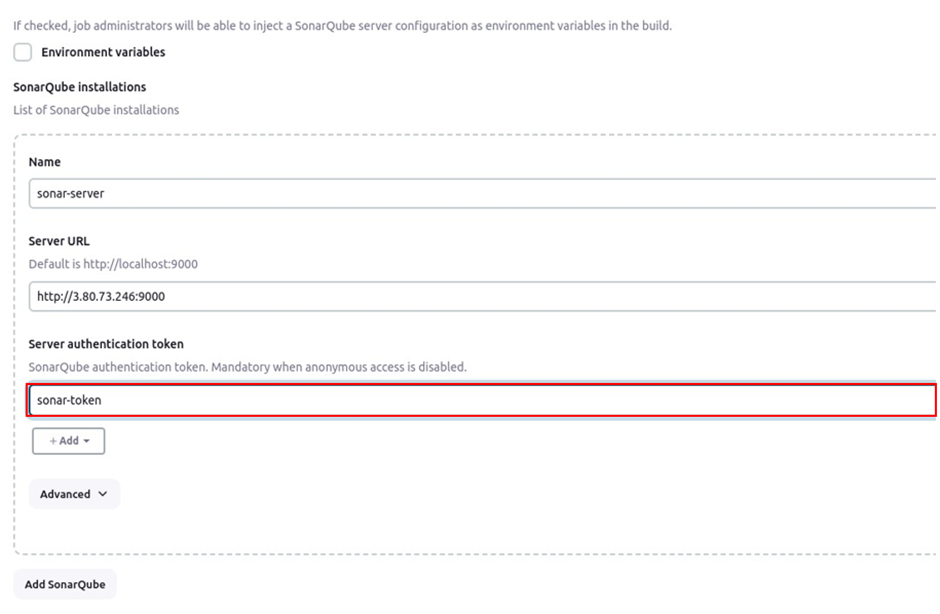
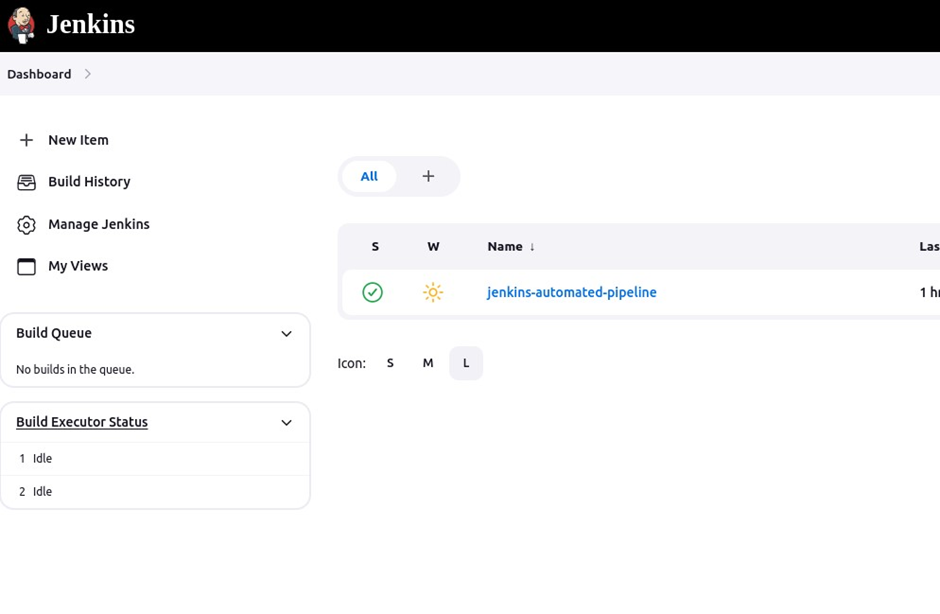
These are all the settings we need for SonarQube. Go back to the pipeline and click Build Now.
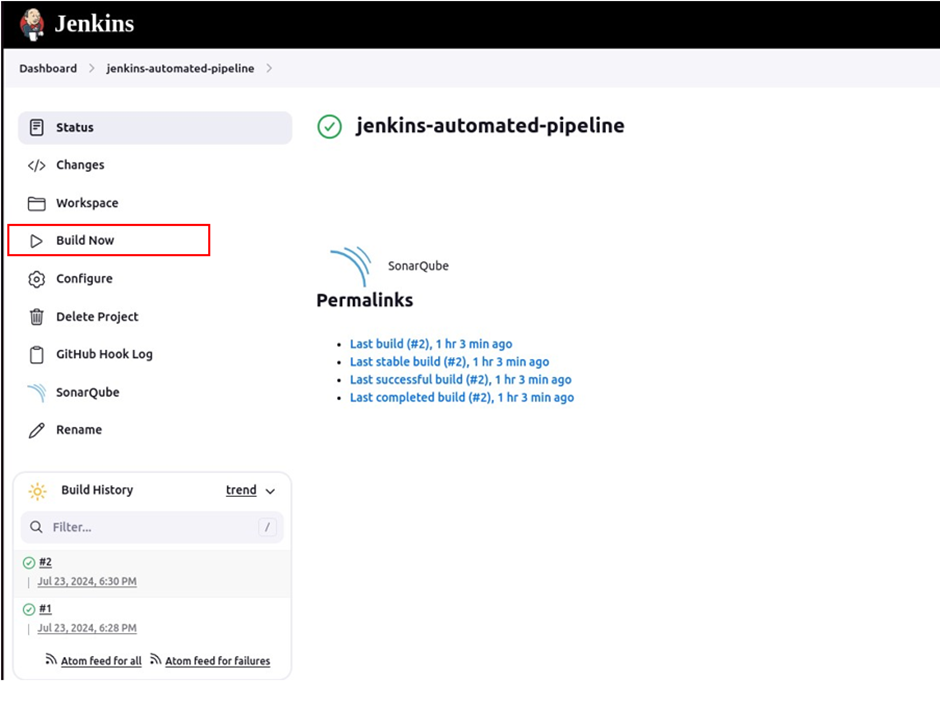
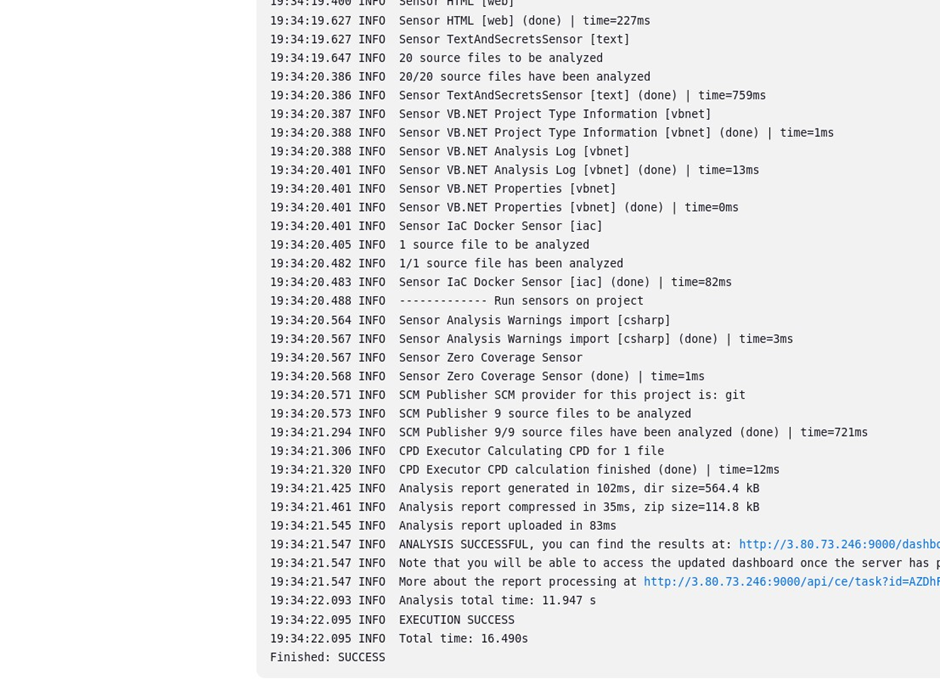
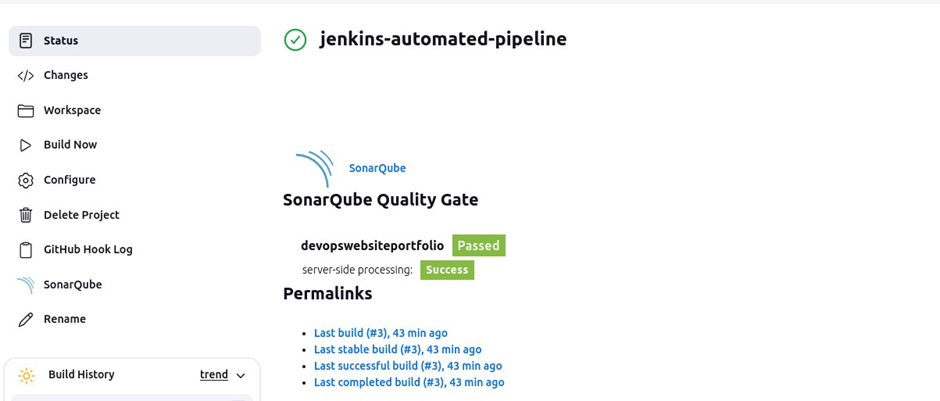
On clicking build now, SonarQube scanned the code and we can see a success.
Come to the SonarQube dashboard under projects, we can see our project passed. Once our code has passed, we will deploy it to the docker server.

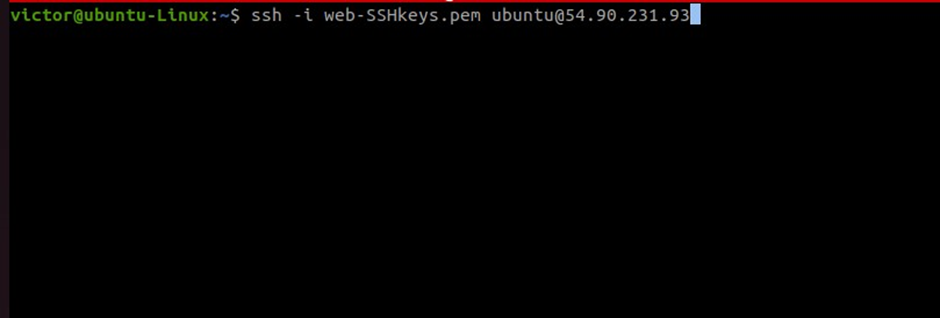
Now copy our docker server IP address and ssh into the docker server.
#replace the IP address with your servers IP
ssh -i web-SSHkeys.pem ubuntu@54.90.231.93
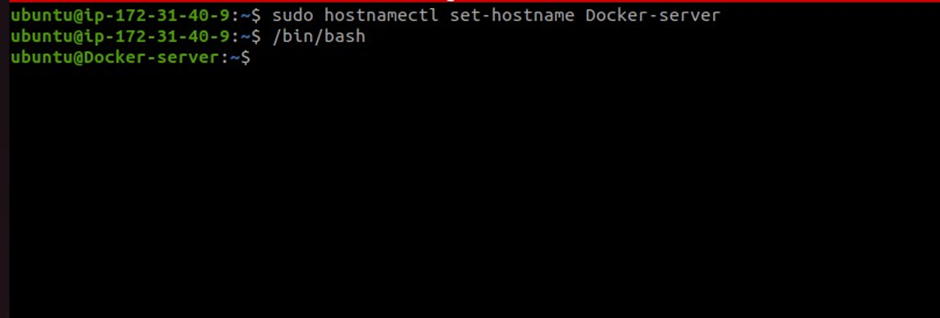
Give the docker server a new hostname, update and upgrade the server then install docker.
sudo hostnamectl set-hostname Docker-server
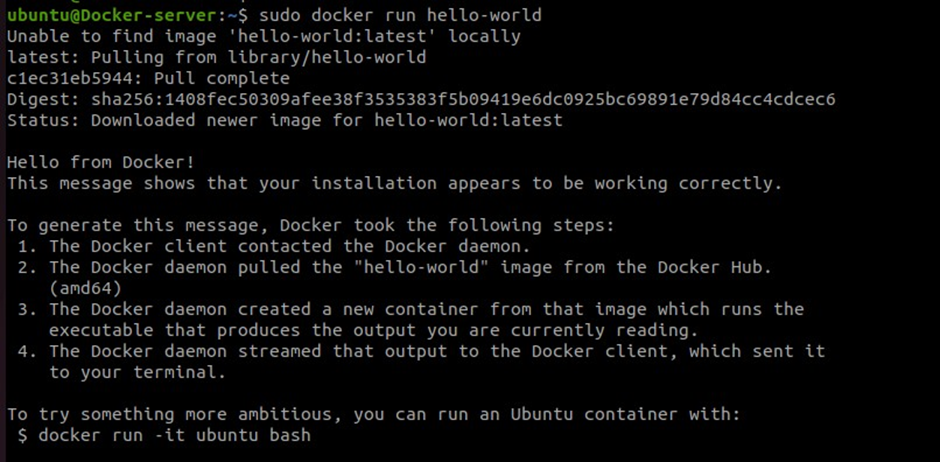
Test the docker installation by running Hello World.
#Set up Docker's apt repository.
# Add Docker's official GPG key:
sudo apt-get update
sudo apt-get install ca-certificates curl
sudo install -m 0755 -d /etc/apt/keyrings
sudo curl -fsSL https://download.docker.com/linux/ubuntu/gpg -o /etc/apt/keyrings/docker.asc
sudo chmod a+r /etc/apt/keyrings/docker.asc

# Add the repository to Apt sources:
echo \
  "deb [arch=$(dpkg --print-architecture) signed-by=/etc/apt/keyrings/docker.asc] https://download.docker.com/linux/ubuntu \
  $(. /etc/os-release && echo "$VERSION_CODENAME") stable" | \
  sudo tee /etc/apt/sources.list.d/docker.list > /dev/null
sudo apt-get update

#to install the latest version, run
sudo apt-get install docker-ce docker-ce-cli containerd.io docker-buildx-plugin docker-compose-plugin

#verify docker installation
sudo docker run hello-world

#add ubuntu user to docker group
sudo usermod -aG docker ubuntu
To enable passwordless authentication, let’s adjust a few configurations on the docker server.
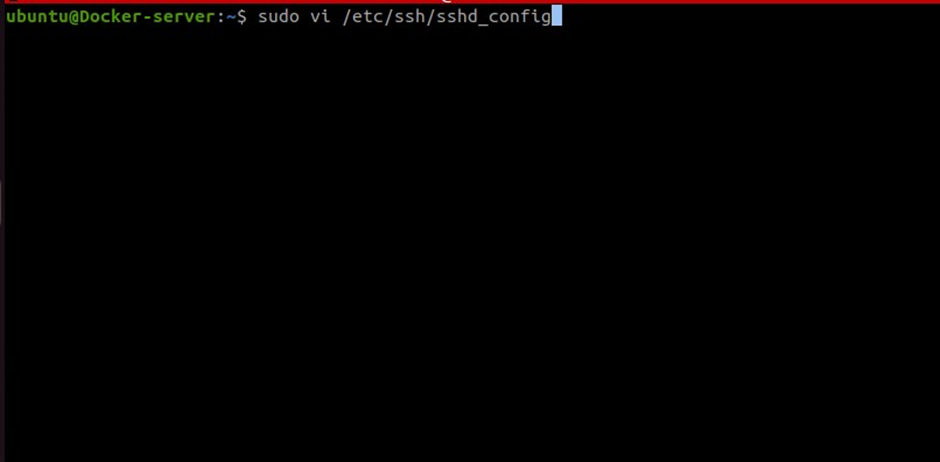
#run the following command in your terminal
sudo vi /etc/ssh/sshd_config
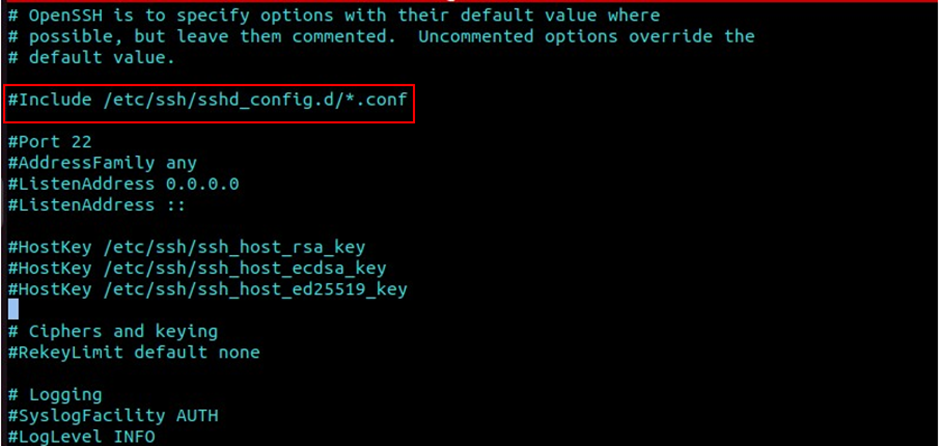
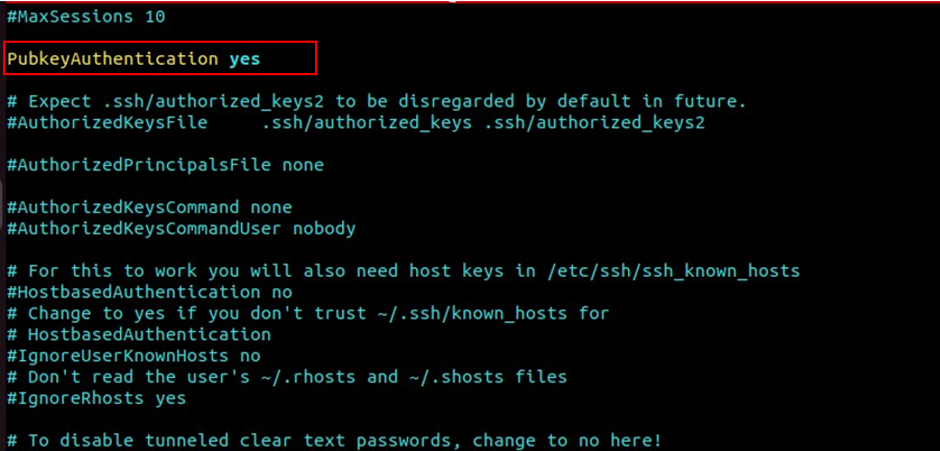
Make the following changes.
#comment include /etc/ssh/sshd_config.d/* .config
include /etc/ssh/sshd_config.d/* .config

#Include /etc/ssh/sshd_config.d/* .config

#uncomment pubkeyauthentication yes
pubkeyAuthentication yes

#uncomment pusswordauthentication yes
passwordlessAuthentication yes
Restart ssh service
#run this command in your terminal to restart ssh
sudo systemctl restart ssh
Switch back to the root user and set a password for the ubuntu user by running the following commands.
#switch to the root user
sudo su -
#change user ubuntu password
passwd ubuntu
#run exit to swith back to ubuntu user
exit

Go back to the Jenkins server and generate SSH keys for password-less authentication for the Ubuntu user in the docker server. Run the following commands
ssh-keygen -t rsa
#click enter till the end
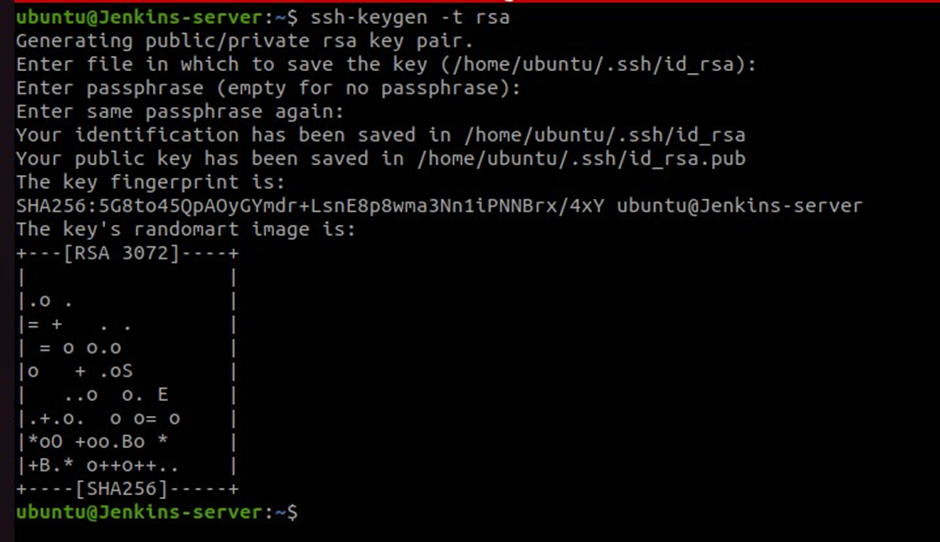
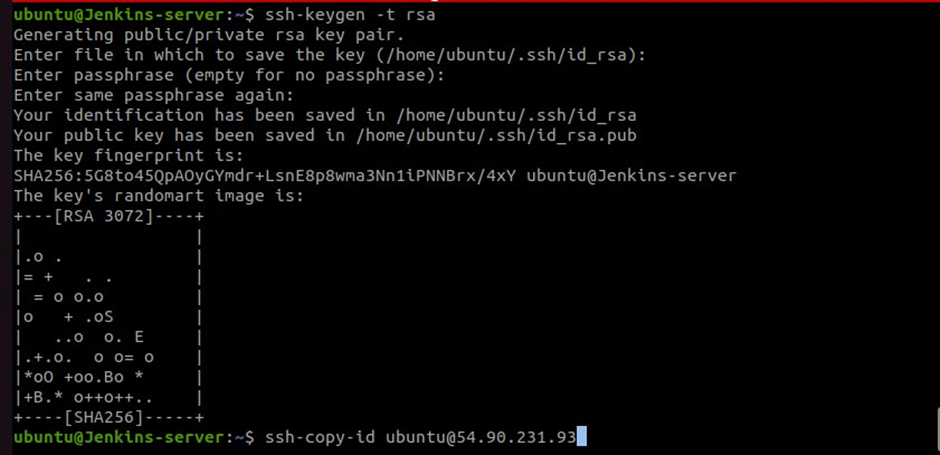
Copy the public keys to the docker server. run the below commands.
#replace the IP address with your server IP
ssh-copy-id ubuntu@54.90.231.93
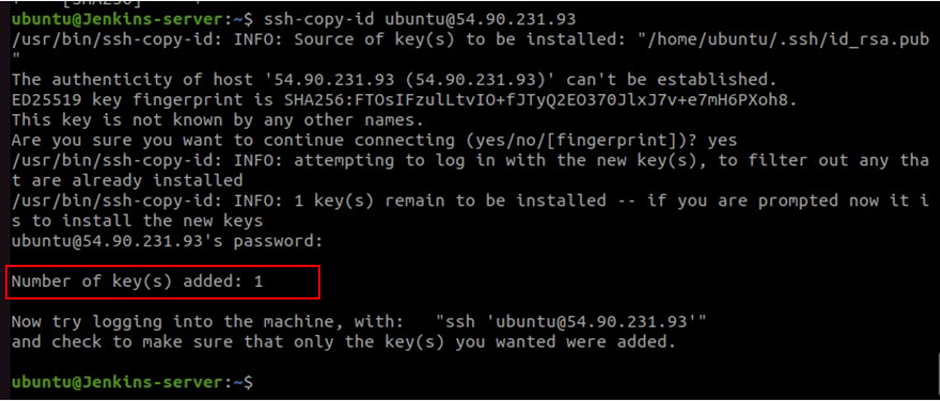
You will be prompted for a password, enter the Ubuntu user’s password in the docker server you just created. You will see number of keys added is one.
Confirm that you can SSH into the docker server from the Jenkins server.
#replace the IP address with your servers IP
ssh ubuntu@54.90.231.93

Come back to the Jenkins dashboard and click Manage Jenkins, then click configure system.
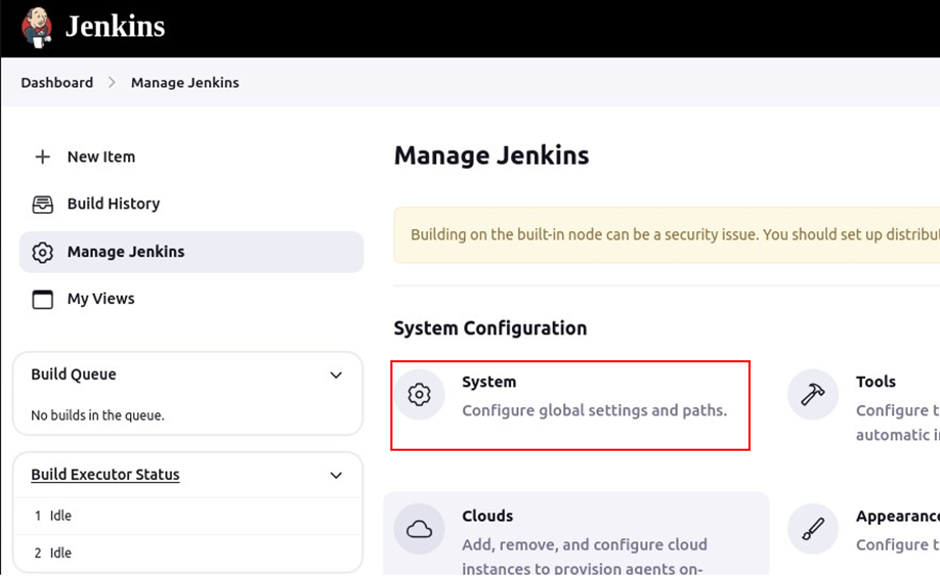
We will add the docker server so that it can execute remote commands. Scroll down and look for the server group center. Under the server group list, click add.
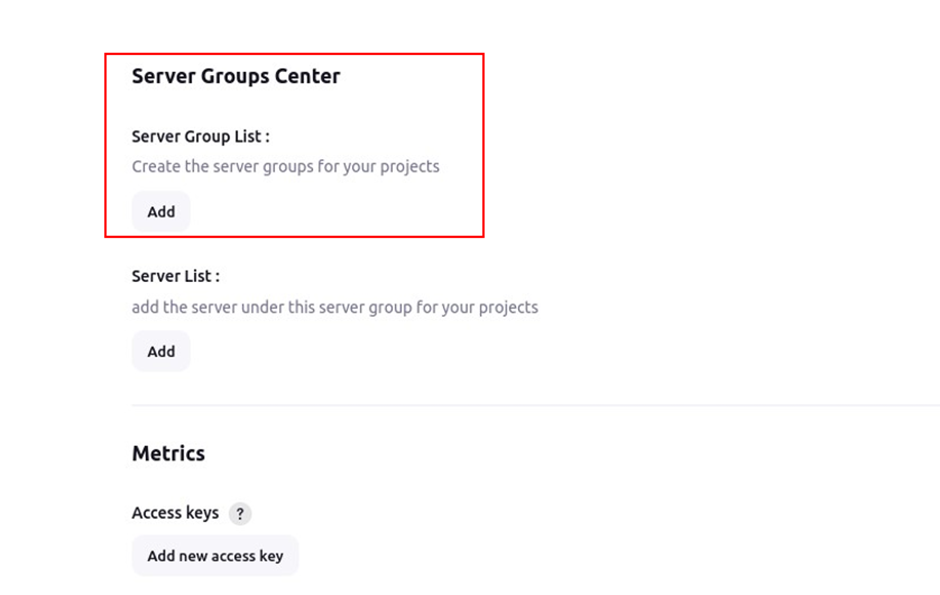
Enter details, for the group name, ssh port, user name, and password, give it the password you created for the Ubuntu user then click save.
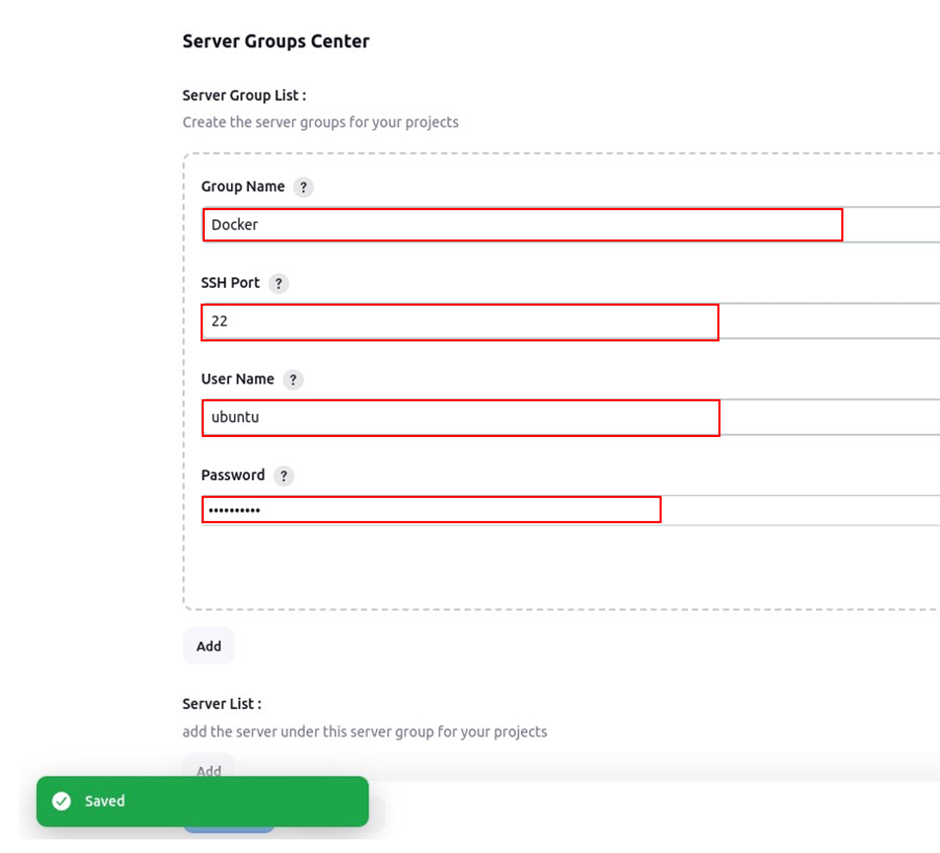
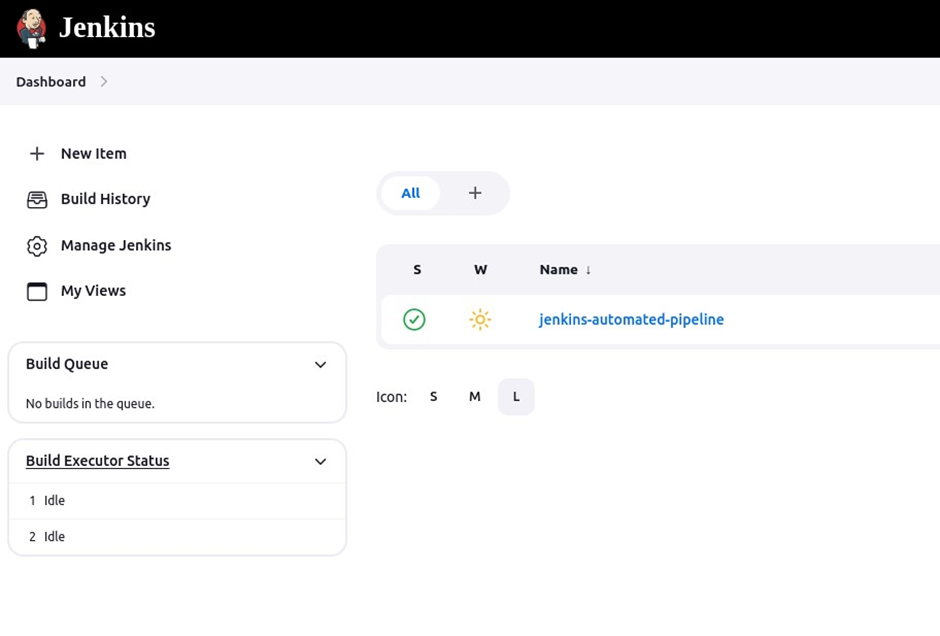
Go back to managing Jenkins
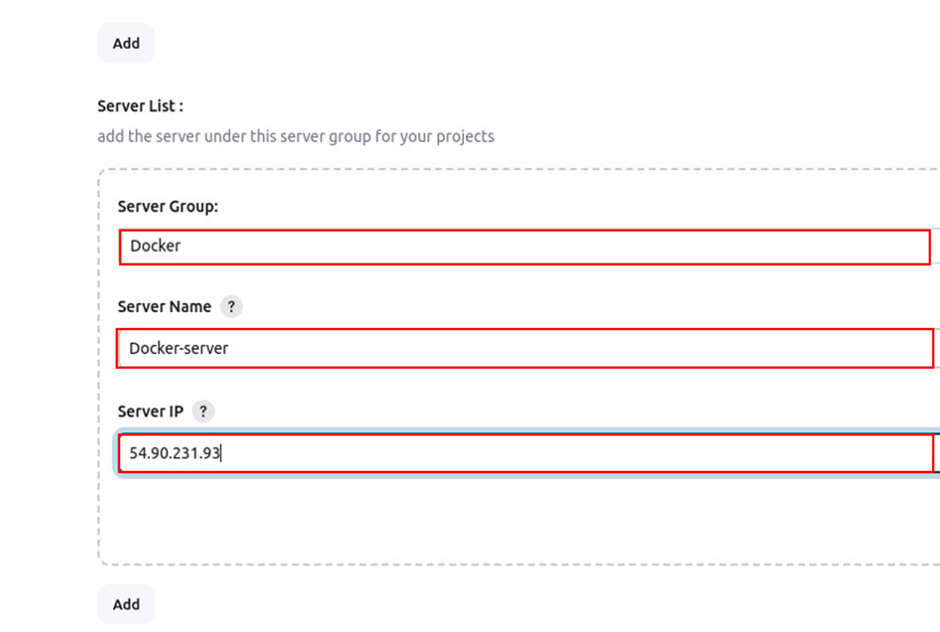
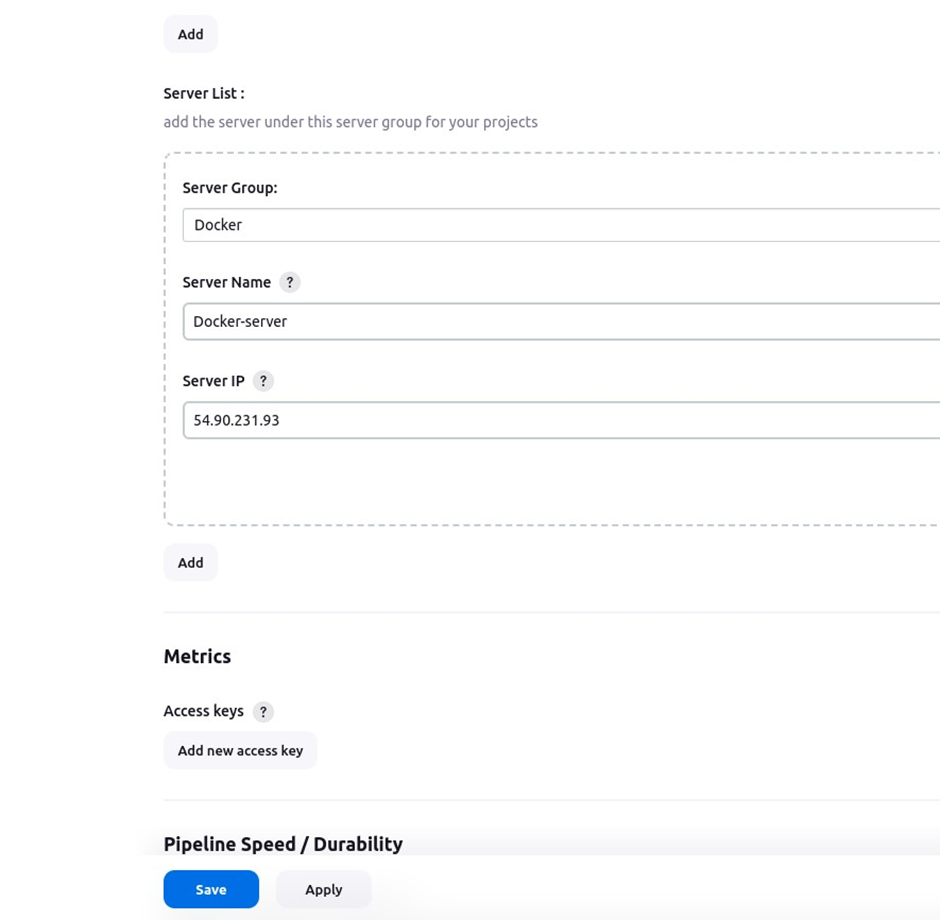
Configure systems and because we had added server group, now we will add servers. Under server group, select the drop-down button and select Docker which is the name we gave to our server list previously. For the server name, give it your preferred name, will call it Docker-server. Under server IP, paste in the IP address of the docker server then click save.
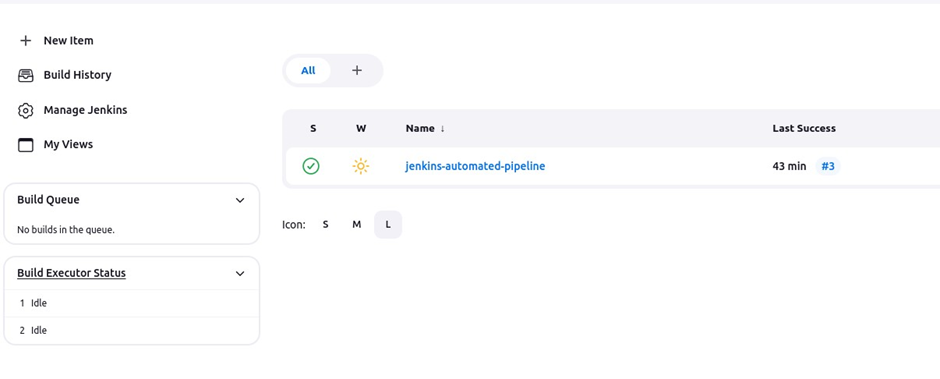
Come back to the pipeline and go to the configure tab.
Let’s verify if we can execute a remote command.
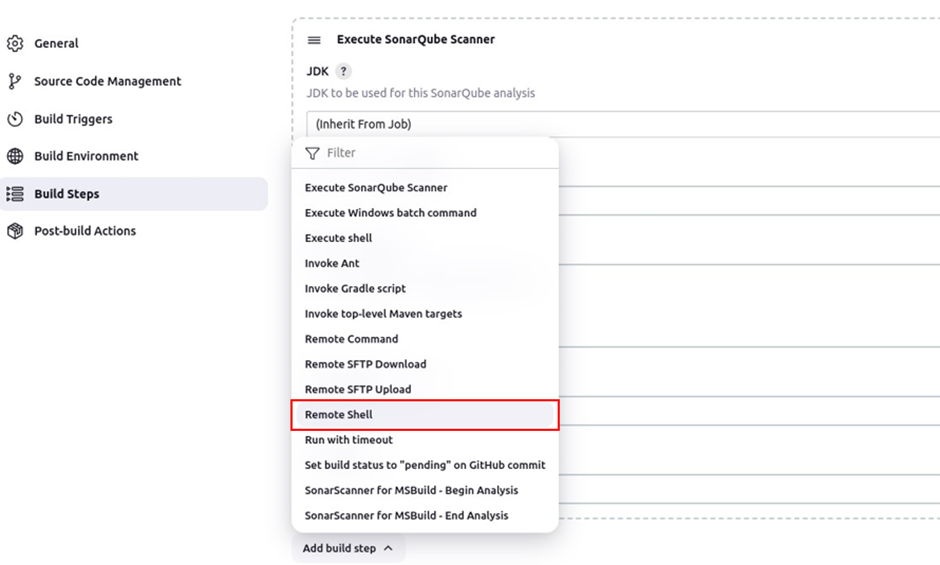
Scroll down and under the build step, scroll down and look for the remote shell then select it.
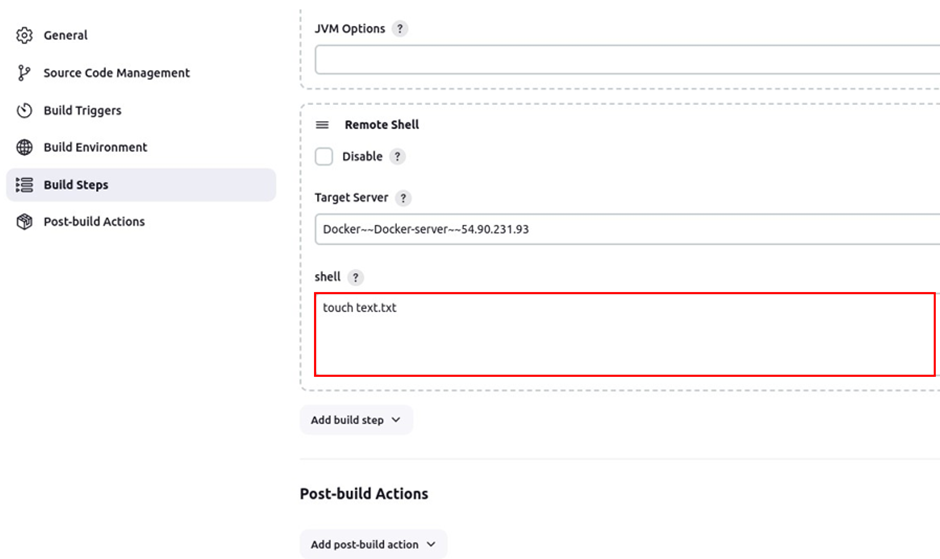
In the remote shell UI under the target server, select the drop-down button and select your target servers. In the shell, run the touch command to create a simple text.txt file and click save.
touch text.txt
Back to the pipeline dashboard, let’s build the pipeline to verify if the command will be executed.
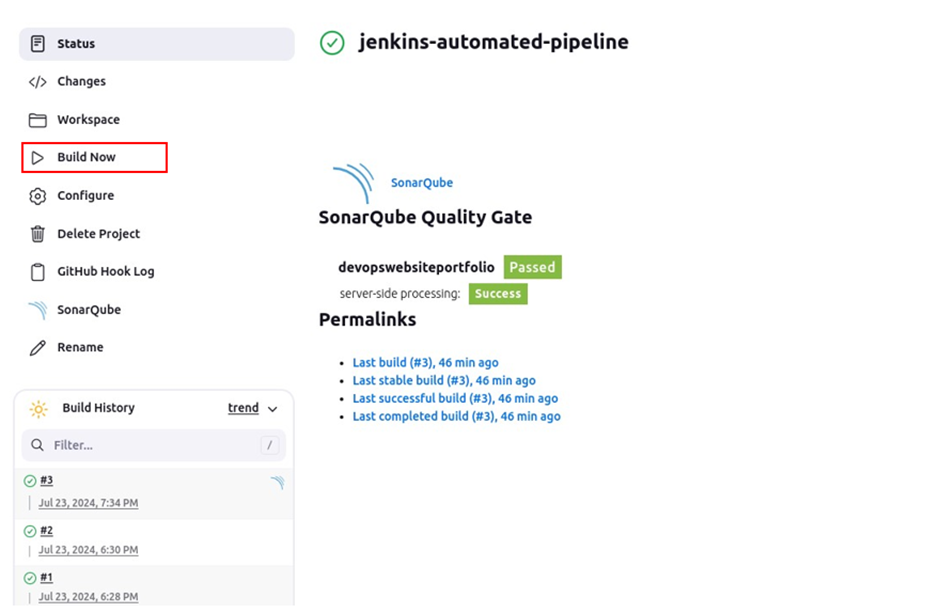
code will be scanned by SonarQube and once successful it will run the remote command on the remote server.
We can see finished with success in the console output, which means our command was executed.
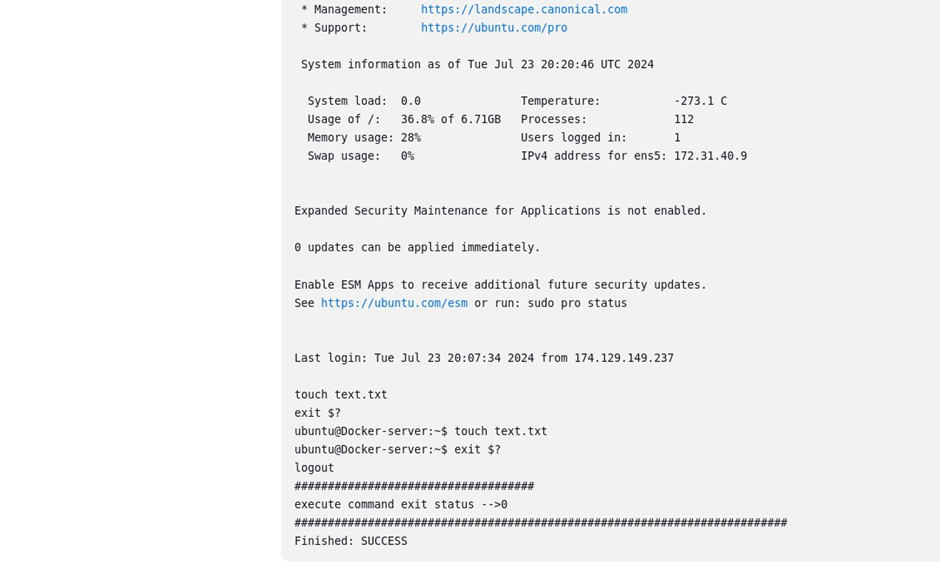
#Run the ls command to list directory content in the docker server\
to verify if the command was excecuted.
ls
We can see a text file was created.

Make sure in your repository there is a Dockerfile. Go back to your pipeline configure tab, in the build step, click execute shell, and remove the previous remote shell.
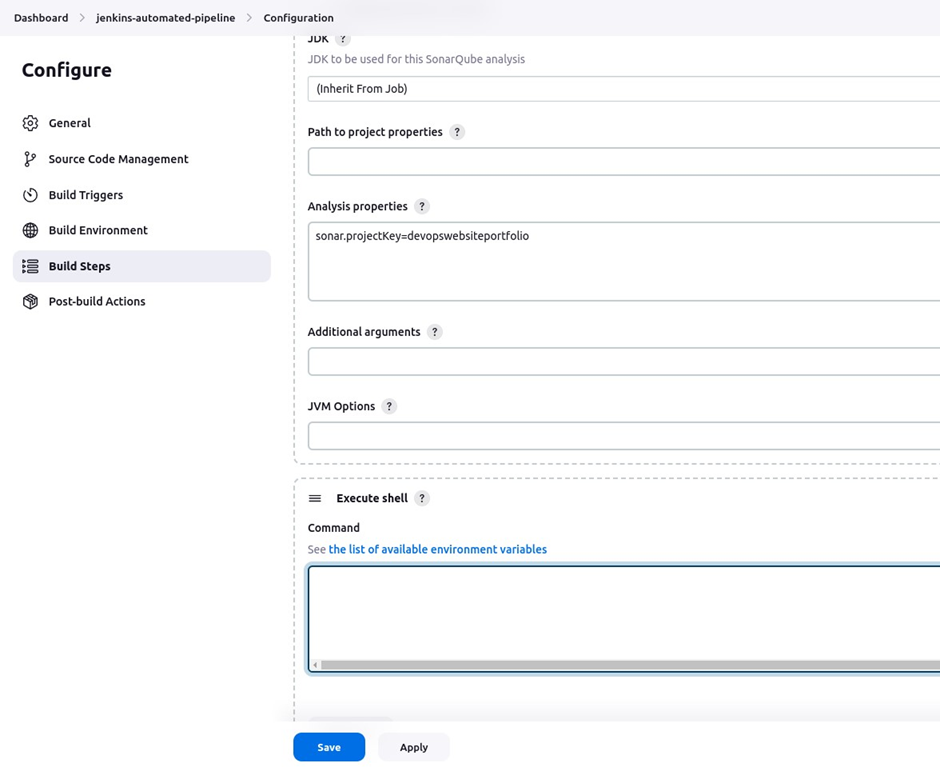
Before we write the shell command to be executed, make a directory in your docker server, then go into that directory.
#make directory
mkdir webfiles

#go into the directory
cd webfiles

We will now copy the current contents, of our GitHub to the remote server, we will use the secure copy command, and the files will be posted to the docker server in the directory we just created.
Achieve this by typing the bellow command then click save.
#we are copying the current contents of the remote server, we will copy all the contents of the current directory to the remote server.
scp -r ./* ubuntu@54.90.231:~/webfiles/
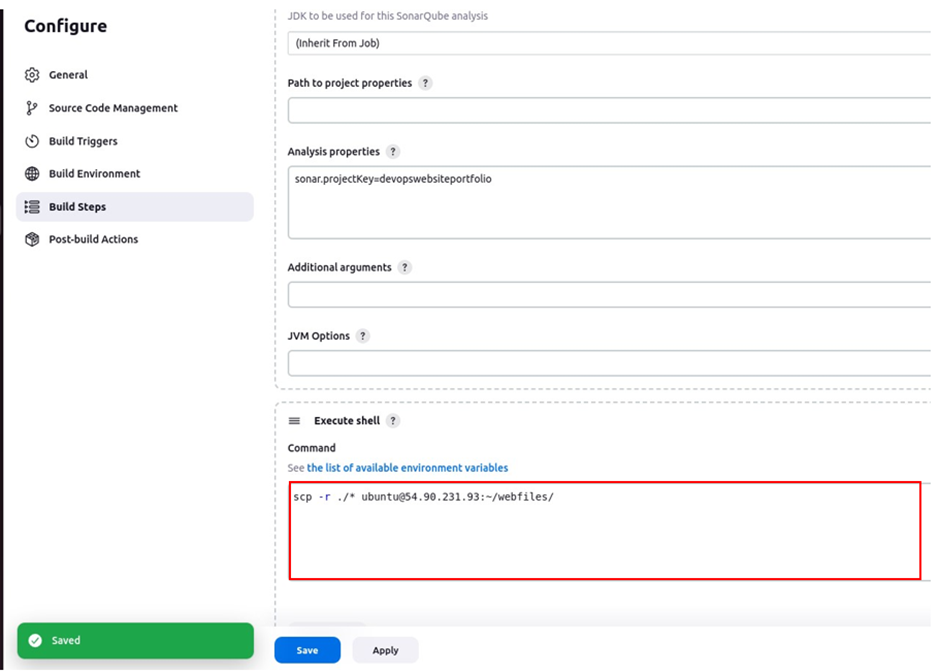
Click build now.
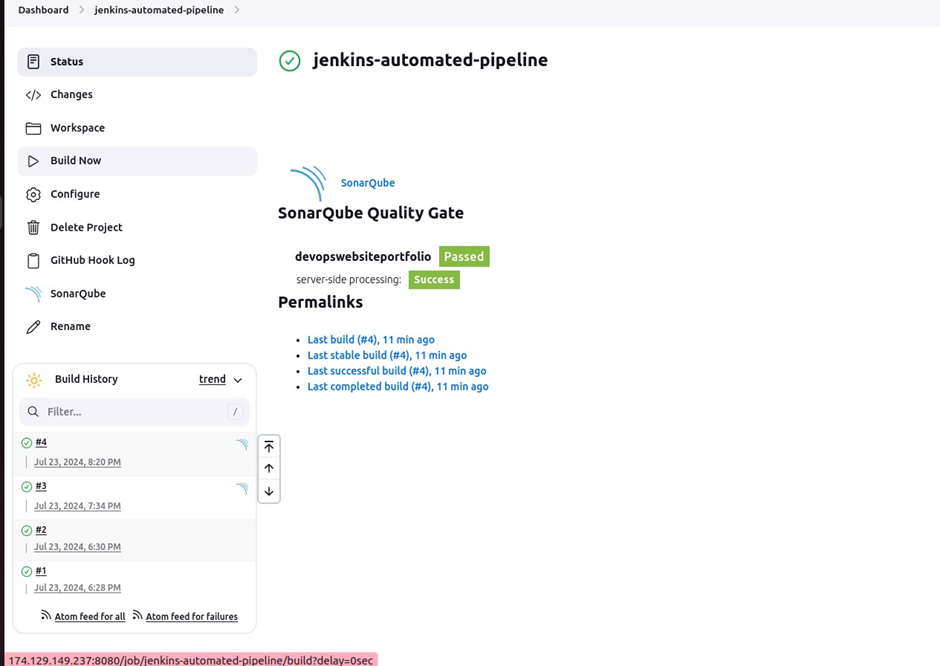
We have received success.
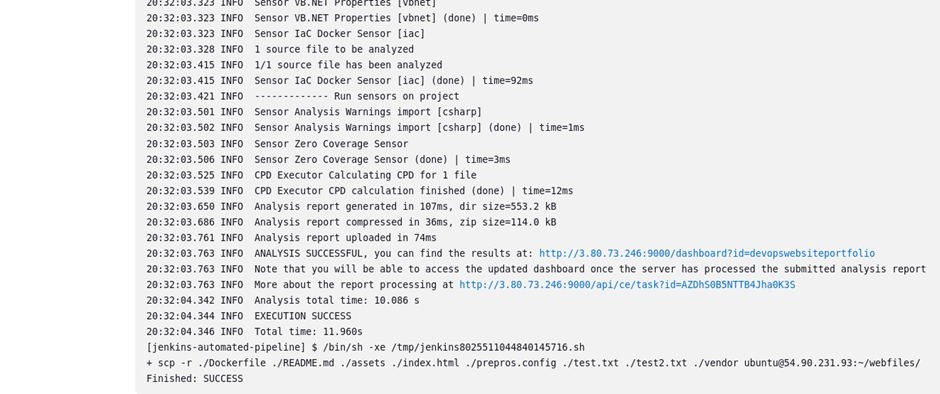
Go back to the folder you created in the docker server.
#run the ls command to list directory content.
ls
We can see all the contents of our GitHub repository have been copied to the docker server. We will use these files to build a docker image and run a container from it.
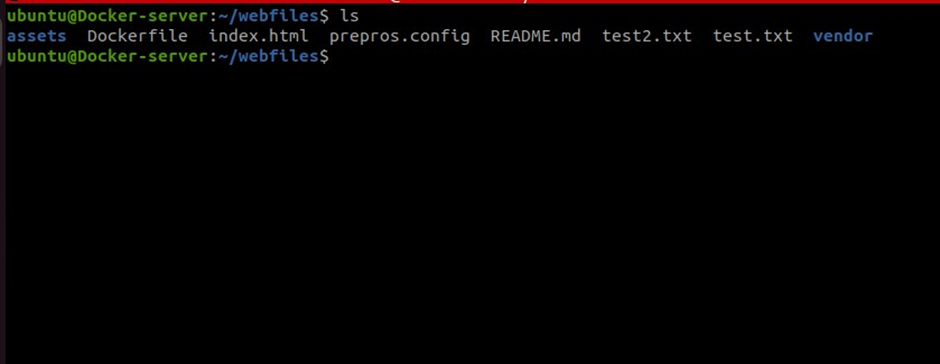
Go back to the pipeline, click the configure tab, then add a remote shell. we will go into the webfiles folder and then create a docker image from the files. Make sure your Ubuntu user is added to the docker group and can run commands minus being a super user, run the below command to achieve that.
#add ubuntu user to the docker group

sudo usermod -aG docker ubuntu.
Run the docker build command to build the docker image.
Then run a container from the created image. add these commands to the remote shell then click save.
#change to the webfiles directory
cd /home/ubuntu/webfiles

#build docker image using the contents of the current directory
docker build -t website .

#run docker using the build image in the detachable mode, and map the port 8085 to the port 80 in the container
docker run -d -p 8085:80 --name powel-website mywebsite
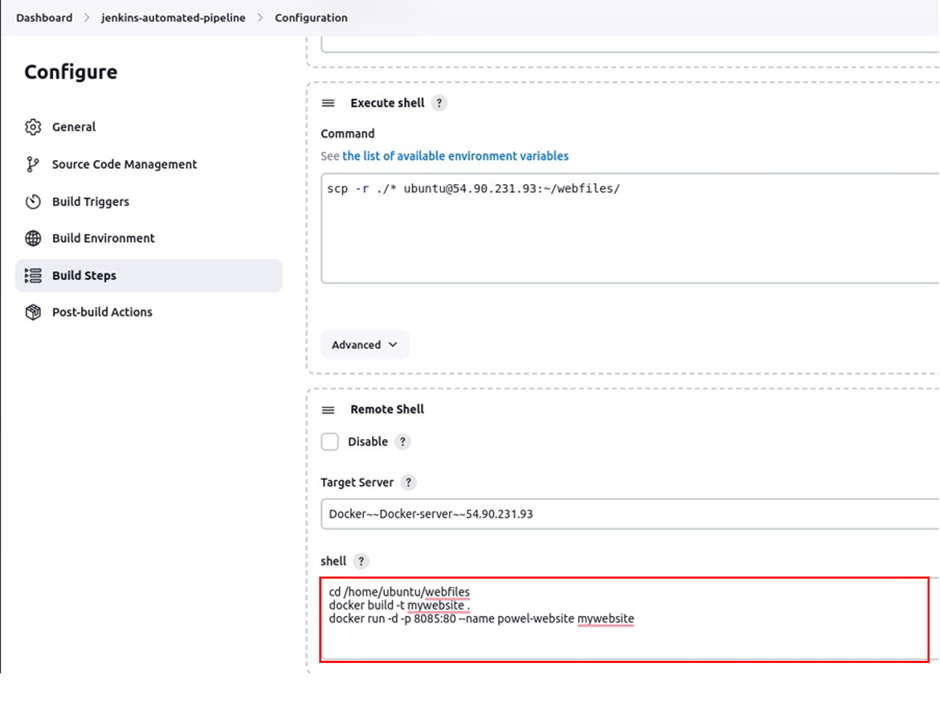
Come back and build the pipeline.
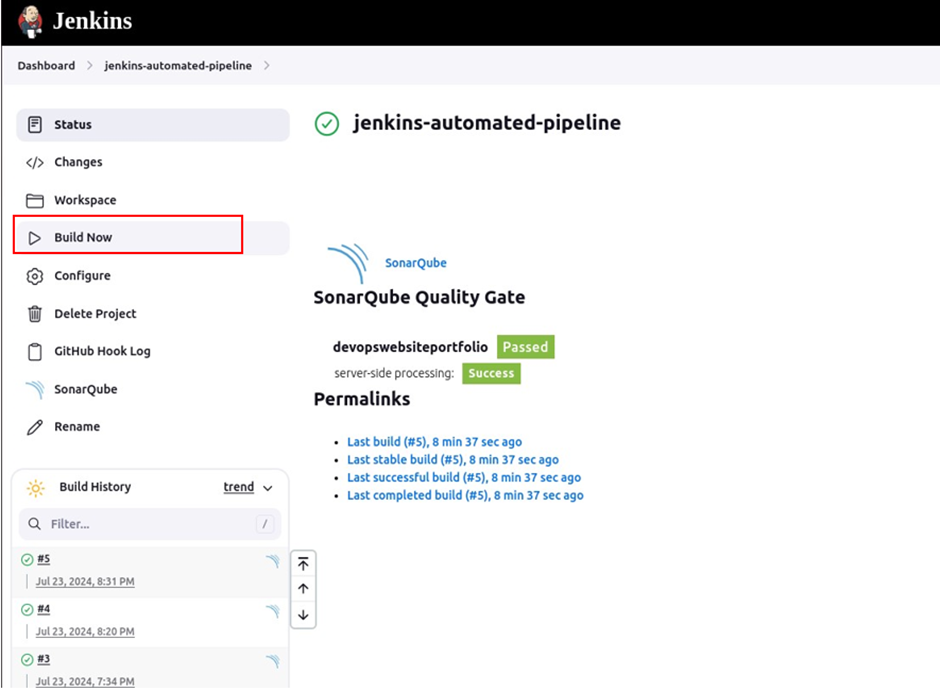
The code will be scanned by SonarQube, docker image will be built then a docker container will be run from that image.
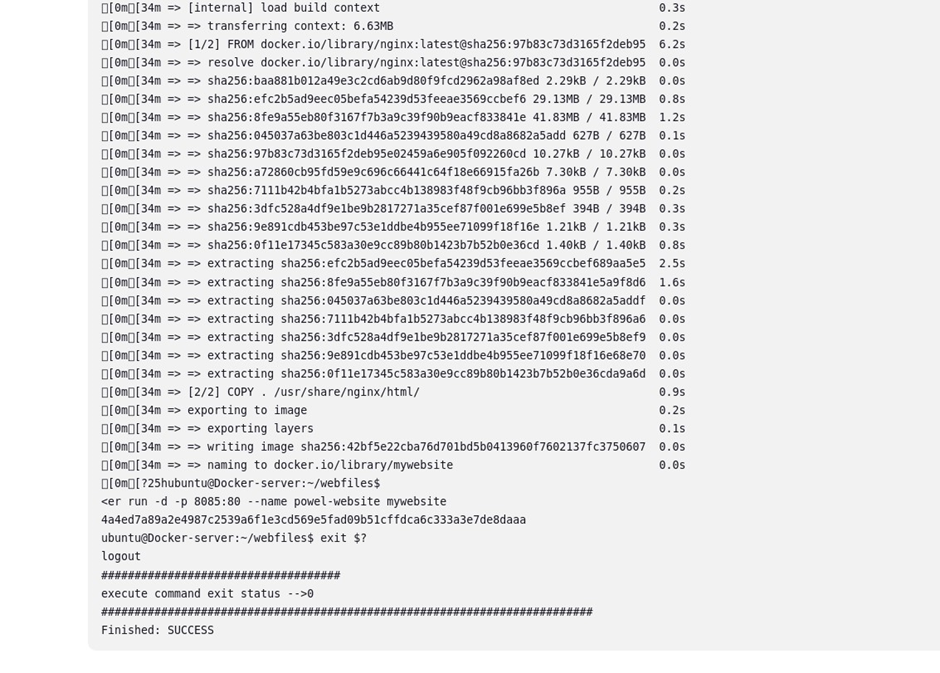
Come back to your docker server and verify this. Run this command in your terminal in the docker server.
docker ps
We can see the container is up and running. We have used port 8085 in the docker server. Go and adjust the security group details in your EC2 instance.

After adjusting the security group, paste in the docker server IP address followed by the port number 8085.
#replace your your servers IP
http://54.90.231:8085
We can see our website is up and running, our objective has been achieved.

Conclusion
Our CI/CD pipeline has been achieved and we have automated the entire process from code commit to deployment. Code changes have been pushed to a GitHub branch, Jenkins has pulled the code and the SonarQube server has scanned our code for static analysis, bugs, and vulnerabilities. Our code having passed the quality checks, Jenkins then automatically deployed the code to the Docker server making it accessible to end users through their browsers.
Thanks for reading and stay tuned for more. clean up resources.

A skilled Cloud DevOps Engineer and Solutions Architect specializing in infrastructure provisioning and automation, with a focus on building scalable, fault-tolerant, and secure cloud environments.

