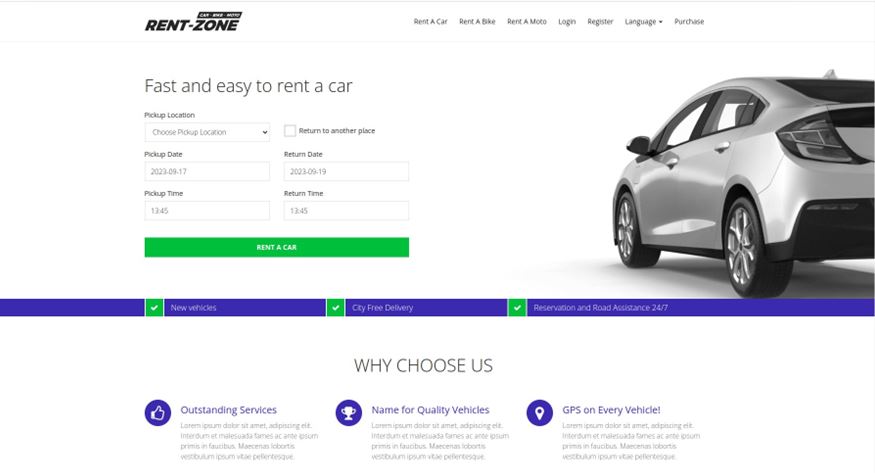
In this project, we will host this Rent-Zone Dynamic web application on AWS.
Introduction
In today’s fast-paced digital landscape, having a dynamic and responsive website is essential for businesses and individuals alike. To achieve this, cloud services like Amazon Web Services (AWS) offer a versatile and scalable platform for hosting your website. In this project, we’ll embark on a comprehensive project that leverages a plethora of AWS services to build a high-performance, secure, and fault-tolerant dynamic website.
The AWS Arsenal
We will use the following reference architecture to host this dynamic website in AWS.
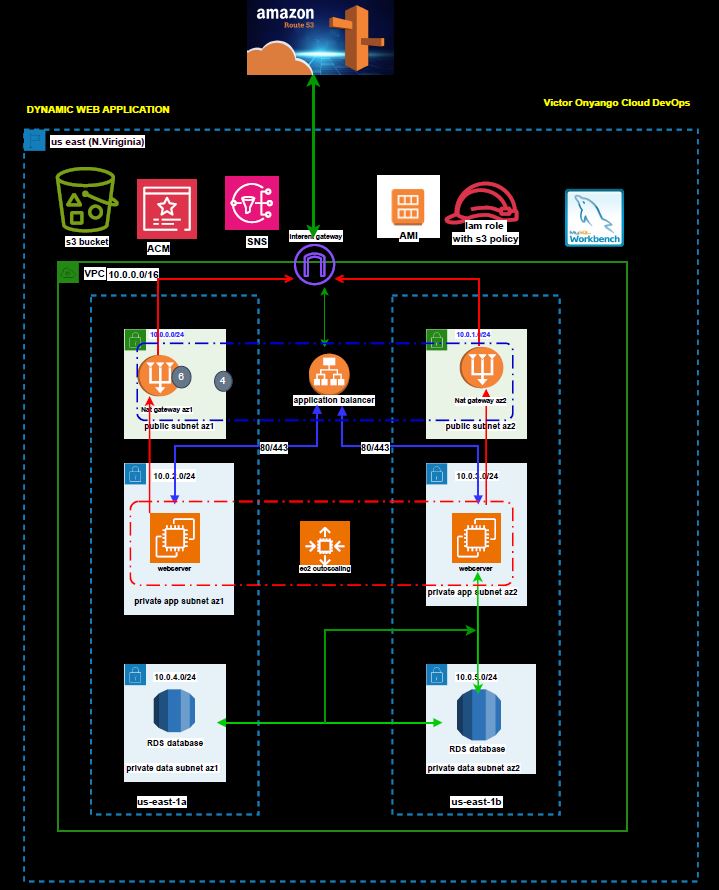
According to our reference architecture, our project will be driven by a range of AWS services, each playing a crucial role in creating a robust and efficient infrastructure for our dynamic website.
Embarking on the Project:
We will systematically break down the tasks into distinct sections, each building upon the other to ensure the successful execution of the project. This structured approach will be carried out using the AWS management console, ensuring a seamless progression through the following key steps:
1. Establishing a Three-Tier VPC from Scratch: We will create a robust AWS Virtual Private Cloud to lay the foundation for our project.
2. Setting Up AWS NAT Gateways: The creation of Network Address Translation (NAT) gateways will enhance our network’s connectivity and security. By ensuring our resources in the private subnets, do not have direct access to the internet.
3. Configuring Security Groups: We will meticulously design security groups to safeguard our resources.
4. Launching a MySQL RDS Instance: The essential database component will be set up, ensuring data management and storage.
5. Creating an S3 Bucket and Uploading Files: We will establish an S3 bucket for efficient data storage and file uploads.
6. Generating Key Pairs: To enhance security, we will create key pairs to enable us to securely access our webservers.
7. Deploying an EC2 Instance: A virtual machine will be launched, providing the infrastructure for our project.
8. Utilizing MySQL Workbench to Import App Data into RDS Database: Data will be imported into the MySQL RDS instance using the MySQL Workbench tool.
9. Installing a Dynamic Web Application on the EC2 Instance (LAMP Stack): The dynamic web application will be installed and configured on the EC2 instance, utilizing the LAMP stack.
10. Creating an AMI (Amazon Machine Image): We will generate an AMI to capture the configured state of our EC2 instance for future deployments.
11. Setting Up an Application Load Balancer: An Application Load Balancer will be implemented to ensure efficient distribution of traffic.
12. Registering a New Domain in Route 53: We will establish a unique domain through AWS Route 53 for our website.
13. Acquiring an SSL Certificate with ACM: A secure SSL certificate will be registered with AWS Certificate Manager (ACM) to protect our website.
14. Securing the Website with the SSL Certificate: Our website will be fortified with the SSL certificate for enhanced security and trustworthiness.
15. Launching a Bastion Host and SSH Access into the EC2 Instance in a Private Subnet: A Bastion Host will be deployed to facilitate secure SSH access to the EC2 instance located in a private subnet. This access will be used to configure our web application.
16. Creating a Second AMI: Another Amazon Machine Image will be generated to maintain redundancy and facilitate scaling.
17. Establishing an Autoscaling Group: An Autoscaling Group will be created to automatically manage and adjust the number of EC2 instances as needed to handle varying workloads.
By following this meticulously organized project plan, we will ensure a successful and well-structured implementation of dynamic websites using AWS services.
Poject Implementation
sign in to your AWS Management console at AWS Management Console.
Establishing a Three-Tier VPC from Scratch:
We will start by building a 3-tier VPC from scratch. We will use the following reference architecture to build our 3-tier VPC architecture.
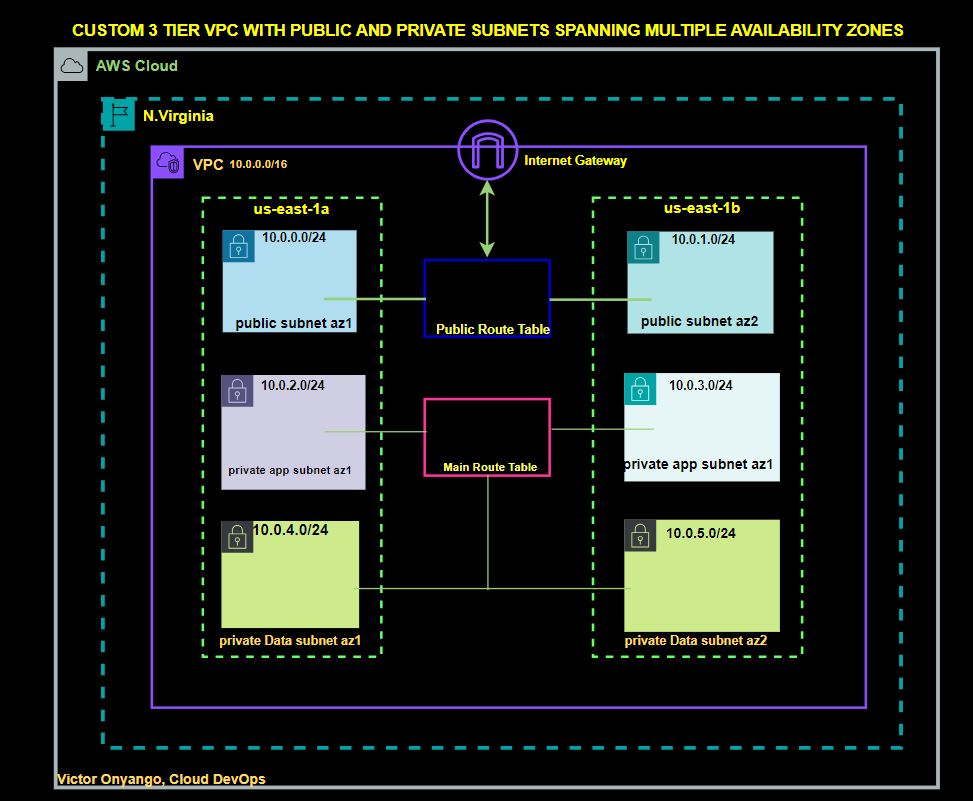
Have already built this Custom VPC, and you can access it in this post
BUILDING A CUSTOM THREE-TIER-VPC ARCHITECTURE FROM SCRATCH
In a rapidly evolving digital landscape, where connectivity is king and security is paramount, the need to tailor your…
2. Create a Nat gateway in the first and the second availability zone, create a route table in private subnets, and add a route to the route table to route traffic to the internet through the Nat gateway.
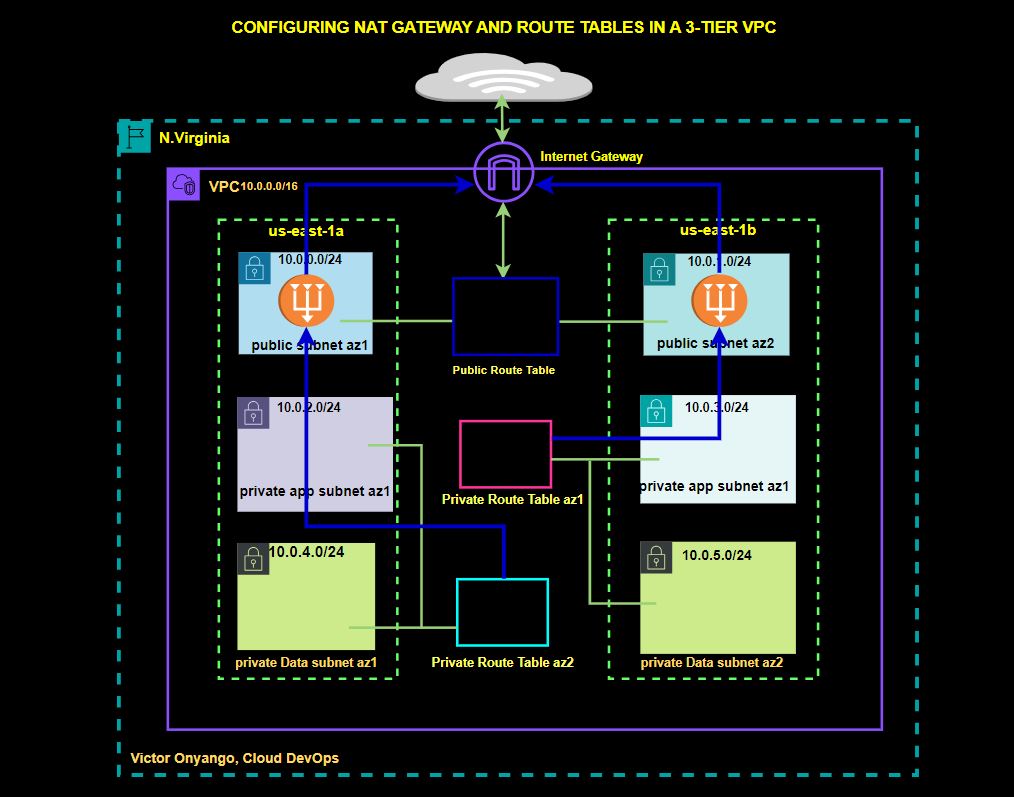
In this comprehensive guide, I will take you through the steps of configuring a dual-NAT gateway in two different availability zones, paired with route tables, enabling your private subnets to effortlessly access the internet. This dynamic combination is not only a showcase of best practices but also a testament to the prowess of cloud network engineering.
According to our reference architecture, we will create a Nat gateway in the public subnet az1, we will create a route table that we call private route table az1. We will then add a route to that route table to route traffic to the internet through the Nat gateway. We will then associate that route table with the private app subnet az1, and private data subnet az1.
Again, for the second availability zone:
We will create another Nat gateway in the public subnet az2. We will then create another route table called private route table az2, we will add traffic to this route table to route traffic to the internet through the Nat gateway in the public subnet az2. We will then associate this route table with the private app subnet az2 and private data subnet az2.
Let’s start.
To create the Nat gateway first make sure you are in the region where you created the VPC.
Then in the search box, type VPC then select VPC under services.

On the VPC dashboard on the left side of the navigation pane select Nat gateway, then click Create Nat gateway.


We will create the first Nat gateway in the public subnet az1.
In the create Nat gateway dashboard under name give your Nat gateway name, call it Nat gateway az1. Once you’ve given your Nat gateway a name, select the subnet where you want to put your Nat gateway. so under subnet, select the drop-down and look for public subnet az1 then select it.
Scroll down, and under elastic allocation ID click allocate an elastic IP and that is going to allocate an elastic IP for you.

These are the only settings we need to create a Nat gateway, scroll down and click Create Nat gateway.
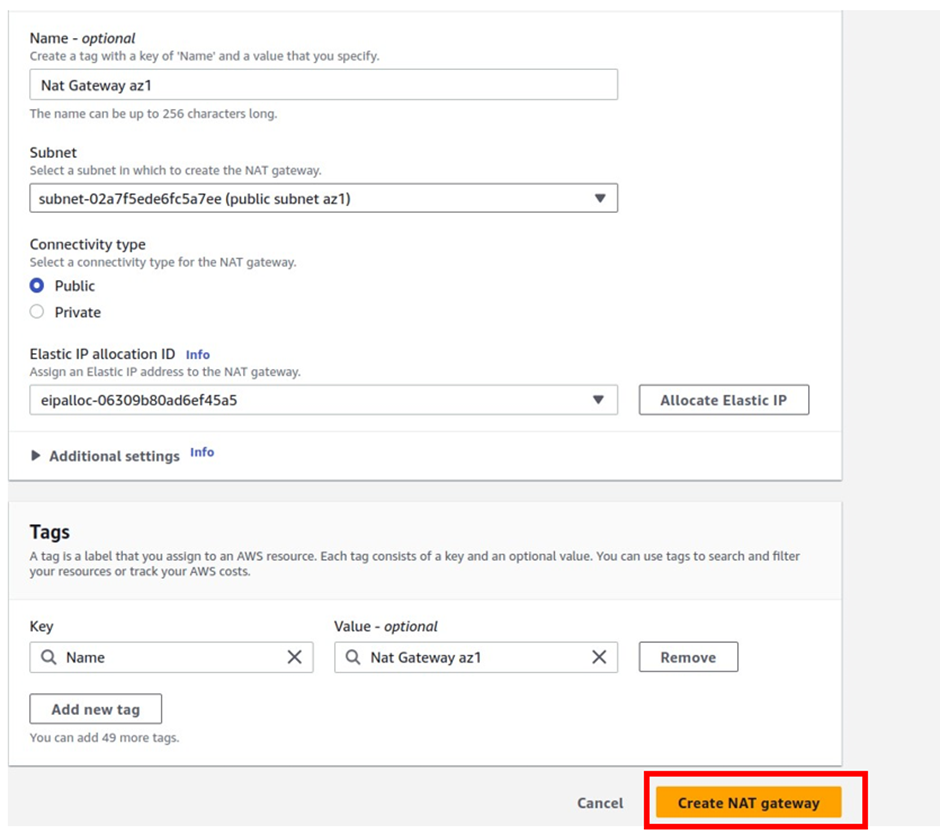
We have created our first Nat gateway in the public subnet az1.
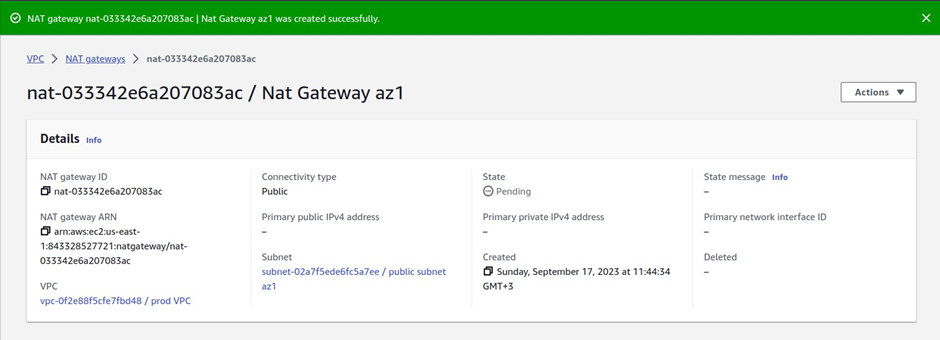
The next thing we will do is to create a route table. We will call that route table private route table az1.
On the left side of your screen, select route tables then click Create route table.


In the create route table dashboard under the name, give your route table a name, and call it private route table az1. Once you’ve given the route table a name, select the VPC you want to create this route table in, so under VPC, select the drop-down and select your prod- VPC. These are the only settings we need to create a route table now click create route table.

We have successfully created our first private route table in private subnet az1.

Next, we will add a route to the private route table az1 to route traffic to the internet through the Nat gateway in the public subnet az1.
To add a route to this route table, under routes select edit routes

then click Add route

For the destination remember internet traffic is always 0.0.0.0/0 so under destination we will type in this value. Then under target, the target is going to be our Nat gateway in the public subnet az1, so select in here then select Nat gateway. Make sure you select Nat Gateway and not Internet Gateway. Then you should see the Nat gateway in the public subnet az1 it is the Nat gateway we call Nat gateway az1. Select it then click Save Changes.


We have added a route to the route table to route traffic to the internet through the Nat gateway in the public subnet az1.

When you scroll down, you can see the routes here.

Next, we will associate this route table with private app subnet az1 and private data subnet az1.
To associate this route table with our subnets, click subnet associations, then click edit subnet associations.

Under the available subnets, we will select the private app subnet az1 and private data subnet az1. Once you’ve selected the two subnets, click Save Associations.

We have successfully associated our private app subnet az1 and private data subnet az1 to this route table.

And you can see that information here.
Under explicit subnet associations, we have two subnets there.

If you click on the subnet’s association tab a gain, you will see that the private app subnet az1 and private data subnet az1 are associated with the route table.

Next, we will create the second Nat gateway in the public subnet az2. So, on the left side select Nat gateway.

then click Create Nat gateway.

Under Nat gateway settings we will give the Nat gateway a name and we will call it Nat gateway az2.
Once we’ve given the Nat gateway a name, we will select the subnet we want to put the Nat gateway in, so under subnets, select the drop-down and select public subnet az2. Under elastic IP allocation ID, click the allocate elastic IP button, this will allocate an elastic IP for you.

Scroll down and click Create Nat gateway.

We have successfully created the Nat gateway

The next thing we will do is to create another route table, and we will call it private route table az2.
On the left side, select the route table.

then click Create Route Table.

Under name give your route table a name, call it private route table az2. Once you’ve given your route table a name then select the VPC you want to put your route table in so under VPC, select the drop down and select your prod VPC. These are the only settings we need to create this route table, click create route table.

We have successfully created a private route table az2.

Now that we have successfully created the private route table az2, the next thing we will do is add a route to this route table to route traffic to the internet through the Nat gateway in the public subnet az2. To add a route to this route table, select the routes tab then click edit routes.

In the edit routes dashboard click Add route

Under destination remember traffic going to the internet is always 0.0.0.0/0 so type it in there and select it.
Then under targets, we will select our Nat gateway, so select the search box, and select Nat gateway.
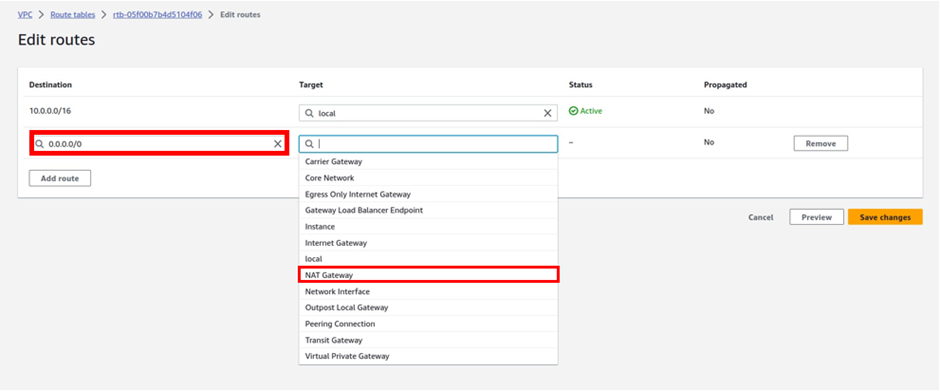
And this time make sure you select Nat gateway az2.

Then click save changes.

We have successfully added a route to this route table to route traffic to the internet through the Nat gateway in the public az2.

To see that route scroll down and you will see it there.
The last thing we will do is associate this route table with private app subnet az2, and private data subnet az2
To associate this route table with our subnets, go to the subnets associations tab then select it.
Then click edit subnet associations.

Under available subnets, we will select the private app subnet az2 and private data subnet az2. Once you’ve selected the subnets, click Save Associations.

We have successfully associated our private app subnet az2, and private data subnet az2 with the private route table az2.
To see that, under explicit subnet associations, we can see that we have two subnets.

and if we click on the subnet’s associations tab, you will see that our private app subnet az2, and private data subnet az2 are associated with this route table.

This is how we create Nat gateway to allow resources in the private subnet, to have access to the internet.
Creating security groups:

according to our reference architecture, we will start by creating an application load balancer security group, this is the security group we will add to the application load balancer, and on this security group, we will open port 80, and port 443, anywhere on the internet.
Next, we will create the SSH security group, and this is the security group that will allow us to connect, to our EC2 instances. On this security group, we will open port 22 and the source is going to be limited to my IP.
It is good practice that anytime you create the SSH security group, you should limit the source to your IP address.
The third security group we will create is called the webserver security group.
This is the security group, that we will add to our EC2 instances, and on this security group, we will open port 80, and port 443, and we will limit the source to come from our application load balancer security group.
The last security group we will create is the database security group, this is the security group we will add to the RDS database, and on this security group, we will open port 3306, and the source is going to come from our webserver security group.
To create the security groups, still in the management console, type VPC in the search box, and select VPCunder services.

Now in the VPC dashboard in the left navigation pane under security, select security groups

let’s filter this by our prod VPC, in the left navigation pane under filter by VPC, select the dropdown, and select your prod VPC.


currently, in the prod VPC, we only have the default security group shown below.

To create our first security group, click Create Security Group

Give the security group a name, call it ALB Security Group(Application Load Balancer security group) then use the same name as the description.
select the VPC you want to create the security group in. Under VPC, select the drop-down and make sure you select your prod VPC.

Scroll down and under the inbound rule, click add rule.

The first port we will open is port 80, so under custom TCP select the dropdown look for HTTP then select it.

source is going to come from anywhere on the internet, click under source and select anywhere from the source dropdown or you can type it manually, so here have selected it from the dropdown.

And here have typed it manually. Still the same thing.

So as shown above, we have created the security group, opened port 80, and allowed sources from anywhere on the internet.
The next rule we will add is for HTTPS, so click add rule, and under the dropdown, look for HTTPS then select it.

Under source, the source is also going to come from anywhere on the internet, so we will select anywhere from the drop-down under source
Once you’ve added the two rules, leave tags as optional scroll down, and click Create Security Group.

We have successfully created the application load-balancer security group. we have opened port 80 and port 443, the source is coming from anywhere on the internet.

The next security group we will create is the SSH security group.
In the Create Security Group dashboard, select Security Group

Then click Create Security Groups.

In the create security group dashboard under security group name give your security group a name.
Call it SSH security group. Under the description, use the same name as the description.
Under VPC, select the search box and choose your prod VPC.

Scroll down and under the inbound rule, click add rule.

The rule we will add is SSH, so under custom TCP select the drop-down look for SSH then select it.
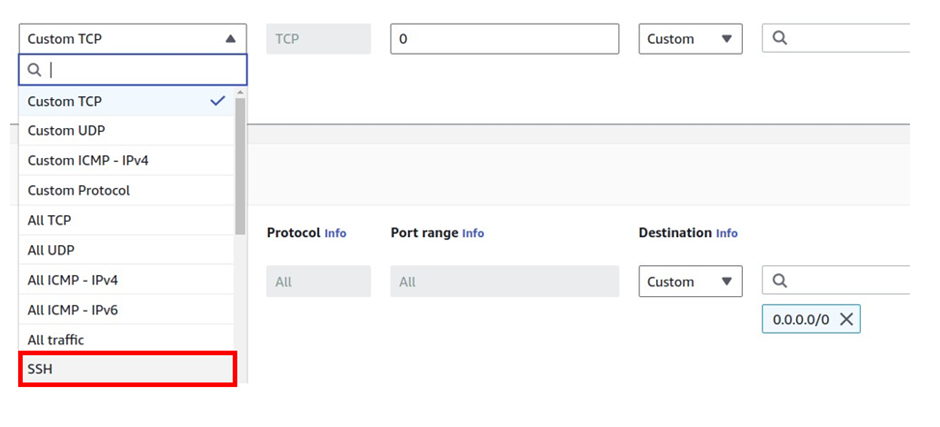
Then under source select the dropdown and select my IP this will enter the IP address of your local machine.

This is how you limit the ssh security group, to your IP. Scroll down and click Create Security Group.

We have successfully created the SSH security group opened port 22 and limited the source traffic to our IP address.
The next security group, we will create is the web server security group, select the security group again.

Then click Create Security Group.

Under the security group name, call it Webserver Security Group. Under the description, use the same name as the description.
Under VPC select the search box and choose your prod VPC then scroll down.

under the inbound rule, the first rule we will add is on port 80.
Click add rule, under custom TCP select the dropdown, look for HTTP, and select it.
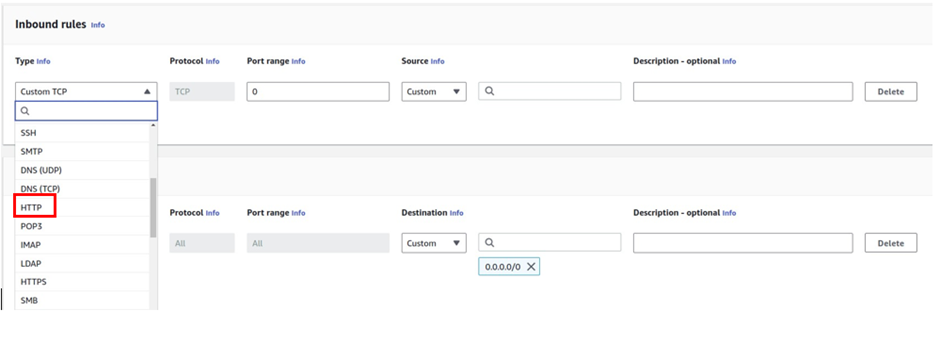
Under source, we will limit the source of this traffic to the application load balancer security group.
So under source, scroll down, and under the security group section, look for application load-balancer security group, then select it.


The next rule we will add is on port 443, so under custom TCP look for HTTPS then select it.

Again under source, we will limit the source of this traffic to our application load balancer security group. So under source select the drop-down and under the security group section, make sure you select the application load-balancer security group.
The last rule we will add for this security group is for SSH, a gain click add rule then under custom TCP, select the drop-down and select SSH


under source we are going to limit the source of this traffic to the SSH security group, so under source select the drop-down, and under the security group section, make sure you select the SSH security group. This is all we need to add to this security group, scroll down and click Create security group.

We have successfully created the web-server security group.

we have opened port 80 and port 443 and limited the source traffic to our application load balancer security group.
Again, we have opened port 22 and limited the source traffic to the SSH security group.
The last security group we will create is for the database, so select the security group again.

Then click Create Security Group.

Under basic details, we will enter the details for our security group. Under security group name give your security group a name, and call it the database security group.
Under description use the same name as the description.
Then under VPC select the drop-down in the VPC section, and make sure you select your prod-VPC. scroll down.

Under inbound rule, click add rule, and the rule we will add is on port 3306, so under custom TCP select the drop-down and look for MySQL/aurora
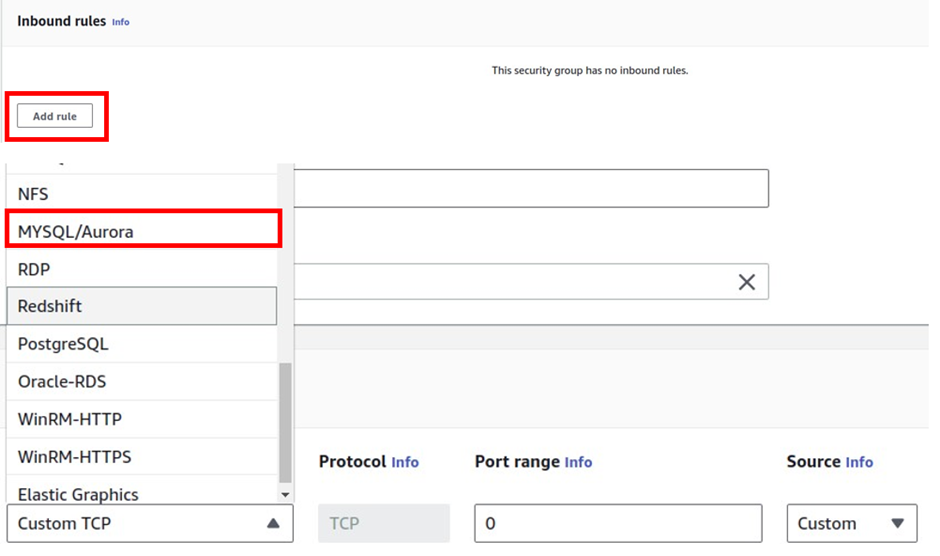
Under source, we will limit the source of this traffic to the webserver security group.

Under source, click in the search box, go down to the security group section, and select the webserver security group. Once you have added the rule, scroll down and click Create Security Group.

we have successfully created the database security group, opened port 3306, and limited the source of the traffic to our web server security group.
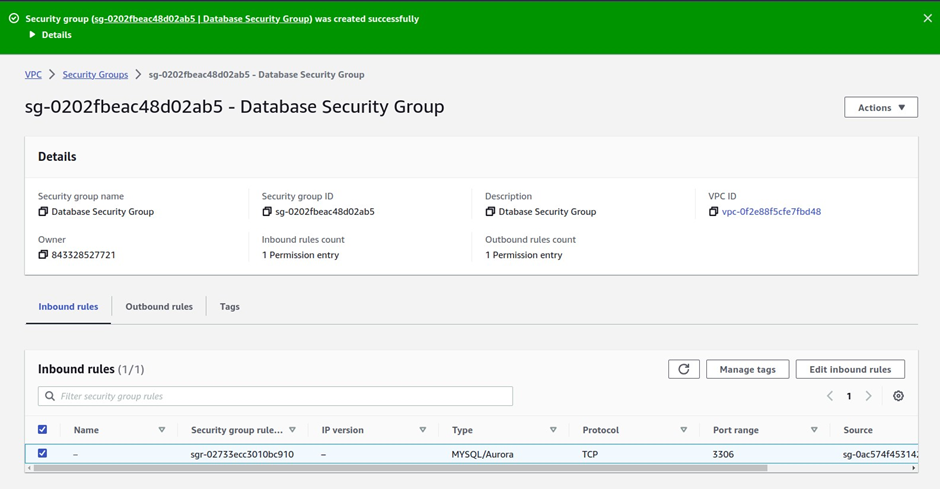
That’s it for the security group.
LAUNCH MYSQL RDS INSTANCE
We will create the RDS instance in the private data subnet.
to create the RDS instance, in the management console type RDS in the search box, then select it under services.

Before we create the RDS instance in the private data subnet, the first thing we need to create is subnet groups. The subnet groups allow us to specify which subnet we want to create our database in.
To create a subnet group, under the database navigation pane, select subnet groups

Then click Create DB subnet group.

Give the subnet group a name, call it the prod database subnet, and use the same name as the description.
under VPC, select the VPC you want to create the RDS instance in, select the dropdown, and select the prod-VPC.

Scroll down and under add subnet, this is where we select where we want to create our RDS instance. select the dropdown under availability zone and select us-east-1a and 1b.
Then under subnets select the drop-down. According to our reference architecture, in us-east-1a, the private data subnet has a CIDR block of .0.4, so select it.
And in us-east-1b the private data subnet has a CIDR block of .0.5, so I will make sure that I select it.
Make sure you’ve selected the right subnet. Then scroll down and click Create.

We have successfully created the subnet groups, and under subnet groups, we can see the prod database subnets.

Now next we can create the database, click databases in the left navigation pane of Amazon RDS

Then click Create database

Under create database, we will choose the database creation method. Under Choose a database creation method, select the radio button in a standard create.
Under engine options select MySQL

Then scroll down, under version select this dropdown, and for this project, we will use MySQL version 5.7, so select it.

Then scroll down, under templates, select dev, and test, According to our reference architecture, we can create a standby database in the other availability zone. If you want to create another standby database in another availability zone, you check the option of Multi-AZ DB instance to create your standby database.
But for this project not to cost us money, we won’t create a standby database.
We will leave it on a single DB instance and then scroll down.

under the Db instance identifier, we will give it a name and we will call it prod-rds Database
Then under credential settings, for the master user name, give it a user name. and call it viktechsolutions, once you’ve entered the user name, create a password. Once you’ve entered the password, then confirm it.


Once you’ve entered the password and confirmed it, then scroll down,
under instance configuration, under db instance class,
select the burstable, and toggle include previous generations on. Then your db instance class should be db t2.micro and this is the free-tier one.

Then scroll down, we will leave storage as default,
Scroll down, underconnectivity,
Check the box don’t connect to an EC2 Compute Resource. Then under network type, leave it on IPv4 then under virtual private cloud, select the drop-down and select your prod VPC.
And under the DB subnet group, make sure the subnet you created previously is selected.

We will leave the other option as default, under VPC security group(firewall) we will choose an existing security group, and then remove the default security group. Click the drop-down and select the database security group.

Once you’ve selected the database security group, click out, and under availability zone, this is where you choose the availability zone you want to create the master database.
According to our reference architecture, we will create the master database in us-east-1b, so select this drop-down and make sure you select it.

Then scroll down, under database identification, make sure password identification is checked.
And that’s why we create a username and password for this database.
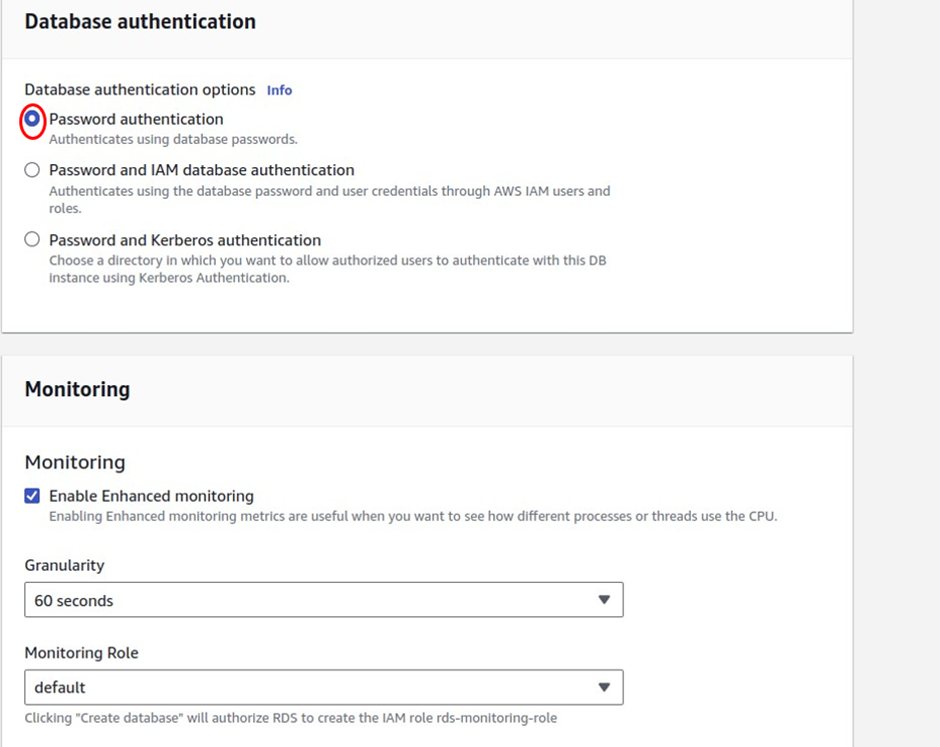
Then scroll down and under additional configuration, expand this option, Under the initial database name, give your database a name. this is very important if you don’t enter a name here the RDS instance will not create the database and you can see it in the description below. Call it application DB.

Once you’ve entered the name for your database, scroll down, we will leave all the other options as default, scroll all the way down, and click Create Database.

We are now creating our RDS instance.

It will take a few minutes for the RDS instance to be created.
Once you’ve created your RDS instance, you will not be able to see the password for the instance in the management console, that’s why it’s important to save your credentials.
To view your credentials here one more time click view credentials here

here it will show you the username and password of your RDS instance, make sure you copy this information and save it somewhere because we will need it later to connect to our RDS.

after waiting for a couple of minutes, our database was created and the status is available, next click on the database identifier name.

Under connectivity and security, this is where you will find the endpoint database endpoint.

We will need this information when we connect our database to our ec2 instance.
If you select the configurations tab,
Here you will also find much information about your database, for example, your database instance ID and your database name.
This is how you create an RDS instance with MySQL engine.

That brings us to the end of this exercise. Seep a cup of coffee and let’s proceed to the next step.
Create an s3 bucket and upload our application code.
In the management console, type s3 in the search box then select s3 under services.

In the s3 console, click Create Bucket.

give your bucket a name, remember your bucket name has to be unique, I will call my bucket viktechdynamicwebappbucket. once we’ve given our bucket a name, we will select the region where we want to create our bucket. we will create our project in us-east-1a, N.Virginia region. So under region, select the drop-down and select us-east-1.

We will leave all the other options as default, then scroll all the way down and click Create Bucket.
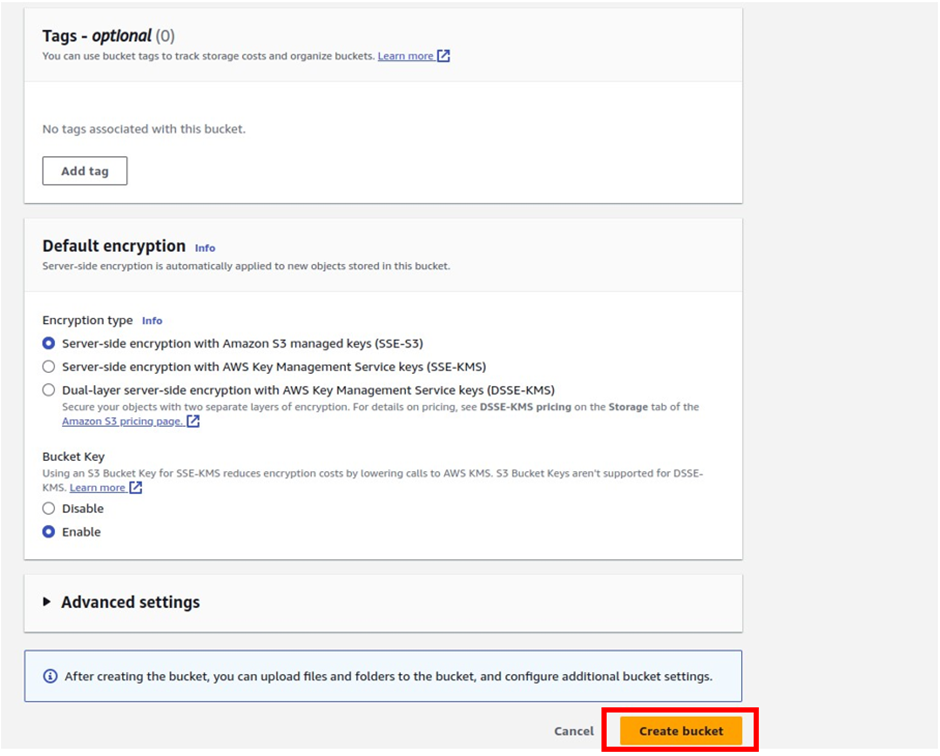
The s3 bucket has been successfully created, and you can see it here.

Now select the bucket and go into the bucket. Once in the bucket, we will now upload our web files into the bucket. To upload our web files, click upload then click add files.


After clicking add files, browse to the location of your local machine where the files are stored select them then click upload.

Our application files are currently uploading.
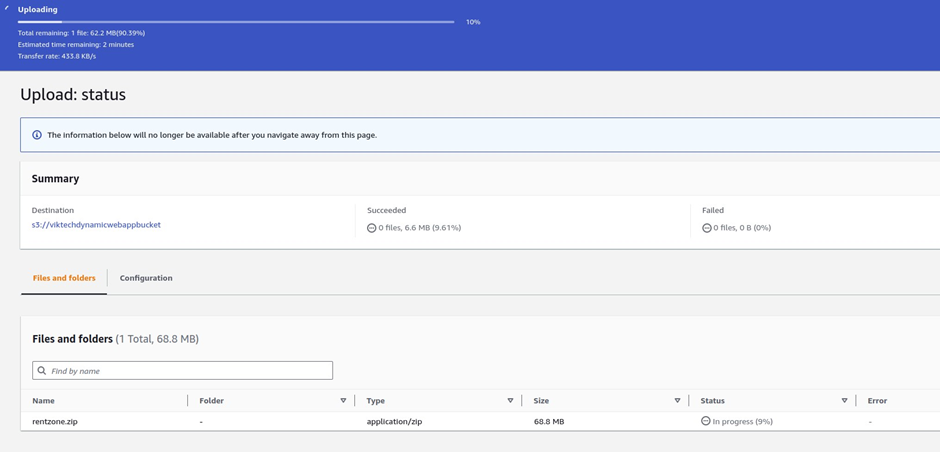
The application code has been uploaded successfully into the s3 bucket and you can see it. click close.

This is all we need to do for this project, let’s proceed to the next project.
6. Create an I am role with s3 bucket policy
This I AM role will allow our ec2 instance to download our web file from the s3 bucket we created previously.
To create an I am role, in the search box, type I am and select it under services.
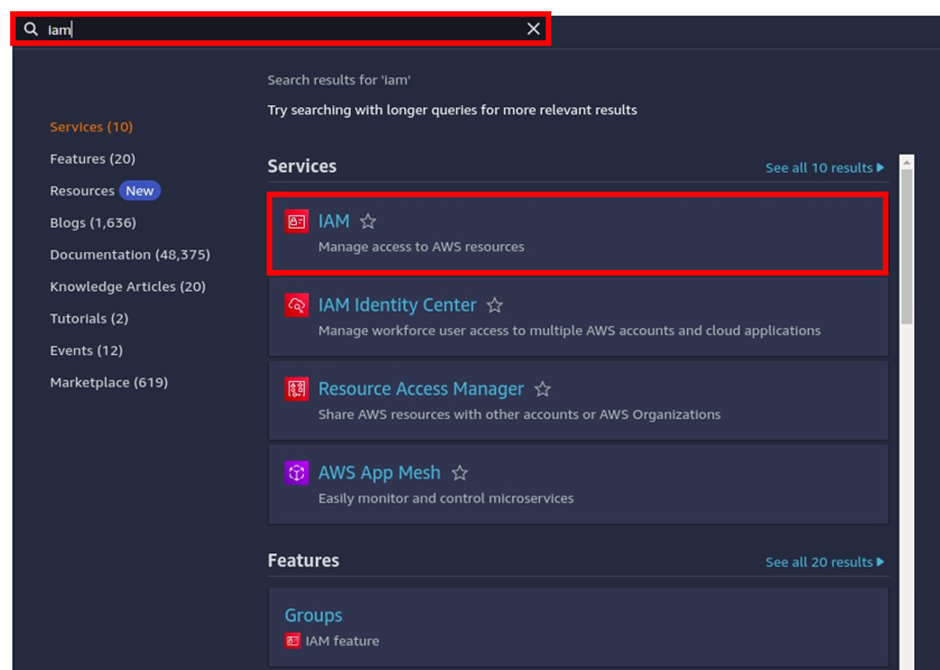
On the I Am dashboard, on the left side of the navigation pane, select roles then click Create Role.


Under trusted entity type, leave it on AWS service, and under use case, select the drop-down and select ec2 then click next.


Under permissions policy, we will attach our s3 permissions policy to this I am role, in the search box type amazons3fullaccess.
Once you’ve typed it press enter and you will see it. Select it by checking the box, then click next

On this page, give the I am role a name, call it the s3 role. Once you’ve given the role a name, scroll down and click Create Role.


the I AM role has been successfully created and you can see it.

This is how you create an I am role and attach a permission policy to it.
7. How to create a key-pair.
We will create a key pair that we will use to SSH into our ec2 instance.
To create a key pair in the management console, type ec2 in the search box then select ec2 under services.

On the ec2 dashboard scroll down under network and security then select key-pair.

Then click Create key-pair

Give your key-pair a name, and I will call it web-SSHkeys, once you’ve given your key pair a name, the key-pair format is going to be RSA, and under key-pair file format, select .pem then click create key pair.
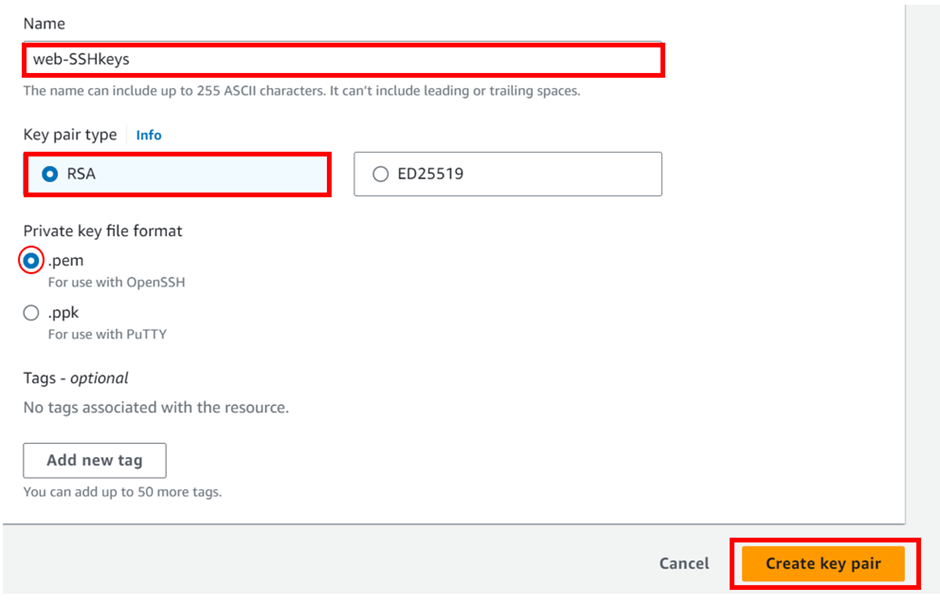
The key pair has been successfully created, and you can see it here.

When you create a key-pair, two keys will be generated for you, a public key and a private key.
The key you see in the management console is the public key, and the key that was downloaded to your computer is the private key.
Make sure your key file is stored in the directory where you will run your SSH commands. And if you are using Linux you can run this command.
chmod 400 <keyname.pem>
so that only you can access your key.
This is how to create a key-pair in the management console, when you create, a key-pair, two keys will be generated, you will store the private key, and aws will store the public key.
Launch a set-up ec2 instance in the public subnet
We will use the setup server to import the SQL data for our application, a gain we will use the setup server to install and complete our application.
Straight away in the management console, type ec2, in the search box, and select ec2 under services.

In the EC2 dashboard, select instances then select launch instances.

In the launch instance dashboard under name and tags, give your EC2 instance a name, and call it a set-up server.
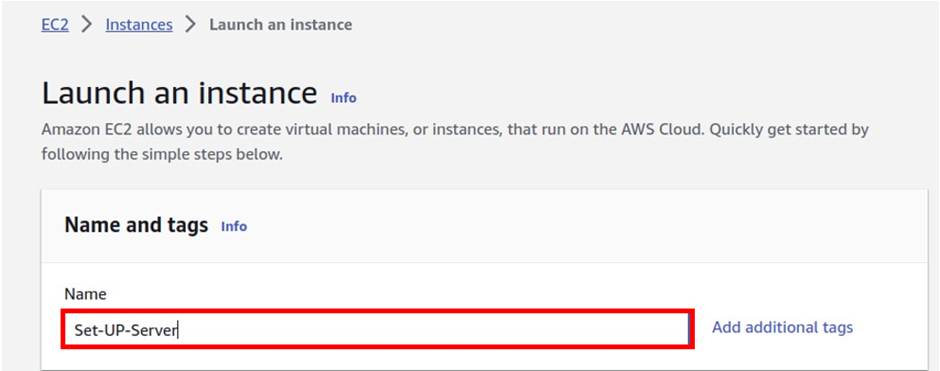
Once you’ve given it a name, scroll down.
Under application and OS images, select the quickstart tab on the quickstart tab, and select Amazon Linux. Under Amazon machine image, select the drop-down and make sure Amazon Linux2 AMI is selected for its free-tier. Scroll down.

under, instance type, make sure you select t.2micro, it is also free tier.

Scroll down, and under key pair login, select the drop-down, and select your key. Remember we just created the web-SSHkeys, select it.

Scroll down, under network settings click edit

Under VPC, select the drop-down and select your prod-VPC.

For subnet, we will launch this instance in a public subnet, so under subnets select the drop-down and select either public subnet AZ1 or public subnet AZ2, I will choose to launch this instance in public subnet AZ1

Scroll down, and under firewall security groups, select an existing security group. For our security group, we will select the application load balancer security group.

Select the drop down a gain and next we will select the SSH security group. Click the drop-down a gain and next select the web server security group. So for the set-up server, we should have three security groups, if you select the plus Icon, you should see the three security groups.
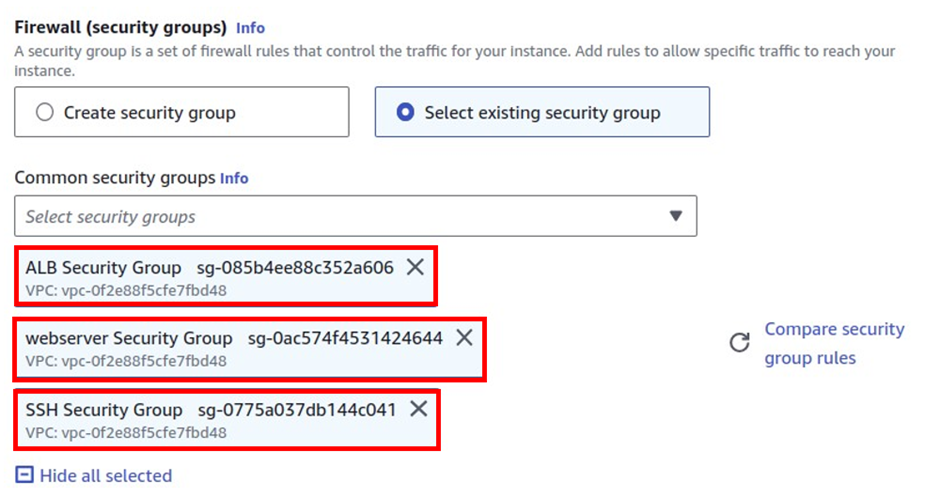
Scroll down, under the advance details, click the drop-down, and scroll down, under I am instance profile, select the drop-down, and make sure you select the s3 role


These are all the settings we need for our set-up server review the settings under summary, you can see we are using Amazon Linux 2 AMI, t2.micro and 3 security groups, click launch instance.

we have successfully launched the set-up server. Select the instance ID, you can see the instance state is running and the status check is initializing.


Wait for about a minute click the refresh button and see if your EC2 instance has passed the status check.

Our instance has passed the status cheque, this is all we need for this session, sip a cup of coffee and let’s proceed.
Use MySQL workbench to import data into the RDS Database
now that we have launched the set-up server, we will use MySQL workbench and set-up server to import the SQL data of our application into the RDS database.
Make sure you have the SQL file for the application.
Once you’ve downloaded the SQL file, next in the management console, type ec2 in the search box, and then select ec2 under services.

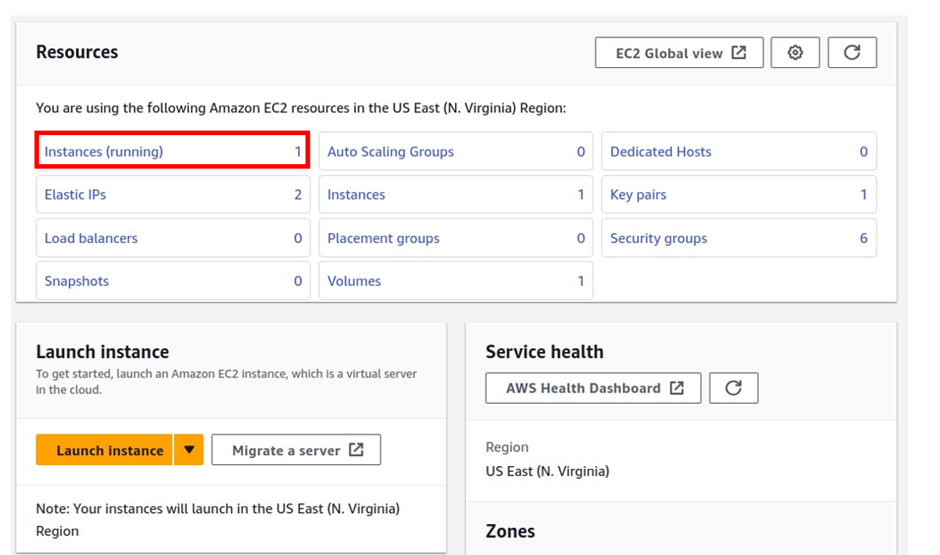
On the ec2 dashboard, select instances running.

Then select your set-up server to see the settings.

Next, click on the AWS logo, and select open link in the new tab Then go to that tab, on that page, type RDS under such box, and select RDS under services.

On the RDS console, select database.

And on this page, select your RDS instance.

The reason for opening the RDS instance and the set-up server is that we need some information from those resources to import the SQL data of our application into the RDS database.
Next, let’s move and open MySQL work-bench if you don’t have one please install it on your machine.

Once you’ve opened the mySQL work-bench, on the top, menu select database. and select Connect database

Select Connect database.

Under connect to the database, select this dropdown, and select standard TCP/IP over SSH

The first value we will enter is the SSH hostname, and this is going to be the public DNS of the set-up server, so let’s go back to the management console, in the management console, go to the ec2 dashboard and make sure you’ve selected your set-up server and copy the public ipv4 DNS.

Once you’ve copied it come to mySql work-bench and under the SSH host name, paste it there.

The next value we will enter is the SSH user name, this will be the user name of the set-up server.
Remember we are using Amazon linux2 and the username of Amazon Linux2 is ec2-user. So under SSH user name, enter ec2-user.
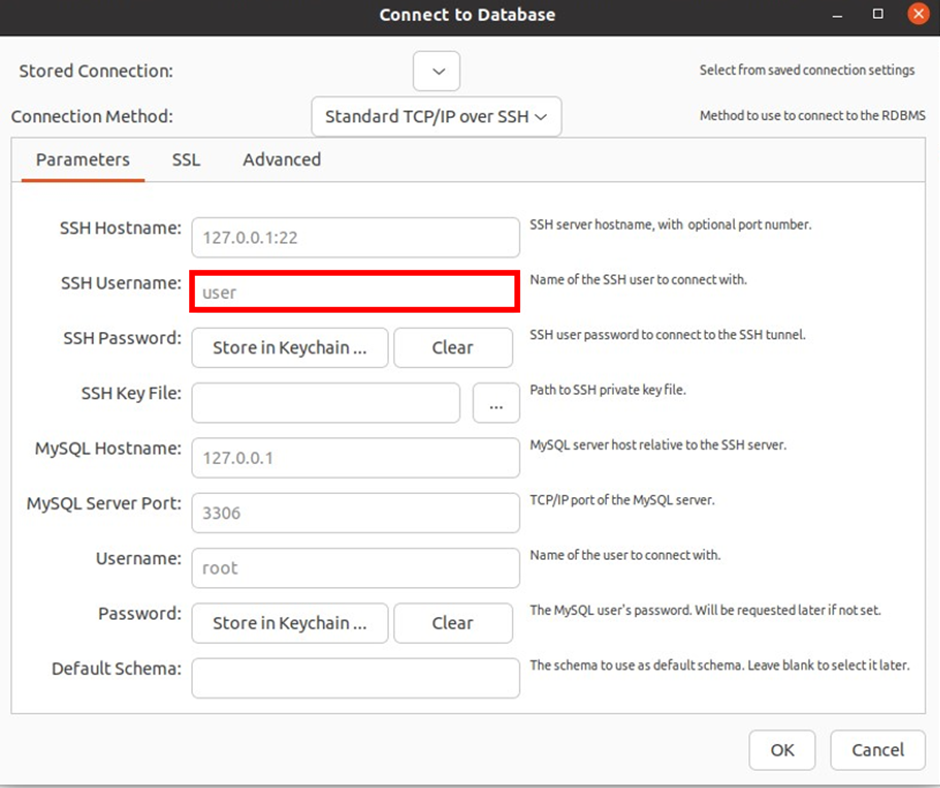
The next value we will enter is the ssh key file and this is the private key of our key-pair that we will use to ssh into our ec2 instance. When we created our key-pair two keys were generated, there is the public key that stays with the AWS and the private key that you download to your local machine. We will add that private key under the SSH key file.
So click this button, and when prompted, browse to the location of your computer where you saved your private key.

Once you’ve added your private key, the next value we will enter is MySQL host-name and this will be the endpoint of the RDS database, so let’s go to the management console, and select the RDS console, under connectivity and security, you will see the endpoint so select it and copy it, then come back to MySQL work-bench and paste it in there.

Then come to mysql work-bench under hostname and paste it in there.

Then the next value will be the mysql server port which will be 3306.
Next, we will enter the database user name, so let’s go back to the management console under RDS and select your database. On the RSDS console, select the configuration tab, on the configuration tab if you scroll down, you will see the master username

Copy it and enter the user name here.

Once you’ve entered the username, under password, we are going to enter the password of our database, so click here and when prompted, enter your database password.
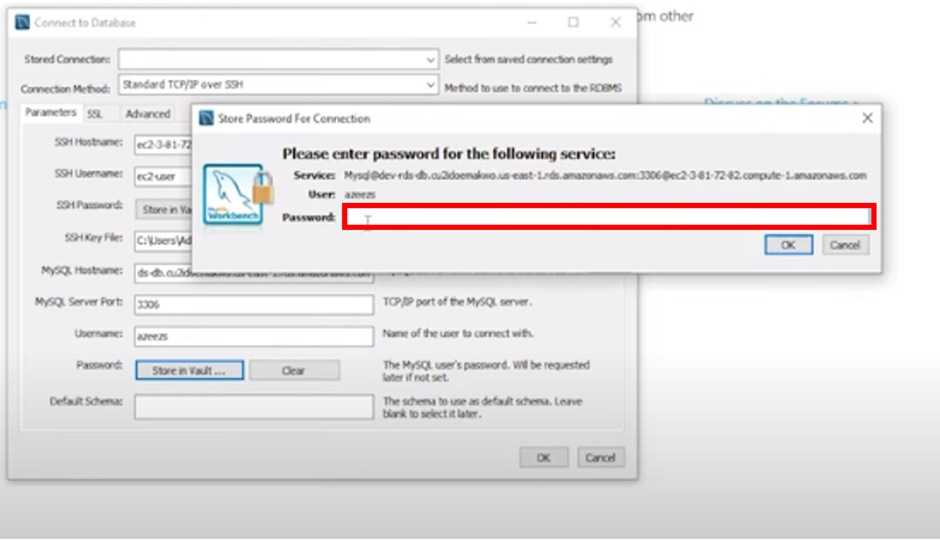
Once you’ve entered your database password click OK.
There we go, we have used MySQL work-bench to connect to our RDS database. And we can see we are in our database.

In the RDS database, make sure you are under the administration tab.
So you can see administration.
on the administration tab click data import.

under data import, select import from self-contained file and then click the strip button and when prompted, select the location of your SQL files.

after you’ve selected the SQL files, under the default target schema, select the drop-down,
And then make sure you select the name of your database.

Once you’ve done the two settings, click start import.
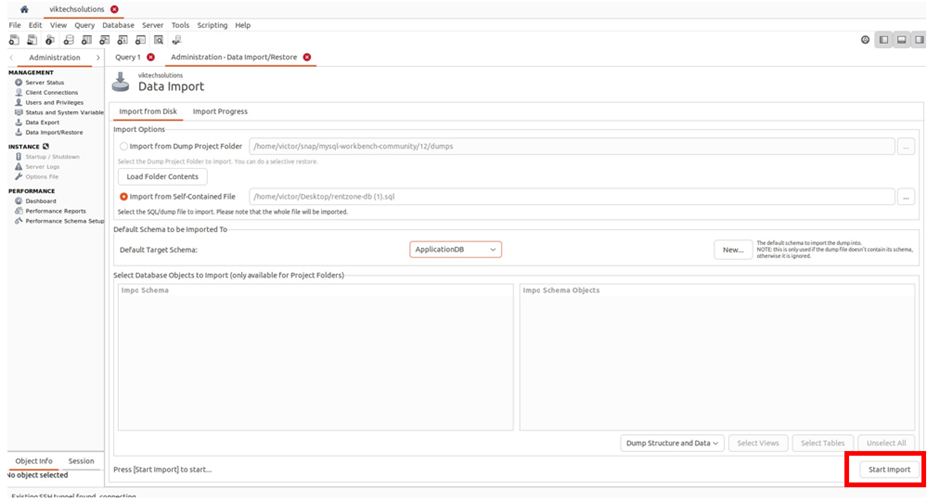
And there we go, we can see our import is running.

After a few minutes, we can see our import completed successfully.
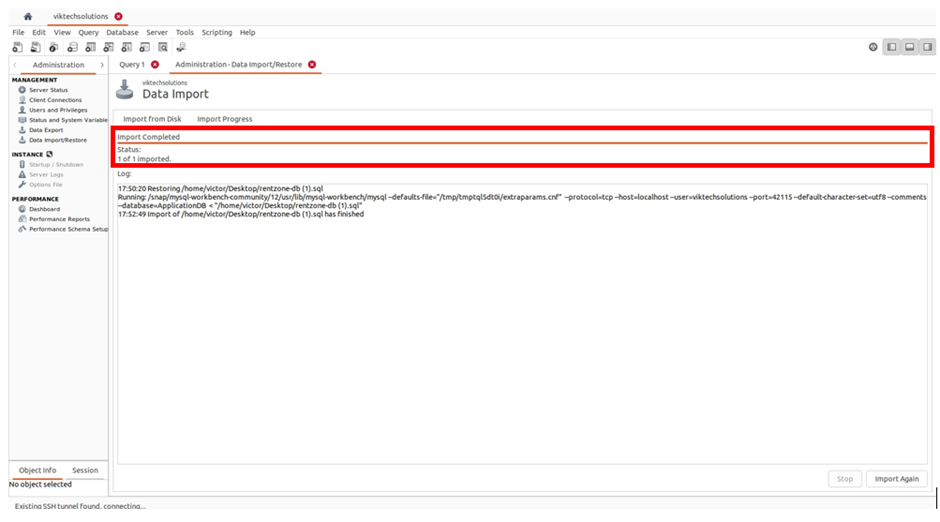
We have successfully imported our SQL data into our RDS database.
This is all we need for this session. Take a small break and let’s proceed to the next stage.
Install a Dynamic Website on an EC2 Instance (Lamp Stack)
We will use our set-up server to install and configure our website
In the management console, type ec2 in the search box, then select ec2 under services.

On the ec2 dashboard, select the instances running then select your set-up server. Click instant connect then on the connect dashboard go to the SSH client tab, copy the command navigate to the directory where you stored your private key, and paste it into your terminal. Make sure only have permission to view your keys. So if you get an error of unprotected key it means your keys are too open run this command,
chmod 400 web-SSHkey.pem
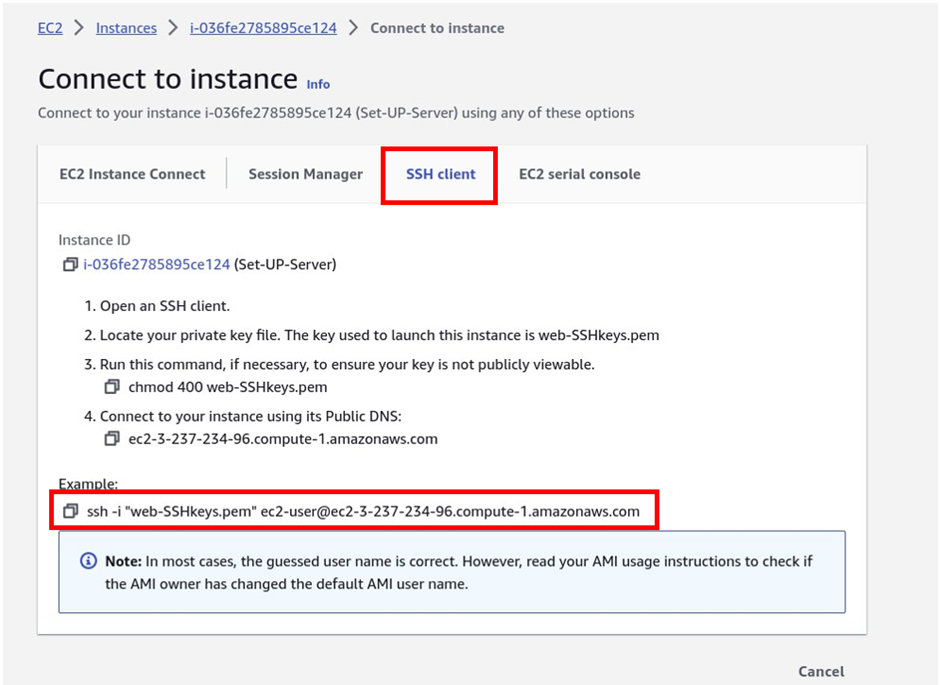

And there we go, we have successfully SSH into our server.

Once you have SSH into your set up server, we will run these commands, to install our website.
1. #update ec2 instance
sudo yum update -y

2. #install apache
sudo yum install -y httpd
sudo systemctl enable httpd
sudo systemctl start httpd

3. # install php 7.4
sudo amazon-linux-extras enable php7.4
sudo yum clean metadata
sudo yum install php php-common php-pear -y
sudo yum install php-{cgi,curl,mbstring,gd,mysqlnd,gettext,json,xml,fpm,intl,zip} -y

4. #install mysql5.7
sudo rpm -Uvh https://dev.mysql.com/get/mysql57-community-release-el7-11.noarch.rpm
sudo rpm --import https://repo.mysql.com/RPM-GPG-KEY-mysql-2022
sudo yum install mysql-community-server -y
sudo systemctl enable mysqld
sudo systemctl start mysqld

5. #download the FleetCart zip from s3 to the html derectory on the ec2 instance
sudo aws s3 sync s3://aosnote-rentzone-web-files /var/www/html

6. #unzip the FleetCart zip folder
cd /var/www/html
sudo unzip rentzone.zip

7. # move all the files and folder from the FleetCart directory to the html directory
sudo mv rentzone/* /var/www/html

8. #move all the hidden files from the FleetCart diretory to the html directory
sudo mv rentzone/.well-known /var/www/html
sudo mv rentzone/.env /var/www/html
sudo mv rentzone/.htaccess /var/www/html

9. #delete the FleetCart and FleetCart.zip folder
sudo rm -rf rentzone rentzone.zip

10. # enable mod_rewrite on ec2 linux

sudo sed -i '/<Directory "\/var\/www\/html">/,/<\/Directory>/ s/AllowOverride None/AllowOverride All/' /etc/httpd/conf/httpd.conf

11. #set permissions

sudo chmod -R 777 /var/www/html
              sudo chmod -R 777 storage/

12. #12. add database credentials

sudo vi .env

13. #13 restart server

sudo service httpd restart

#website should be up and running
We will run the first command to update our ec2 instance, so copy and paste the command.
sudo yum update -y
Then after the update, run the next command to install Apache.
sudo yum install -y httpd
sudo systemctl enable httpd
sudo systemctl start httpd
We have successfully installed Apache on our EC2 instance.

Clear the screen and then next we are going to install PHP version 7.4
So copy and paste the command below.
sudo amazon-linux-extras enable php7.4
sudo yum clean metadata
sudo yum install php php-common php-pear -y
sudo yum install php-{cgi,curl,mbstring,gd,mysqlnd,gettext,json,xml,fpm,intl,zip} -y

Next, run the bellow command to install MySQL version 5.7, so select it and copy, then press enter
sudo rpm -Uvh https://dev.mysql.com/get/mysql57-community-release-el7-11.noarch.rpm
sudo rpm - import https://repo.mysql.com/RPM-GPG-KEY-mysql-2022
sudo yum install mysql-community-server -y
sudo systemctl enable mysqld
sudo systemctl start mysqld
We have successfully installed MySQL version 5.7

Now, the next command we will run will download the application code from the s3 bucket, so when you run this command make sure you update the name of your s3 bucket.
#download the FleetCart zip from s3 to the HTML directory on the ec2 instance
sudo aws s3 sync s3://aosnote-rentzone-web-files /var/www/html
Let’s go to the management console click the aws logo, and open the link on another tab, then type s3 in the search box, then select s3 under services.


Then select the s3 bucket where you uploaded the webfiles.
Then select the name of the s3 bucket, then copy it.

Then come back to your command and paste it.
When you paste the name of the bucket, make sure there is a space between your s3 bucket and your HTML directory.
Once you’ve updated the name of the bucket, copy the command come back, and run the command in your terminal.
#command with my bucket name updated
sudo aws s3 sync s3://viktechwebappbucket /var/www/htm

We have successfully downloaded the application files from the s3 bucket into the html directory of our ec2 instance.
The next command is going to change the directory into our html directory then unzip the file we copied from our s3 bucket into the html directory.
So copy and paste the command into your terminal.
cd /var/www/html
sudo unzip rentzone.zip
There we go, we have now changed our directory into the html directory, and we are unzipping the zip folder we downloaded from our s3 bucket.

Remember we have changed our directory into the html directory, so in the html directory, you can type ls, to list the contents of the directory.
Now in the HTML directory, you can see we have two files, one is the zip folder and the other is the file we unzipped from the zip folder.

Now the next command will move all the unzipped files into our HTML directory. So copy this command and paste it into your terminal.
sudo mv rentzone/* /var/www/html
list the contents of this directory by typing the ls command in your terminal. you can now see we have all the files.

Once we have moved those files into the HTML directory, there are also some hidden files we have to move into the HTML, directory, so this next command will move those hidden files, into the HTML directory.
sudo mv rentzone/.well-known /var/www/html
sudo mv rentzone/.env /var/www/html
sudo mv rentzone/.htaccess /var/www/html
Once we have moved all the files into the html directory, we don’t need the zip, folder, so we are going to delete them using this command.
sudo rm -rf rentzone rentzone.zip

The next command we will run will enable mode rewrite on our EC2 instance so copy this command and paste it into your terminal.
# enable mod_rewrite on ec2 linux
sudo sed -i '/<Directory "\/var\/www\/html">/,/<\/Directory>/ s/AllowOverride None/AllowOverride All/' /etc/httpd/conf/httpd.conf

The next command we will run will set permission in our html directory, and storage directory.
So copy those two commands and paste them into your terminal.
#set permissions
sudo chmod -R 777 /var/www/html
sudo chmod -R 777 storage/

Now that we have installed all the software that our application needs to function and we have set all the permissions on our html directory, the next thing we need to do is to configure our website by connecting it to our database,
For this application we are working on, all we have to do is to edit our .env file.
A .env file, short for “environment file,” is a plain text configuration file used to store environment variables for software applications. Environment variables are typically used to store configuration settings, API keys, database connection strings, and other sensitive or environment-specific information that an application needs to function properly.
Here are some key points about .env files:
Format: .env files are usually simple text files, where each line represents a single environment variable in the form of KEY=VALUE. For example:
To edit this file, we will use the vi editor
So type the bellow command in your terminal.
sudo vi .env
This command will open this file in the vi editor, the next thing to do is to edit this file and enter our database information here.

To edit this file, press I to go to the insert mode, once you are in the insert
mode, you will see insert down here.
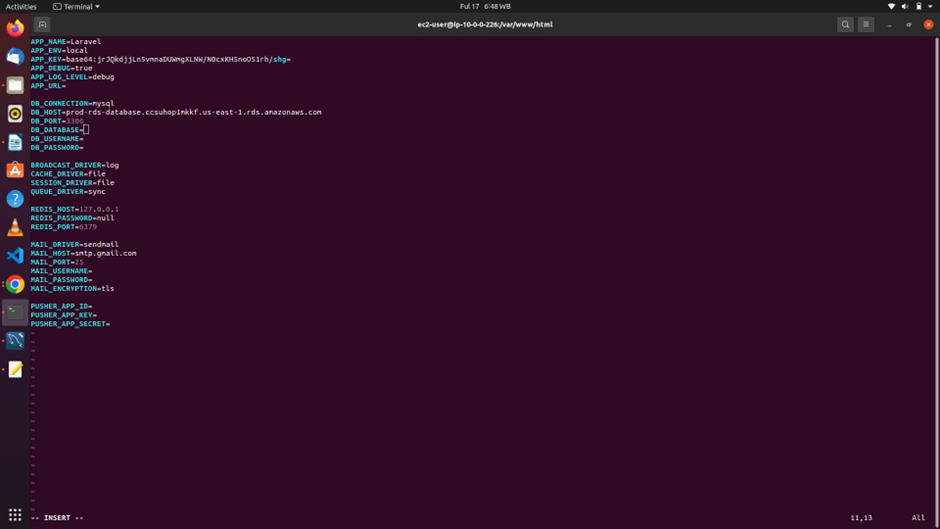
press the drop-down arrow on your keyboard and bring it down to the database connection, then press down again to bring it to the DB host, then under db host, press the left arrow,
Now for the DB host, this will be the end-point for your RDS instance,
Now let’s go to the management console to get the endpoint of our RDS instance.

In the management console type RDS in the search box, then select RDS Under services.

On the RDS dashboard, select db-instances, then select your RDS.

Under connectivity and security, you will see the endpoint of your RDS instance, select it.

Copy it then come back to your terminal, then under DB host, paste it there.

After pasting the end-point, then now come to the DB database, and under DB database, this is where you will enter the name of your database.
Let’s go to the RDS console and select your database again, then go to the configuration tab, and under the configuration tab, scroll down, for the db name, you are going to see the name of your database.

Select it and copy it, then come back to your vi, editor, for db database, and paste it there.

The next value we will enter is the db user name and this will be the user name of your database.
To get the username of your db instance lets go back to the management console and under master username, you will see the user-name of your RDS db instance here.

So copy it and come back to your terminal and under db username, paste it in there.

Then next enter your DB password.

Once you’ve entered all those details type the escape key on your keyboard, then type:wq! Then press enter.
This is how we save changes and exit the vi editor.

This is all we need to do to connect our database to the application.
Remember any time you make a change to a file in your ec2 instance it is always good to start Apache again.
So copy this command and paste it to your terminal to start Apache a gain.
#restart server
sudo service httpd restart
And there we go, we have restarted the Apache web server and this is all we need to do to install and configure our website.
Now if you go to the ec2 console, and copy the public ipv4 address or the public DNS of our ec2 instance, we should be able to access our website. We will be accessing our website over HTTP protocol on port 80.
Remember HTTP Protocol is always not secure.
We are now on our website, you can clap for yourself.

One thing we should not do is the exclamation mark in our browser this means that our website is not secure.
This is because we are serving our website via HTTP.
This is all we have to do for this session. The next step will make our website secure.
CREATE AN AMAZON MACHINE IMAGE (AMI)
Now that we have configured and installed our website on the set-up server, we will use the set-up server to launch an AMI, and we can use that AMI to launch a new ec2 instance.
To use the setup server to create an AMI, in the management console, type ec2 in the search box, then select ec2 under services.
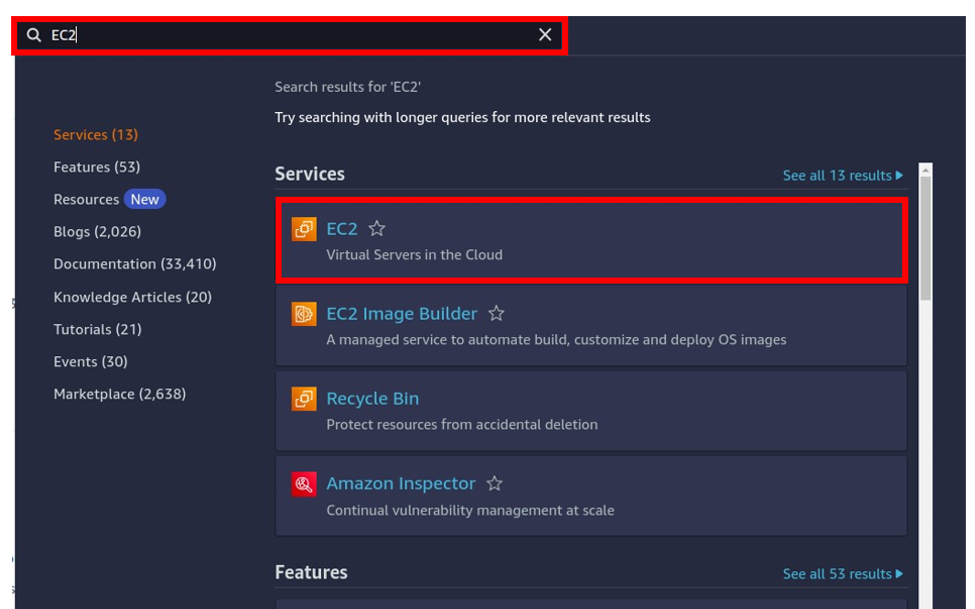
Now on the ec2 dashboard, select the instances running and select your set-up server.
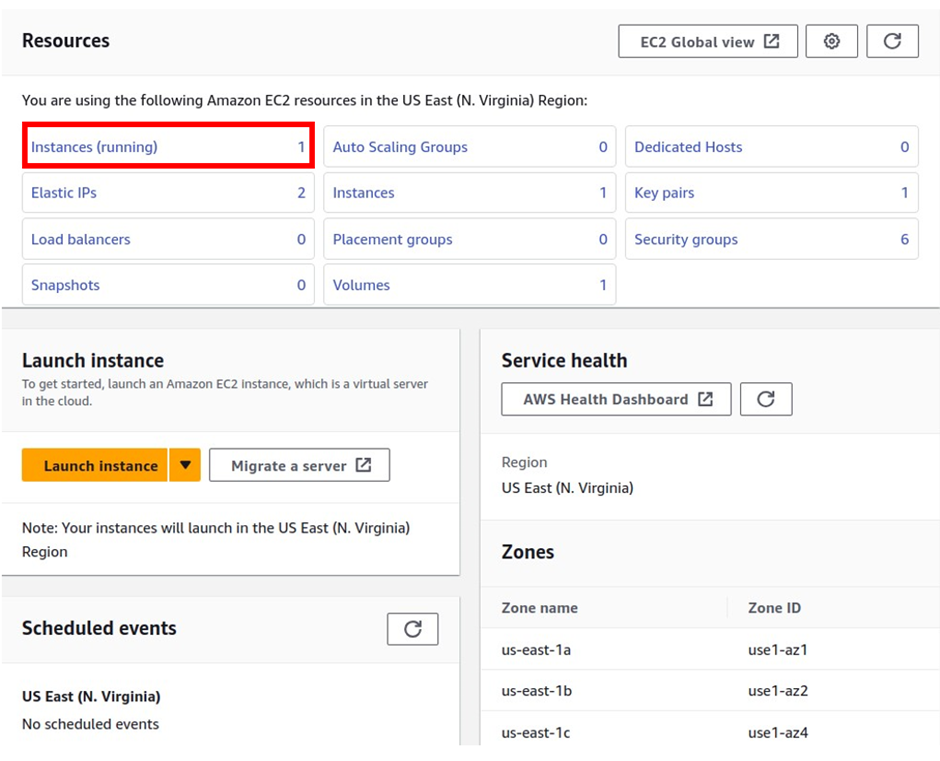

Then select actions,

Select image and templates, Then select Create image.

In the create image dashboard under the image name give your image a name and call it rent-zone AMI, then use the same name as the description,

Scroll down, under tag we are going to tag our image and snapshots together then click add a new tag.
Under key, enter a name, and undervalue paste the same name as your image.
These are the options we need to create our image, scroll down and click Create image.

We have used the set-up server to create an image.

To see the image, on the menu on the left, scroll down and under images select AMI

And here, you will see the rent-zone AMI.

Once the AMI is available also select the snapshot and you should be able to see the snapshots.

You can launch an application or a website on an ec2 instance, then you create an Amazon machine image(AMI) of that ec2 instance, so anytime you use the AMI you created to launch any ec2 instance, the application and your website will be installed and configured on that instance.
CREATE AN APPLICATION LOAD BALANCER
We will use the AMI we created to launch an ec2 instance in the private subnet, when we use an AMI to launch an ec2 instance, in a private subnet, the ec2 instance will have our website already installed on it.
And to access the website, we will create a target group, and add the ec2 instance to the target group.
Then we will create an application load-balancer to route traffic to the target group. This is how users on the internet will be able to access our website.
To start, type ec2 in the search box, and select ec2 under services, in the ec2 dashboard select instances running, we have accomplished what we want to use our instance for, so let’s now stop it.
Select the set-up server go to the instance state, select the dropdown, and then select stop instance.


We have successfully stopped our set-up server.

Next, we are going to launch an ec2 instance, to launch an ec2 instance, click launch instance.

Under name and tags, give your instance a name, call it web-server az1.

Once you’ve given the instance a name, scroll down, under application and os images, select my AMIs
Under my AMIs, make-sure owned by me is selected, then click the Amazon machine image drop-down and select your rent-zone AMI.

Then scroll down, under instance type, and make sure it is t2. micro, It is the free one.
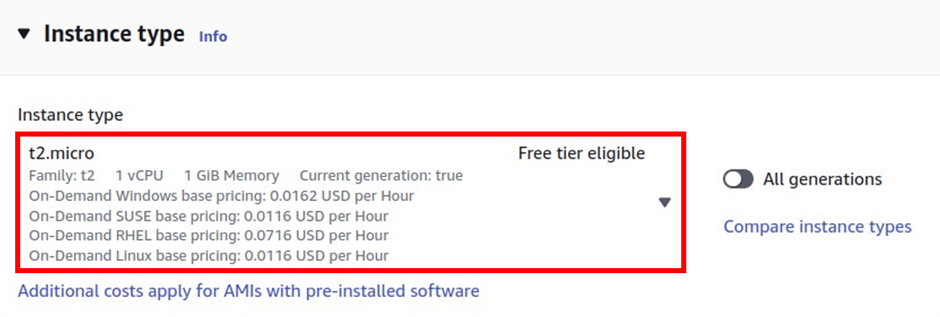
then scroll down under key-pair, select the drop-down, and select your key.

Scroll down, under network settings, click edit, for the VPC, select the dropdown, and make sure you select your prod-VPC.

For the subnet, select the drop-down, and let’s launch this ec2 instance in the private app subnet az1.

Then scroll down, under firewall and security group, select an existing security group, then select the dropdown and select the web server security group.

Then scroll down, these are all the settings we need to launch our ec2 instance. And you can review those settings under Summery, now click launch instance.

We have successfully launched an ec2 instance in the private subnet using the AMI, to see the ec2 instance, you can click on the instance id.
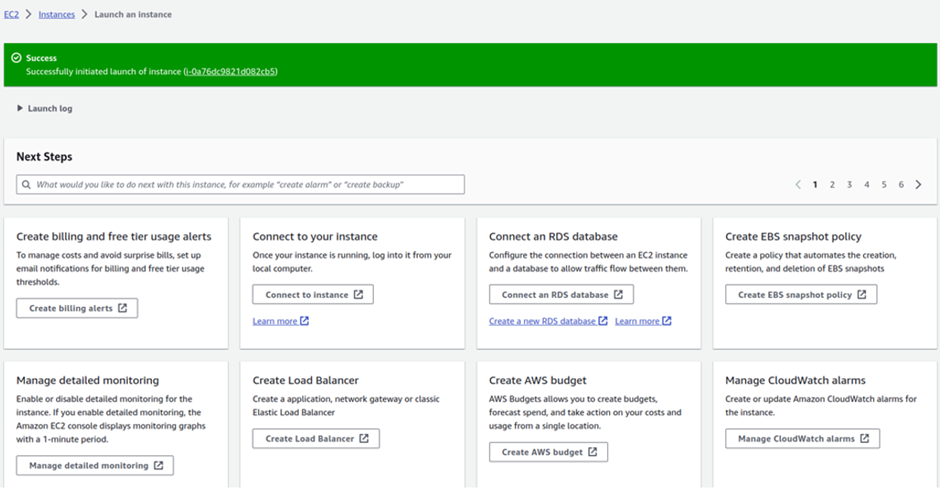
Now remember to access our website on the internet, we have to create a target group and add our instance to the target group, then we use an application load balancer, to route traffic to the target group.
To create a target group, on the left navigation pane, scroll down, and under load balancers, click target group.

Then click Create Target Group.

Under basic configuration choose the target type and it is going to be instances.

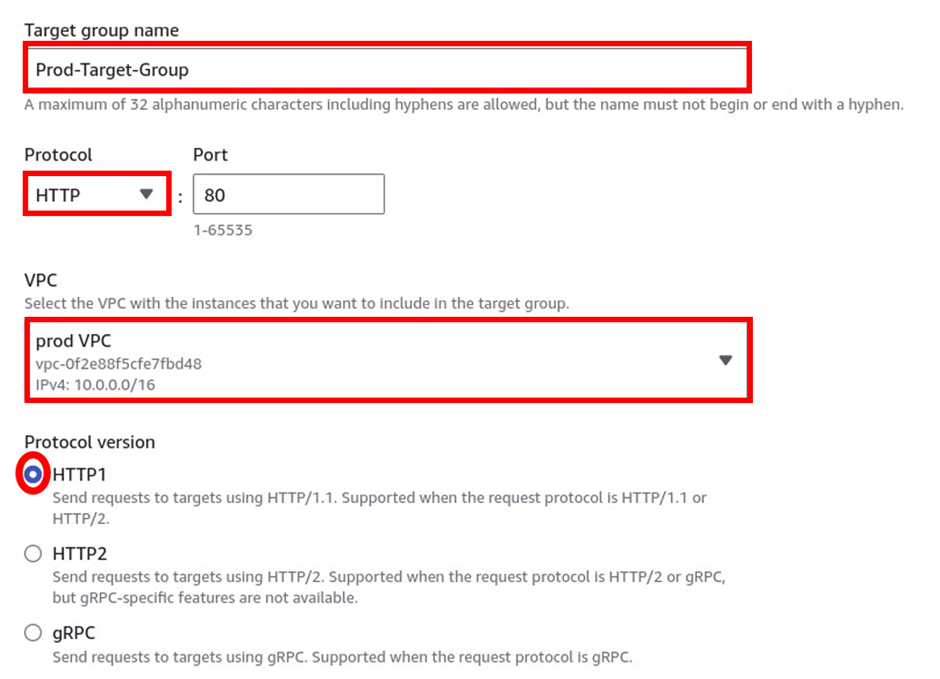
Then scroll down, under the target group name, give it a name, call it the prod-target group.
Once you’ve given your target group a name, under the protocol, it is going to be HTTP, port 80, and under VPC, select the drop-down and make sure you select your prod-VPC,
for the protocol version, leave it on HTTP1 and scroll down.
Under health-cheques, click the advance, dropdown, and scroll down, Under the success status code we will add 301 and 302, We need this status code for when we need to redirect traffic from HTTP to HTTPS. So let’s scroll down and click next.


we will add our instance to the target group, and we can see our webserver az1 under available instances, to add our instance to the target group, we will select it then click include as pending below.


When you click include as pending, it will add it to the target, and you will see it. once you see your ec2 instance here as pending, click Create Target group

There we go we have created a target group, and added the ec2 instance to the target group.

The next thing we will do is to create an application load balancer to route internet traffic to this target group.
To create an application load balancer on the left side of navigation panes, scroll down, and under load balancing, select load balancers.

Then click Create load balancers.

On this page scroll down we are going to create an application load balancer.
Under application, load balancer click create.

Under basic configuration, give your load-balancer a name, call it prod-application load balancer.
Once you’ve given your application load balancer a name, scroll down, the application load balancer is going to be internet-facing so select the radio button next to internet-facing. Again select the radio button under IPv4.

Then scroll down, under network mapping under the VPC, select the drop-down, and make sure your prod VPC is selected.

Then in the VPC, under mappings, we will select us-east-1a availability zone, and in us-east-1b, we want to make sure that the application load balancer has a reach, to the public subnet az1.
So in us-east-1a, make sure you’ve selected public subnet az1.
Then scroll down a gain and in us-east-1b, make sure you have a gain selected public subnet az2, the application load-balancer always works in the public subnet.

scroll down under the security group, remove the default security group, select the drop-down, and select your application load balancer security group.


Then scroll down, under listeners and routing, the first listener we will create is on port 80, the protocol is HTTP, and the port is 80, then under default action, select the drop-down and select the target group.
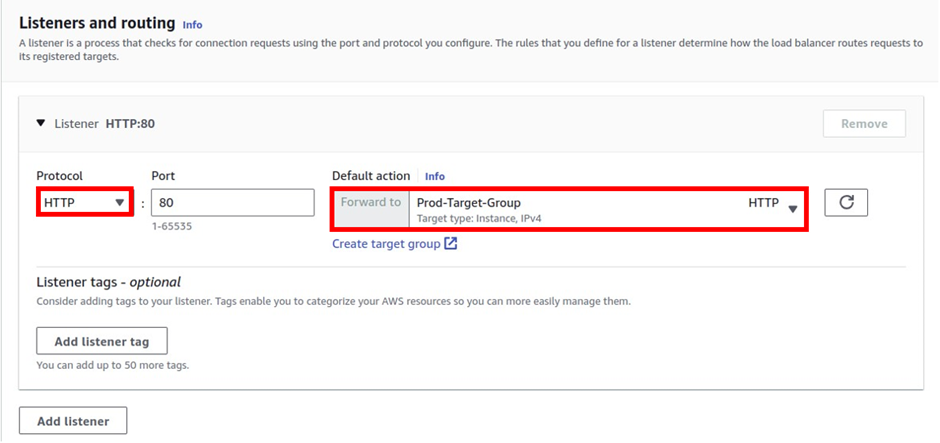
We will only create an HTTP now and when we request our public certificate, we will use that to create our HTTPS, listener.
scroll down, we will leave all the other options as default then click Create Application load-balancer.

We have successfully created, the application load balancer, click view load balancer.

We can see the application load-balancer we just created and the state is provisioning.
We will wait for the state to be active then we will use the DNS name of the application load balancer to access our website.
Once you’ve waited for some time, click the refresh button and the state of the application load balancer is now active.
Once the state of your application load balancer is active, copy the DNS name, Then come to your web browser and paste it in there and you should be able to access your website.

We can access our website using the DNS name of our application load balancer.

The next thing we will do is go to the EC2 console and then select our instances.

We will now terminate that set-up server because we don’t need it anymore.
So select the set-up server and make sure you don’t select your webserveraz1, then select the drop-down of the instance state, then terminate it.

This is all we need to do for this section. Clap for yourself.
REGISTER A NEW DOMAIN NAME IN ROUTE 53
We will register a new domain name with amazon route 53, to allow our end-users to access our website using our domain name.
Instead of the DNS name of our application load balancer.
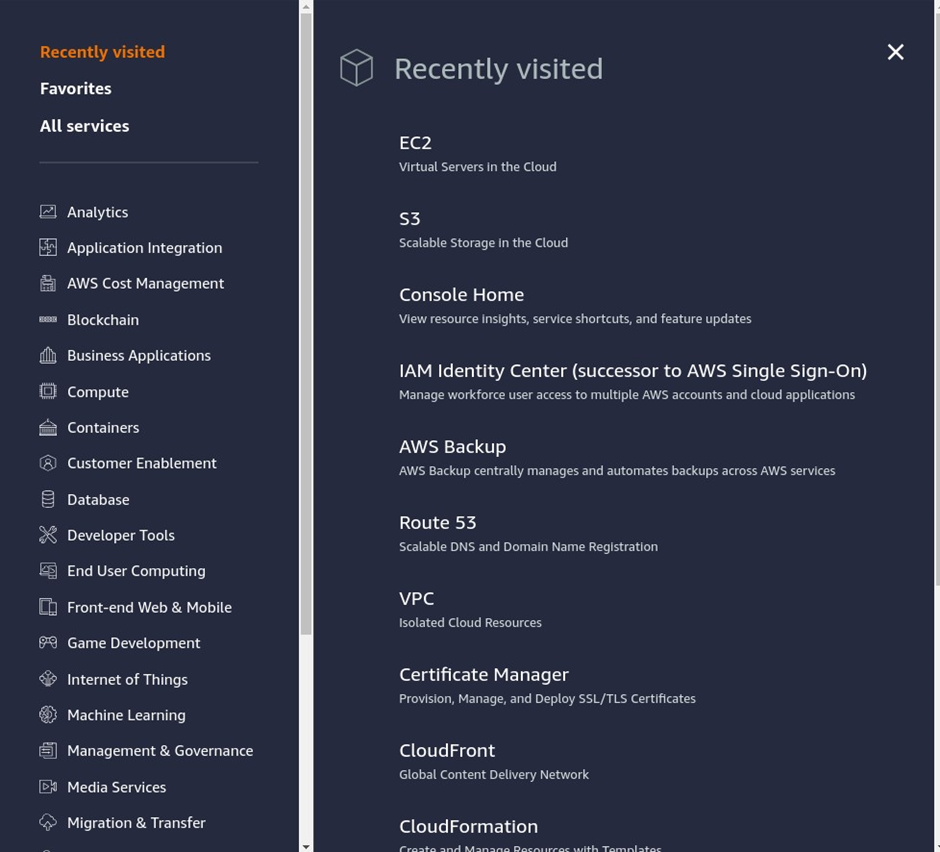
Straight away go to the management console type route 53 in the search box, and select route 53 under services.
In the route 53, dashboard, first, we have to check whether that domain name is available, under register domain, type the domain name, and I will
call it viktechsolutionsll, once you’ve typed your domain name, click cheque.

And there we go, the domain name we are trying to register is available,
Once you’ve entered the domain name you want to register on the right side proceed to checkout.

On this page, enter your contact information, under privacy protection, make sure it’s enabled to hide your contact details, then click next.
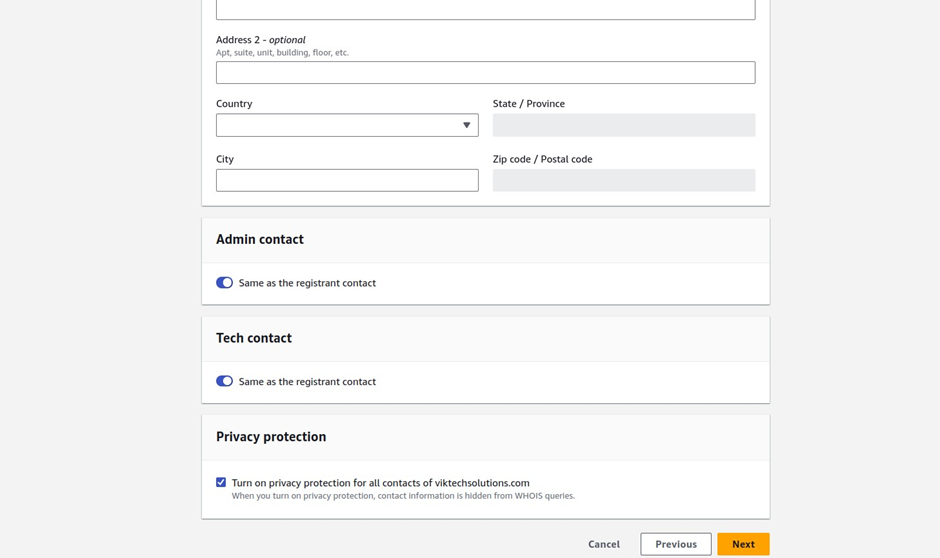
On this page review your contact information, tick the box on terms and conditions then click submit.

This is all we need to do to register a domain name.

The domain name can take up to 3 days to be complete but for me, it took about 20 minutes and it was available for use.
If you click pending request, you will see the domain name is there and the status is pending.
After waiting for a few minutes, click on the registered domain your domain name should now be available.

CREATE A RECORD SET IN ROUTE 53
We will create a record set in Route 53 so that we can access our website using our domain name.
To create a record set in route 53, in the management console, type route 53 in the search box, and select route 53 under services.

On the Route 53 dashboard, select hosted zones.

Then select your domain. In your hosted zone click Create Record.

Under record name, enter www

Then under record type, it is going to be an A record. And for the alias toggle the button.

Then under route traffic select the drop-down, and select alias to application and classic load balancer.

Then for the region select the drop-down and select the region where you created your application load balancer.
My application load balancer is in the us-east-1 so look for it and select it.
And in that region, if I select this drop-down, my application load balancer is there. Leave it on simple routing.
This is all the settings we need to do in the record set. Click Create Records.
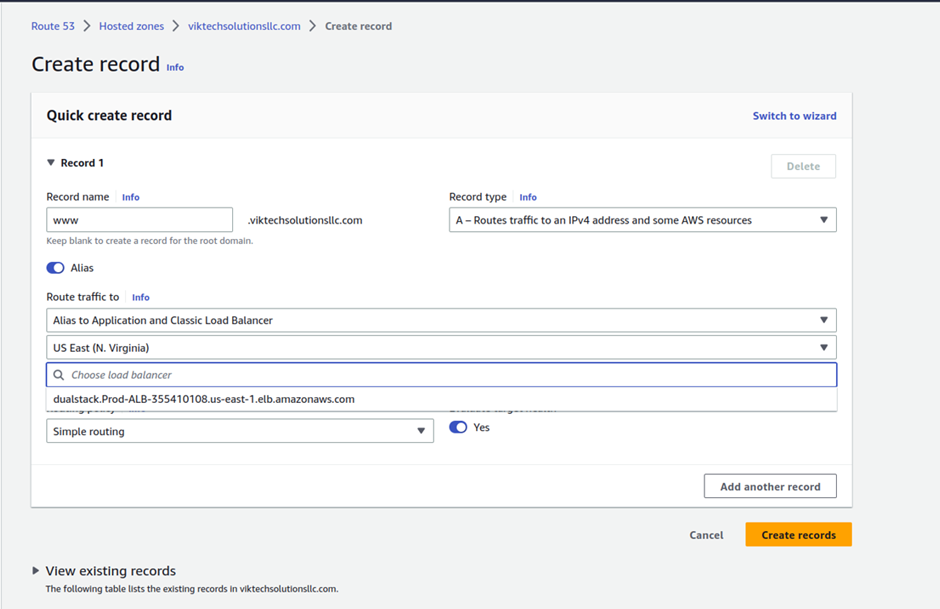

We have created a record set. you can click view to see the status of the record set. currently, the record status is pending.

We will give it some time for the status to be in sync.

There we go, the status is now in sync.

Let’s go back to our hosted zone, by clicking your domain name up, then selecting the record you just created, then selecting the box to copy the record name.
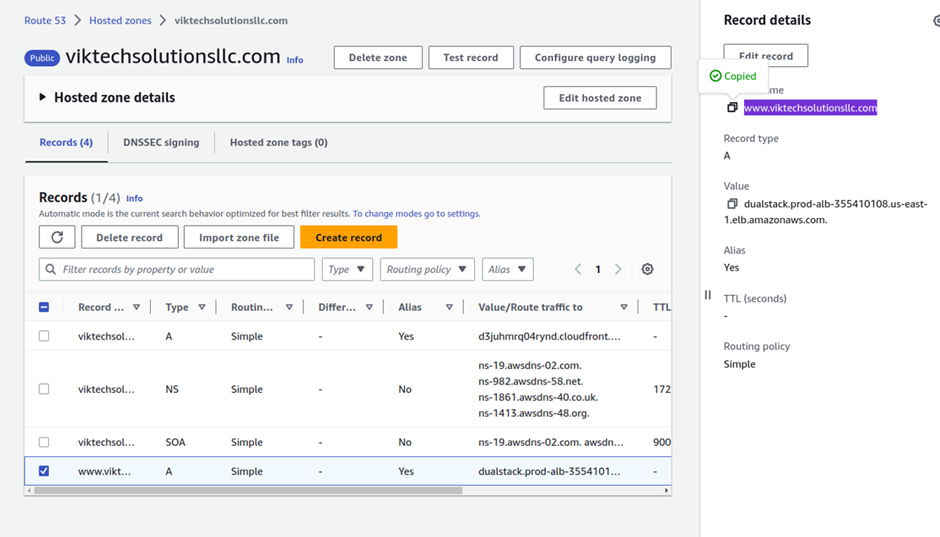
Let’s open a new browser and paste it.

And there we go, we can now access our website, from our domain name.
REGISTER FOR SSL CERTIFICATE FROM THE AWS CERTIFICATE MANAGER
We will register for a free SSL certificate from the AWS certificate manager and we will use the SSL certificate to encrypt all communications between the web browsers and our webservers.
When you visit a website and that website has a lock Icon,
That means that all communication between your web browser and that website is secure.
Currently for our website, the communication between the website and our browser is not secure.

We will use this SSL certificate to secure all communication between our website and the web browser.
This is also referred to as encryption in transit.
To register for a free SSL certificate, in the management console, in the search box, type certificate manager, then select certificate manager under services.
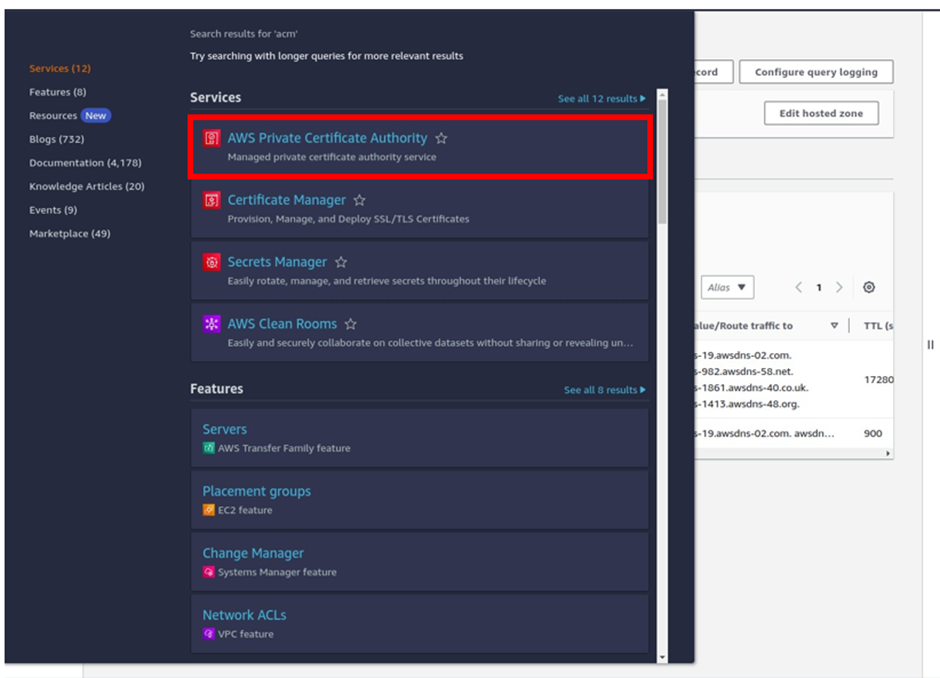
Remember certificate manager only works in the US-east-1 region, so make sure it’s selected.

Then in the certificate manager console, click request certificate.

We will request a public certificate so click the radio button then click next.

Then under domain name, we will enter the domain name we want to request the certificate for, so I will enter my domain name, after entering the domain name click add another name for this certificate to add a wild card for your domain. The wild card allows you to have www.yourdomainname.com
In the search box, type *.yourdomainname
Once you have entered the wild card for your domain name, scroll down.

Under validation method, we will select DNS validation and you can see that’s the method that’s recommended.
Then click request.

We have successfully requested a certificate. To view it, click View Certificate.

The status is saying pending validation that is because we have to create a record set in route 53, to validate that this domain name belongs to us.
To create a record in route 53, AWS has made it very easy, all you have to do is click create record.

On this page, we will select the domain name we are creating a record set for in route 53. So make sure you have checked your domain name and wild card then click Create Record.

We have successfully created a DNS record in route 53, to validate that this domain name belongs to us.

The next thing you should do is to click the refresh button Once you’ve clicked refresh, you will see that the status of the SSL certificate has been issued.
And for the two domain names we requested a certificate for, the status is a success.
This is how you request a free SSL certificate from the AWS, certificate manager.

SECURE A WEBSITE OR WEB APPLICATION WITH ACM SSL CERTIFICATE
We will use the SSL certificate we registered previously, to secure our website.

To use the SSL certificate to secure our website, we will add a new listener to our application load balancer that listens to traffic on port 443.
So in the management console type EC2 in the search box and select EC2 under services. On the EC2 dashboard on the left side of the navigation pane, scroll down and under load balancing select load balancers.

then select your application load balancer, move to the listeners and rules tab then click add listeners.

Now on the add listener dashboard under protocol, select the drop-down and select HTTPS, HTTPS is on port 443.


and under default action, select forward to the target group
Then under forward to target group, select this drop-down, and select our Prod-Target-Group. Scroll down.

Under Secure Listener settings, move to Default SSL/TLS certificate, select the drop-down, and select the certificate you created.

That’s all we need to do then click add.

We have successfully added another listener on port 443.

Click view listener and if you select your application load balancer again, scroll down under listeners, One on port 80, and the other on port 443.
Both are currently forwarding traffic to the target group. But for our port 80 listeners, we will edit it to redirect traffic to port 443.

So select your port 80 listeners.

Then under default actions select Redirect to URL, then under protocol port, select HTTPS port 443
Then click save changes.

There we go, we have successfully modified our listener on port 80, to redirect traffic to port 443.

Select your application load balancer and scroll down, we now have a listener that is redirecting traffic from port 80 to port 443.
And we have a listener on port 443 that is forwarding traffic to the target group.
These are the listeners we need to set up for our application load balancers and this is how to secure your applications with the SSL certificates.

Next, if we open our web browser and type our domain name a gain.

You can now see that our website is now secure and if you double-click on it, you can see that now it has HTTPS and our domain name.
We can also tell that the website is secure because we have got the lock icon.
After you secure your website with the SSL certificate you redirect your traffic from HTTP to HTTPS, if your website looks like this.

This is expected because we are now redirecting traffic from HTTP to HTTPS.
We have to SSH into our EC2 instance and configure one of our configuration files, to reflect that change.
SSH INTO EC2 INSTANCE INTO A PRIVATE SUBNET USING BASTION HOST, (JUMP SERVER)
We will SSH into our web server in the private subnet and update our configuration files so that our website can look properly.
To SSH into an EC2 instance in a private subnet, we have to launch a Bastion Host, into a public subnet, then we will SSH into that Bastion host. And from that bastion host, we can SSH into the webserver in the private subnet.
So to start, in the management console type EC2 in the search box and select EC2 under services.

On the ec2 dashboard, select instances running.

We currently have our web servers in the private subnet.

Next, we will launch our bastion host in the public subnet, which we will use to SSH into our web server in the private subnet.
Click launch instances.

Give the instance a name, and call it bastion host.

Once you’ve given your instance a name, scroll down. Under application and os images, select the quick start tab.
And on the quickstart tab, select Amazon Linux.
Make sure amazon linux 2 is selected because is the free tier one.

Scroll down and under instance type, it is going to be t2.micro and it is also a free tier. Under the key pair, select the drop-down and select your key pair.

Then scroll down, under network settings select edit, Then for the VPC, select the drop-down and select your prod-VPC.
Under the subnet, select the drop-down and remember a bastion host must be in the public subnet.
So for our subnets, we can either select public subnet az1 or public subnet az2.
So I will select public subnet az1.

Then scroll down, under firewall and security group, select an existing security group, then select the drop-down and select your SSH security group.

Then scroll down, these are all the settings we need for the bastion host, review summary, and then click launch instance.

We have successfully launched the bastion host in the public subnet.

To see it, click view all instances, and we can filter it by instances running, now select in the filter search box, then select instance state.

Then select instance state =

Then select running

We have two ec2 instances, the bastion host we just launched, and our webserver in the private subnet that we want to SSH into.

Now that we have launched the bastion host, in the public subnet, lets SSH into the instance
We will first start by navigating to the directory in which our key pair was stored, then do what we call SSH key forwarding
Because am on a Linux machine, I will use this command.
ssh-add -L <ssh keyname.pem>
and because my key name is web-SSHkeys.pem, my command will look like this
ssh-add -L web-SSHkeys.pem
type this command in your terminal and press enter.

Then we will type this command to SSH into the bastion host.
ssh -A ec2-user @<public ip address of your instance>
so copy this command go back to the management console copy the public IP address of your bastion host and paste it there. And now my command will look like this.
ssh -A ec2-user @34.200.250.257
once you’ve typed that command, then press enter.

We have used key forwarding to SSH into our Bastion host.
Now what is remaining is to SSH into our private instance and do configuration for our application files.
To SSH into our private EC2 instance, we will type this command into our terminal.
ssh ec2-user@<private ip adress of our private instance>
and now my command will look like this
ssh ec2-user@10.0.2.125
once you’ve typed that command press enter.


and there we go, we have now SSH into our private instance, and to know that we are in the private instance, you can confirm it with the private IP address of that instance.
Now that we have SSH into our webserver az1, we will update our configuration file to reflect to changes we made to our website.
The first file we will update on our web server is the .env file.
And remember the .env file is in the html directory, so the first thing we will do is navigate to our html directory. By typing in the terminal.
cd /var/www/html

After navigating to the HTML directory, we will use the vi editor to edit the .env file.
Sudo vi.env

And then we will edit the APP_URL=

After adding that configuration, press escape then save.
Now type ls
cd to the app directory then type ls then navigate to the provider’s directory.
Type cd providers in your terminal
Then we will edit the PHP file add this boot function code
if (env('APP_ENV') === 'production') {\Illuminate\Support\Facades\URL::forceScheme('https');}
open it in your vi editor.

Paste the boot function here


Save and quit the text editor

After changing any configuration it is always good to restart the Apache
Copy and paste this command to restart Apache
sudo service httpd restart
Then go back to your browser and access your website securely over https.
We can now see our website is looking properly.

we have launched a bastion host, SSH into our instance in the private subnet, and changed our configuration files and now our website is looking properly with the lock icon. Clap for yourself.
CREATE SECOND AMAZON MACHINE IMAGE AND CREATE AN AUTOSCALING GROUP.
Since we have now managed to secure our application with SSL and configured our website

We will now create a second AMI that will reflect this change so next time we don’t have to do all these configurations but just use the AMI to launch our website since it will have all the configurations set already.
So straight away, go to the management console and type EC2 in the search box, then select EC2 under services.

In the EC2 dashboard select the instances running.

Then select your webserver AZ1, click the action drop-down button move down to image and templates then select create image.

Then in the create image dashboard give your image a name, call it Rent Zone AMI version 2. Then scroll down and select tag image and snapshots together then under the key enter name and undervalue, and enter Rent zone AMI version 2 this is all you need to create your AMI click create image.
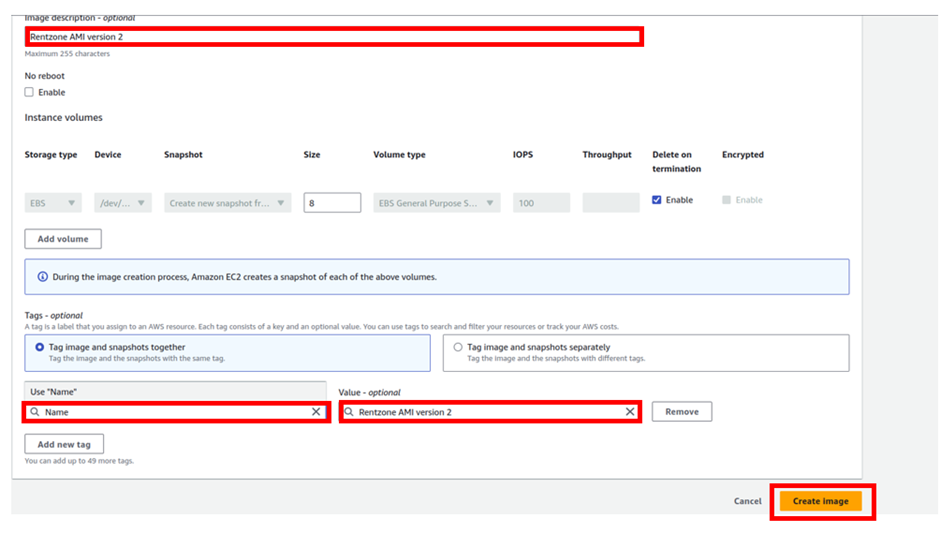
We have successfully created our second AMI to reflect our new changes.

In the EC2 dashboard on the left side of the navigation pane, under Images,
if you click AMI we are able to see our image.

and a gain if you navigate to the elastic block store, and select snapshots. Under snapshot ID, you are a gain able to see your snapshots.

This is all for the second AMI.
Now we will proceed to create our autoscaling group.
To create an autoscaling group, we will first all stop our web server az1 then we will let the autoscaling group do the work of launching our instances as required
Straight away go to the management console and in the search box, type EC2 then select EC2 under services.

In the EC2 dashboard select your instances running

Select both webserver az1 and bastion host then select instance state dropdown button then select terminate instance.

You will be brought to the terminate instance dashboard then click terminate.
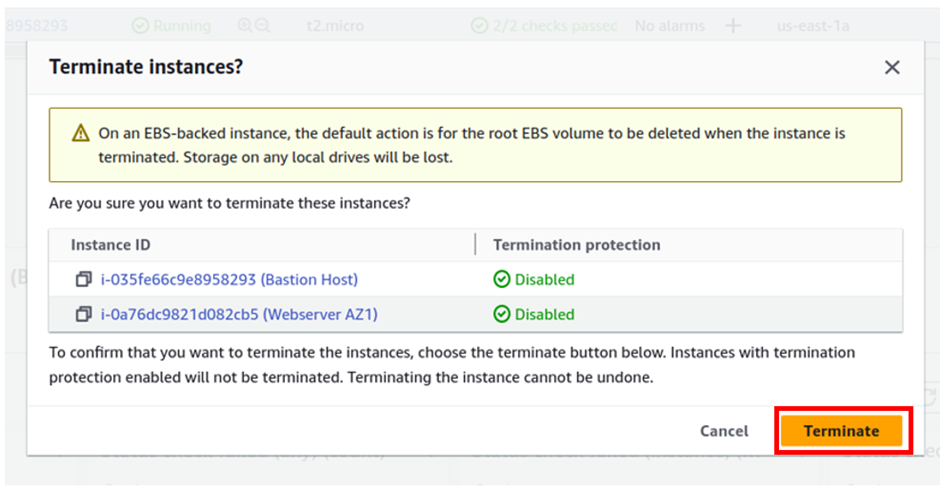
There we go we have successfully terminated the set web server az1 and bastion host since we now don’t need them.

To save AWS costs always terminate unused resources.
Remember for the webserver az1, we have already created an AMI which we will use with an autoscaling group to launch instances for us.
Now to create an autoscaling group, remember we need a launch template that the autoscaling group will use to launch our EC2 instances.
So, in the EC2 dashboard in the left navigation pane, under instances select launch templates.

Then click Create Launch launch-template.

In the launch template dashboard, under the launch template name give your launch template a name. call it production launch template. Then under description, use the same as the description.
Under scaling guidance, check the box for the provide guidance to help me set up a template that I can use with EC2 autoscaling.
Scroll down.

Under application and OS Images, select my AMI tab then select click owned by me radio button. Then select the search, look for Rent zone AM1 V2 then select it.

Scroll down and under instance type, make-sure t2. micro is selected, this is free tier eligible.
Scroll down.

Under key pair login, select the drop-down and select the SSH keys you created previously.
Then scroll down.

In the networking settings under subnets select the drop-down and select don’t include in the launch template.
Then under firewall and security select the radio button on select existing security group, then under security groups, select the search box and select your webserver security group. These are the settings we need for the launch template. Now click Create Launch Template.

We have created our launch template.

Next, we will now proceed to create an autoscaling group. So, in the left navigation pane of the EC2 dashboard, under autoscaling, click autoscaling group.
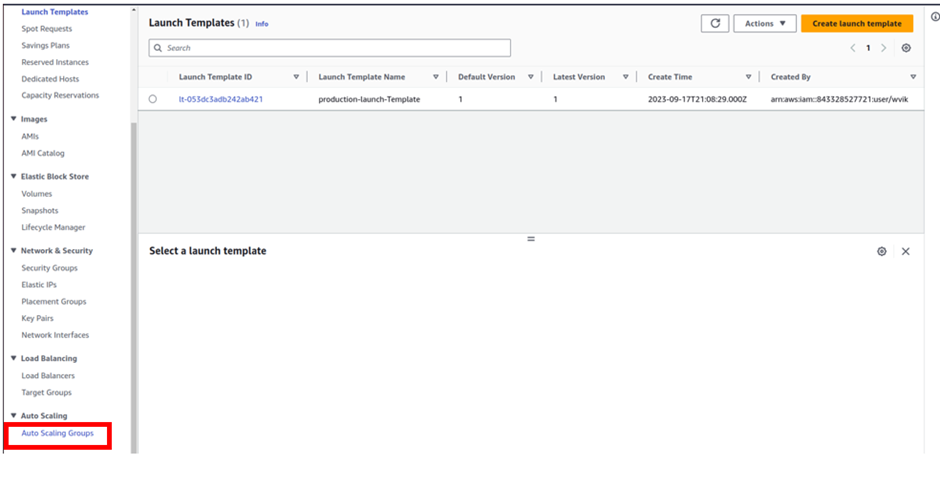
In the autoscaling group dashboard, click Create autoscaling group.

In the create autoscaling group dashboard under the name, give your autoscaling group name, call it prod-ASG then under launch template select the drop-down and select the template you just created, production-lunch-template then click next.

In this dashboard you can review your launch template, then click next.
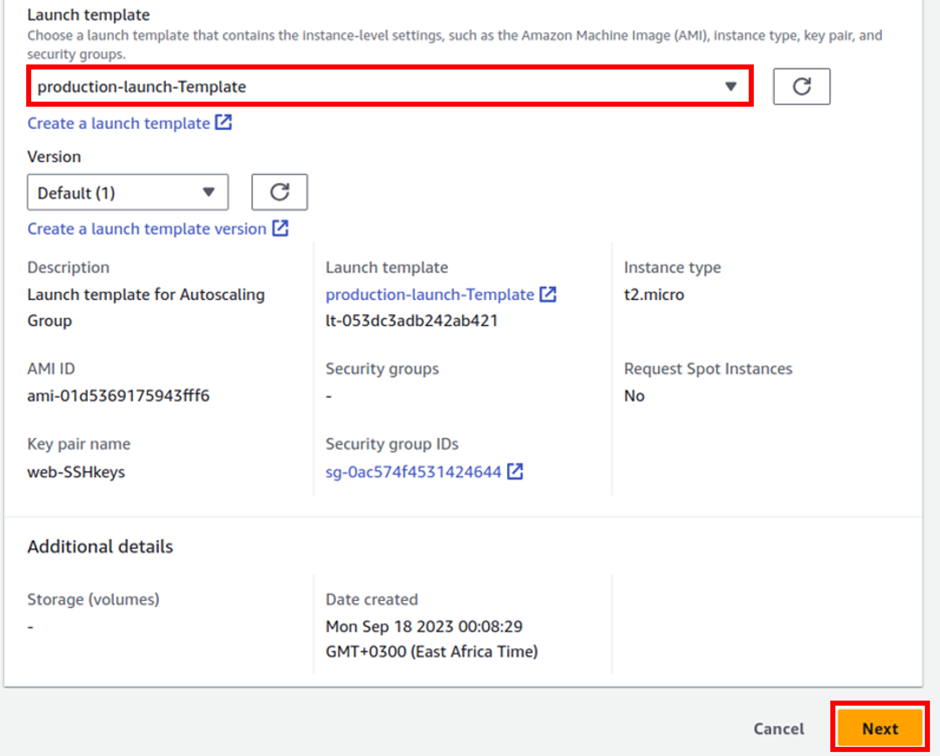
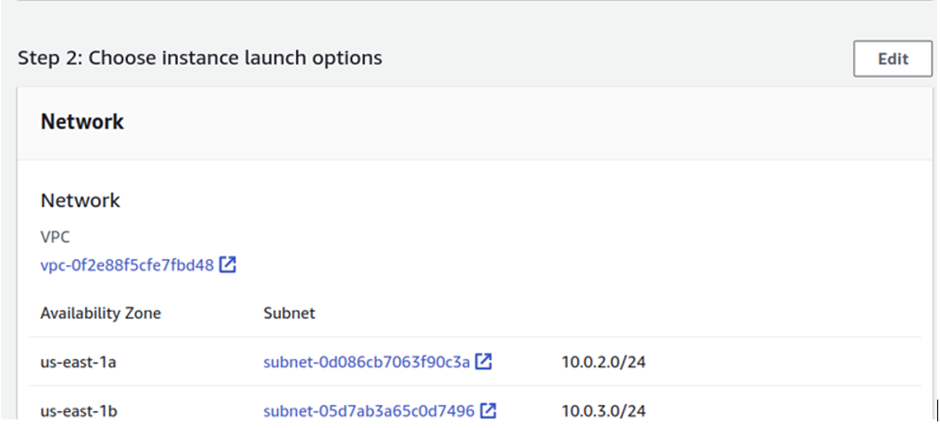
In the network section under VPC, select the drop-down and select your prod VPC.
Then under availability zone and subnets, select the drop down and look for us-east-1a, and us-east-1b, select them click out then click next.


Under the load balancing section, select attach to an existing load balancer target group, then select the search box and select your prod-target group.
Then under attach to an existing load balancer, choose from your load balancer target groups.
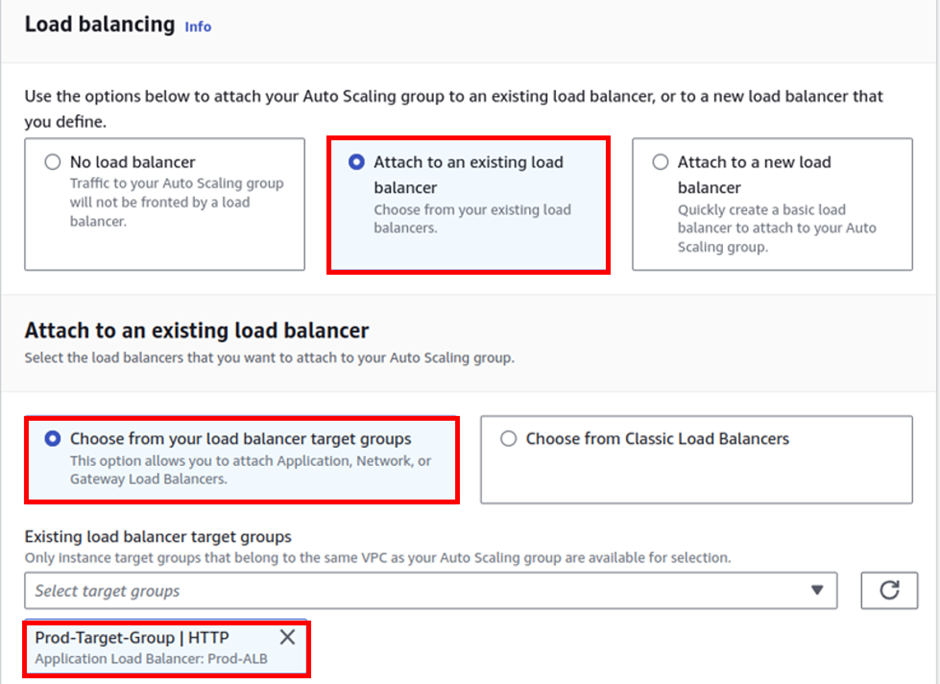
Then for the VPC service lattice, select no VPC lattice service.

Click next then under health checks, in the health check grace period, leave it at 300 click the box to enable group metrics collections. Then click next.

Under configure group size and scaling policy dashboard, under group size, for the desired capacity, choose 2, minimum 1, and maximum select 4. For scaling policies select none then click next.


Under add notification click add notification.

We will choose SNS, then under SNS topics check the boxes below, then click next.

Then under add tags, we will click add. Under the key enter name then under vallue, enter ASG-webserver.

The next page is a preview, now click next, preview then create the auto-scaling group.


And there we go, our auto-scaling is provisioning.

If you click instances, you can see auto scaling has already launched our desired capacity instances and the status cheque is initializing.

Now on the left navigation pane of the EC2 dashboard select target groups.

We can see the registered targets are two and their conditions are all healthy.

Now come back to your web browser and paste your domain name.

There we go, we created an AMI and the autoscalling group has now used the AMI to launch for our EC2 instance and we can now access our website.

And since we configured an SNS topic for our autoscaling group, we have to
go to our email inbox and confirm the subscription.


After confirming your subscription you will now be able to receive SNS topics.
Once a gain clap for yourself. This has brought us to the end of this long project hosting a dynamic website on AWS.

Take a glass of coffee and pull everything down. Goodbye and stay tuned for more. I would like to extend a thank you note to Azeez Salu for making this project a success.

A skilled Cloud DevOps Engineer and Solutions Architect specializing in infrastructure provisioning and automation, with a focus on building scalable, fault-tolerant, and secure cloud environments.

