
Welcome to the world of Virtual Private Clouds (VPC’s), where the boundaries of your network are defined not by bricks and mortar, but by your imagination and technical prowess.
This article is your gateway to understanding VPC architecture. We will embark on an exciting journey where we’ll unravel the intricacies of VPC’s, step by step, to empower you with the knowledge and confidence to craft your very own digital masterpiece. This guide will equip you with the tools and insights to build a Custom VPC that suits your unique vision.
Discover the freedom and control that comes with shaping your network infrastructure from the ground up, and start your journey towards a digital world that’s truly your own.

Ever wondered what a three-tier architecture is?
A three-tier architecture also known as a three-layer architecture is a software architecture pattern that divides an application into three interconnected and distinct components or layers.
Each layer has its specific role and responsibilities, which helps in creating scalable, maintainable, and modular software systems
1. Presentation Layer (Tier 1)
The presentation layer, also known as the user interface (UI) layer, is the topmost layer in the architecture.
It handles user interactions, displays information to the user, and collects user inputs.
This layer is responsible for presenting data and results to the end-users in a human-readable format, such as a web page or a mobile app.
Example Scenario: A web-based e-commerce platform where customers browse products, add items to their cart, and proceed to checkout. The web application’s user interface is part of the presentation layer.
2. Application Layer (Tier 2)
The application layer, also known as the business logic layer or middleware layer, is the middle layer of the architecture.
It contains the business logic and rules that govern the application’s functionality.
This layer processes requests from the presentation layer, performs computations, and interacts with the data layer for data retrieval and storage.
Example Scenario: In a banking application, the application layer would handle operations like fund transfers, balance inquiries, and account management. It verifies user identities, ensures transaction consistency, and enforces business rules.
3. Data Layer (Tier 3)
The data layer, also known as the persistence layer or database layer, is the bottom-most layer of the architecture.
It is responsible for storing, retrieving, and managing data, usually in a database or data storage system.
The data layer doesn’t contain business logic but provides CRUD (Create, Read, Update, Delete) operations on data.
Example Scenario: An online customer relationship management (CRM) system where customer information, interactions, and transactions are stored in a relational database. The data layer handles database queries and updates.
Real-World Scenarios:
1. E-commerce Platform:
Presentation Layer: The online store’s website or mobile app, where users can browse products, add them to their cart, and make purchases.
Application Layer: Manages user accounts, handles payment processing, calculates shipping costs, and applies discounts or promotions.
Data Layer: Stores product catalogs, user profiles, order history, and transaction records in a database.
2. Hospital Information System:
Presentation Layer: The user interface for doctors, nurses, and administrators to access patient records, schedule appointments, and view medical history.
Application Layer: Manages patient admissions, billing, prescription generation, and treatment plans.
Data Layer: Stores patient records, medical histories, appointment schedules, and billing information in a secure database.
3. Social Media Platform:
Presentation Layer: The web or mobile app where users can create posts, like and comment on content, and interact with their friends.
Application Layer: Handles user authentication, content algorithms, and post moderation.
Data Layer: Stores user profiles, posts, comments, and media files (images and videos) in a distributed and scalable database.
The three-tier architecture allows for flexibility, scalability, and separation of concerns, making it a common choice for designing complex and robust software systems. Each layer can be scaled independently, and changes to one layer typically have minimal impact on the others, simplifying maintenance and development efforts.
In our 3-tier VPC reference architecture,
our infrastructure is divided into 3 tiers.
In the first tier, we have public subnets which will hold resources such as
Nat gateways,
load balancers,
and bastion hosts.
On the second tier, we have our private subnets, and this is the tier that will hold our webservers (EC2 Instances).
On the third tier, we have another private subnet and this is the subnet that will hold our databases.
We will duplicate the subnets across multiple availability zones for high availability and fault tolerance.
finally, we will create an internet gateway and route table to allow the resources in the VPC to have access to the internet/outside world.
prerequisites
· AWS account and IAM user
To complete these steps, you will need an AWS account. If you don’t have one, sign up for an account at aws.amazon.com.
Once you have an AWS account sign in to your AWS Management Console.
To create your VPC, let’s go to the management console.
In the management console, the first thing you should do is select the region where you want to create the VPC. according to our reference architecture, this VPC should be in the northern Virginia region. (us-east-1)
To change your region, select the dropdown in the top right navigation pane in the management console, and make sure you select, Us-east (Northern Virginia).

Once you’ve selected the region where you want to create your VPC, proceed and create VPC.
Straight away in the search box, type VPC, and under services select VPC

In the VPC dashboard, select VPC’s
.

Then click Create VPC

Under VPC settings, select VPC only then give your VPC a name, and call it prod- VPC.
Leave it on the IPv4 CIDIR block.
Under IPv4 CIDIR enter Your CIDIR block.
according to our reference architecture, the CIDIR block for this VPC is 10.0.0.0/16, enter this value under the CIDIR block.

Once you’ve entered your CIDIR block, we will leave it at no IPv6 CIDR block, tenancy is going to be the default, and tags are optional. scroll down and click Create VPC.
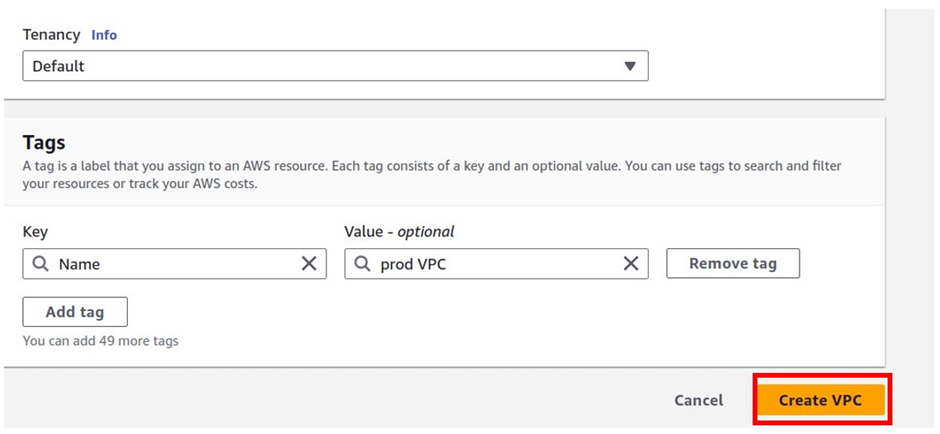
We have successfully created our prod VPC

Once you’ve created your VPC, you can see all the VPC’s in your account by selecting the filter by VPC search box as shown below.


If you don’t see the VPC you’ve just created just click refresh page, then select the filter by VPC box again, you should be able to see your VPC.
This is how you see all the VPC’s in your account.
Once you filter it by a particular VPC, it is only going to show you the information on that VPC.
The next thing we will do is enable DNS hostname, for our VPC.
Referencing VPC documentation under DNS attributes in your VPC,
enableDnsHostnames: Determines whether the VPC supports assigning public DNS hostnames to instances with public IP addresses.
The default for this attribute is false unless the VPC is a default VPC.
enableDnsSupport: Determines whether the VPC supports DNS resolution through the Amazon-provided DNS server.
If this attribute is true, queries to the Amazon-provided DNS server succeed. For more information, see Amazon DNS server.
The default for this attribute is true.
DNS options
If you need public IPv4 DNS hostnames for the EC2 instances launched into your subnets, you must enable both of the DNS options.
Enable DNS hostnames: EC2 instances launched in the VPC receive public DNS hostnames that correspond to their public IPv4 addresses.
To enable the DNS hostname in your VPC, first, make sure you filter it by your prod VPC.

Then select the actions drop-down button, then select edit VPC settings.

on the edit DNS hostnames page shown below, make sure that the box on the enable DNS host name is checked then click save changes.

we have successfully modified VPC settings and enabled DNS hostname in our VPC.
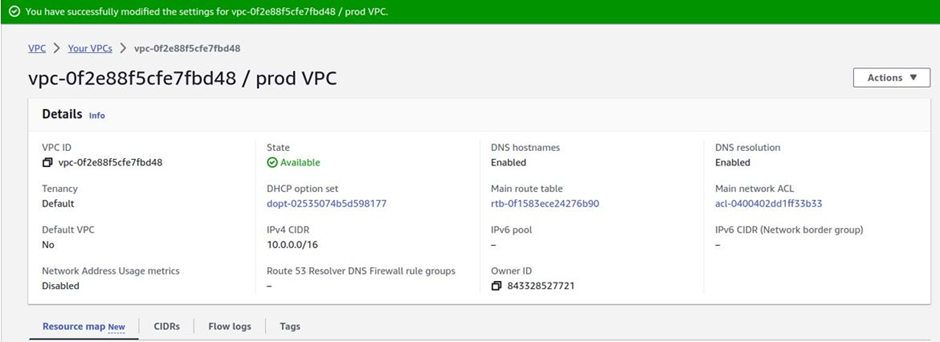
This is how you enable the DNS hostname in the VPC. The next thing we will do is to create an internet gateway for our VPC to allow resources in our VPC to communicate with the public.
On the left side of the VPC dashboard, select Internet Gateway.

Then click Create Internet Gateway

Under Internet gateway settings, Give your Internet gateway a name, call it prod Internet Gateway. leave tags as optional then click Create Internet Gateway.

You have successfully created an internet gateway.

The next thing is to attach our internet gateway to the VPC we’ve just created to allow the VPC to communicate with the internet. And you can see that information.

To attach an internet gateway to a VPC, click this attach to a VPC

under available VPCs, select the search box, and select your prod VPC. remember it is only showing the VPC in your account that does not have an internet gateway attached to it.
You can only attach one internet gateway, to a VPC. We just created this prod VPC and we haven’t attached any internet gateway to it, that’s why it’s the only VPC that is showing there. Select it, then click Attach Internet gateway

You have successfully attached an internet gateway to the prod VPC you created previously.

If you can look at the internet gateway, the state is attached, and the VPC we’ve attached it to is the prod VPC.

Once we have attached our internet gateway to the VPC, we will create our public subnets in the first and the second availability zones, as shown according to our reference architecture.
To create our public subnets, select subnets on the left side of the VPC dashboard.

Then you’ll be brought to the Create subnet dashboard.

Am still filtering my VPC, by the prod VPC, that’s why we are not seeing any subnets in there because we have not created any subnet in that VPC. If you are seeing subnets on your screen, make sure you filter it by the VPC you just created. We will create our first public subnet in this VPC. Click Create Subnet.

Then select the VPC you want to create this subnet in. Select the drop-down and select your prod VPC.

Then scroll down, under subnet settings, give your subnet a name and according to our reference architecture, call it public subnet az1. Under availability zone select the dropdown and select us-east-1a.

Under the IPv4 CIDR block, we will enter the CIDR block for the subnet, the CIDR block for this subnet according to our reference architecture is 10.0.0.0/24. Enter this value. Once you’ve entered the CIDR block, scroll down, and click Create Subnet.

We have successfully created our first public subnet in the US-east-1a availability zone.

Bear in mind we need two public subnets, one in Us-east-1a and another in Us-east-1b. So, let’s create the second public subnet.
To create the second public subnet, we will follow the same procedure, in the subnet dashboard click Create Subnet.

In the create subnet dashboard, under VPC, select the drop-down and select your prod VPC.

Scroll down and in the subnet settings section under subnet name, give your subnet a name, call it public subnet az2, once you’ve given your subnet a name, under availability zone, we will put this subnet in the us-east-1b, so select the drop-down and select us-east-1b availability zone.

under the IPv4 CIDR block, enter the CIDR block of this subnet. According to our reference architecture, it is 10.0.1.0/24 enter this value. Leave tags as optional then scroll down and click Create Subnet.

We have created our second subnet in the US-east-1 b availability zone.

To see both of your subnets, click Clear filters


It will show all the subnets in this region for all the VPCs. Once a gain you have to filter it by your VPC. Under filter by VPC, Select your prod VPC. you should be able to see only the two subnets you’ve just created.

We have public subnet az1 and public subnet az2. Make sure when you look at their availability zones, public subnet az1 should be in the us-east-1a availability zone, and public subnet az2 should be in the us-east-1b availability zone.

Once we’ve created the two subnets, the next thing we will do is to enable auto-assign IP settings for the two public subnets.
When you enable auto-assign IP settings for the public subnets, it means that any time you launch an instance in these public subnets, those instances will be automatically assigned a public IPv4 address.
to enable the auto-assign IP settings for the two subnets, select the first one Then select actions. Then click edit subnet settings.

It will bring you to the edit subnet settings dashboard and under the auto-assign IP settings section, check the box next to enable auto-assign public IPv4 address then click save.

We have successfully changed the subnet settings.

Repeat the same procedure for the subnet in the second availability zone. Click the action drop-down, and select Edit subnet settings.

Then in the edit subnet settings dashboard, under the auto-assign public IP settings section, check the box next to enable auto-assign IPv4 address then click save.

You have successfully changed the subnet settings.

The next thing we will do is to create a route table.
according to our reference architecture, we will call this route table, a public route table.
To create a route table, on the left side of the navigation pane on the VPC dashboard, select route table as shown

It is filtering my VPC by the prod VPC, and in the prod VPC, there is only one route table.
This route table was created when you created the VPC, so in your VPC, you should have one route table.
Another thing you should know about this route table is that it is called the main route table and it is private by default.
To create the public route table, click Create route table.

Give your route table a name, so in the route table settings section under name enter the name of your route table. Call it a public route table.
Once you’ve given the route table a name, select the VPC you want to create the route table in. Under VPC, select the drop-down, and select your prod VPC, leave tags as optional, scroll down, and click Create route table.

We have successfully created our public route table. If you go to the routes tab, it shows local.

which means that it is only routing traffic locally within the VPC. This is because we have not associated this route table with any route.
Once we’ve created the route table, the next thing we will do is add a public route to the route table.
The public route will allow the route table to route traffic to the internet/outside world.
To add a route to the route table, make sure you are in the routes tab, then click edit routes then click add route.


To add a route that routes traffic to the internet to this route table, under destination, click in the search box and type 0.0.0.0/0 then select it.
Then under target click in the search box a gain and here select your internet gateway.


Once you’ve selected the internet gateway, the internet gateway you have in your VPC will show here, and as you can see it’s the prod internet gateway.
Select it then click Save changes


The public route for the public route table has been updated successfully.

This is how you add a public route to the route table. Make sure your destination is 0.0.0.0/0 and your target is the internet gateway.
We’ve added a route to the internet through our route table. If you scroll down, under the routes tab you can see that route.

The next thing we will do is associate the two public subnets we created previously with the public route table.
To associate the subnets, make sure you are still in the public route table, then move to the select subnet associations tab.

Once in the subnet association tab, click edit subnet associations.

On this page, you will see the subnets you created previously. These are the only subnets in our VPC currently. Select both subnets, public subnet az1, and public subnet az2, by checking in the boxes, then click save associations

You have successfully associated the two subnets with the public route table.
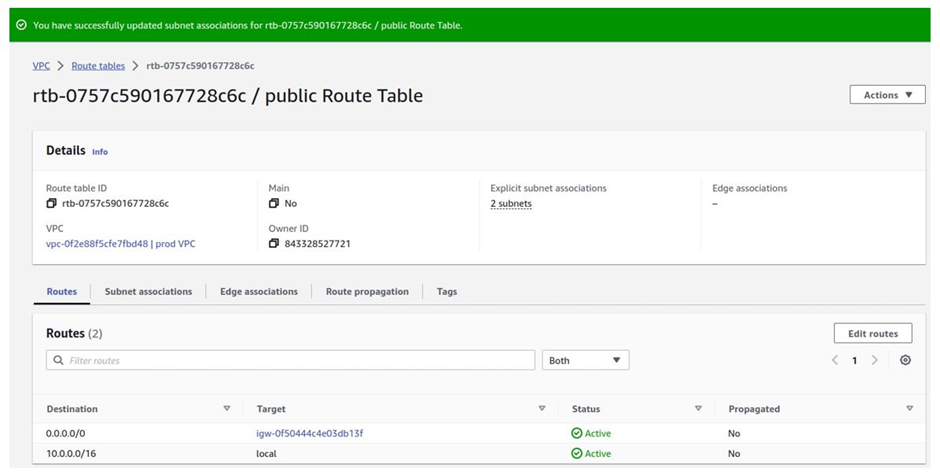
come to the subnets associations tab, you can see those two subnets there.

Again select the public route table then scroll all the way to the bottom, under explicit subnet associations, there are two subnets.

finish creating your VPC. Proceed to create the four remaining private subnets.
to create the private subnets, on the left side of the VPC dashboard, select subnets.

It is still filtering by my VPC, and currently, I have two subnets.

Then click Create Subnets

Select the VPC you want to create your subnet in. Under VPC select the drop down and select prod VPC.

Then scroll down, in the subnet settings section under the name, give your subnet a name, and according to our reference architecture, call it private app subnet az1. it will be in the us-east-1a, so under availability zone, select the drop-down and make sure you select us-east-1a availability zone.

Under IPv4 CIDR block, according to our reference architecture our CIDR block will be 10.0.2.0/24. Enter this value.
Once you’ve entered the CIDR block, select it. Leave tags as optional then scroll down and click Create Subnet.
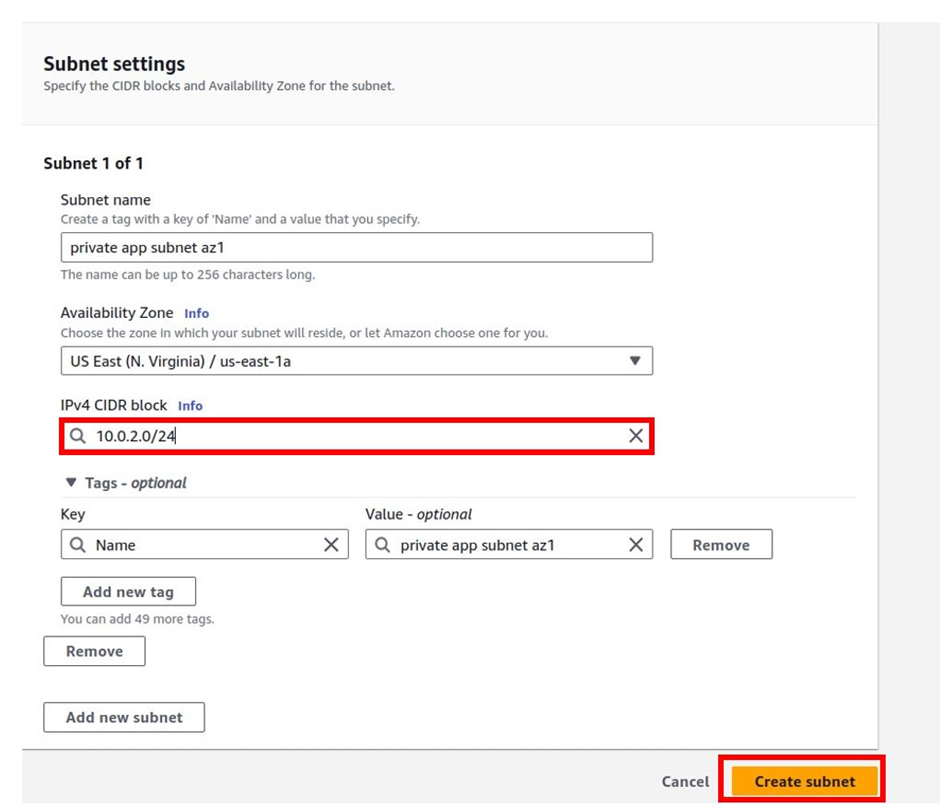
private app subnet az1 has been successfully created in the us-east-1a availability zone.

We need four private subnets, so let’s create the second one. Still, in the subnet dashboard, click create subnets.

select the VPC you want to create the subnet in. Under VPC, select the drop-down and select your prod VPC. Scroll down to the subnet settings.

In the subnet settings section under the name, give your subnet a name and according to our reference architecture, the subnet is going to be called, private app subnet az2. once you’ve given your subnet a name under the availability zone, select, the drop-down, and select us-east-1b as our second availability zone.
under the IPv4 CIDR block, according to our reference architecture, it is 10.0.3.0/24, so enter this value and then select it.
Leave tags as optional then click Create Subnet.

Our second private app subnet az2 has been successfully created.
Remember we need two more private subnets. Click Create Subnet a gain.

select the VPC you want to create the subnet in. Under VPC ID, select the drop-down and make sure you select your prod VPC.

Scroll down to the subnet settings section. Under the subnet name, give your subnet a name, call it private data subnet az1.
under the availability zone, select the drop-down and select us-east-1a.
Under IPv4, CIDR block, enter 10.0.4.0/24.
Leave tags as optional then click Create Subnet.

Our private data subnet az1 has been successfully created.

We will create our last subnet. Click Create Subnet again.

Under VPC ID, select the VPC you want to create your subnet in, so select the drop-down and select your prod VPC.

Scroll down to to subnet settings section.
Under the name, give your subnet a name, call it private data subnet az2. Under availability zone, select the drop down and select us-east-1b then underIPv4 CIDR block enter 10.0.5.0/24 leave tags as optional then click create subnet.

Our private data subnet az2 has been successfully created in the second availability zone.

We have created all four private subnets, to see the subnets, click Clear filters

It will bring you all the subnets in your account., remember we have the default VPC that was created when we first created our AWS account.
filter a gain by your prod VPC,
select the drop-down then select your prod VPC

Now you should only see the subnets in prod VPC. And we can see we have six, subnets.

Check the availability zones and make sure you’ve put the subnets in the right availability zone, reference architecture being your guidance.

Again one thing we should know is the difference between a public subnet and a private subnet.
when you create a route table and add a route that routes traffic to the internet, any subnet you associate with that route table becomes public.
On the other hand, when you have a route table that does not have a route to the internet, any subnet you associate with that route table is private. Now to verify this, let’s look at our created VPC,
click on route tables and make sure the route tables are filtered by your VPC.


In the prod vpc there are two route tables, one is the one we created and the other one was created when we created our vpc. The main route table.
looking at the first route table that we call the public route table, select it, and then move to the routes tab.
Under the routes tab, we can see it is routing traffic to the internet. So any subnet we associate with this roundtable will be public.

select the subnet associations tab. You will see public subnet az1 and public subnet az2 were associated with this route table. That is what makes those two subnets public.

If you scroll down at the bottom in the same dashboard, you will see subnets without explicit association and therefore will be implicitly associated with the main route table.

On the other hand, select the main route table by checking the box
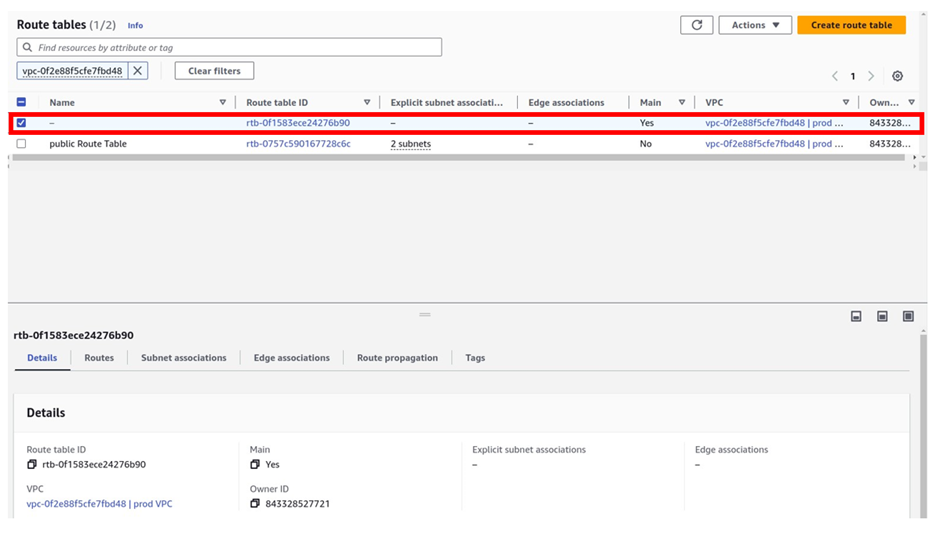
The main route table was created when we created the VPC.
if you look at this route table under main is indicated yes. The main route table is private by default, let’s go to its route tab.
The main route table is only routing traffic locally in the VPC, and it does not have a route to the internet.

We created four private subnets and did not explicitly associate them with any route table, by default, they will be implicitly associated with the main route table which is private.
Scroll down to subnets without explicit association,
The sentence below subnets without explicit association reads, “The following subnets have not been explicitly associated with any route tables and are therefore associated with the main route table.

Creating a 3-tier custom Virtual Private Cloud (VPC) from scratch is a complex and crucial task for building a robust and secure network infrastructure. It empowers organizations to tailor their network environment, enhance scalability and security, optimize resource usage, and meet regulatory requirements.
Thank you for your time and stay tuned for more.
always remember to clean resources.

A skilled Cloud DevOps Engineer and Solutions Architect specializing in infrastructure provisioning and automation, with a focus on building scalable, fault-tolerant, and secure cloud environments.
